PowerClerk Support Center
- Project Pages
- Program Design Menu
-
- Automations
- Channels
- Communications
- Connections
- Content Library
- Custom API IDs
- Data Fields
- Deadlines
-
- Questions to ask yourself
- Locating the Deadlines feature
- What are Deadlines
- How to Create a Deadline
- Deadline Automation Action Rules
- Utilizing Project Admin Page for Deadlines
- Communication Templates for Deadlines
- Deadline Set/Satisfy Options
- Program-Wide Deadline Actions
- Reporting on Deadlines
- Deadlines in Project List Columns
- FAQs
- Document Templates
- eSignature Envelopes
-
- Questions to Ask
- Locating the eSignature Feature
- What are eSignature Envelopes?
- eSignature Checklist: The Prerequisites to create a new Envelope
- How to set up Advanced eSignature Envelopes Step-by-Step
- How to add an eSignature Envelope to a form
- eSignature Automation Trigger
- Viewing Completed eSignature Envelopes
- Resending eSignature Notifications
- Canceling eSignatures
- FAQs
- Forms
-
- Questions to ask yourself
- Locating the Forms feature
- How to create and edit Forms
- Adding data fields
- Form Versions and Draft Forms
- Configuring Forms
- Form Field Elements
- Field Properties
- Conditional Visibility
- Sensitive Data Fields
- Location Form Element
- Address Autocomplete
- Exporting a Form to Excel
- VersaForms
- FAQs
- Formulas and Calculated Fields
- Front Page
- Incentive Design
- Milestones
- Project List Columns
- Project Summary
- Project Views
- Roles
- Themes
- Workflow
- Admin Menu
- Tools Menu
-
- My Account
-
- Questions to Ask
- Locating the My Account feature
- How to use the My Account feature
- Lockouts and Password Resets
- Setting up Multi-Factor Authentication
- Missing, lost, or stolen mobile devices: resetting Multi-Factor Authentication
- Disabling Multi-Factor Authentication
- Recovery Guidelines for MFA Administrators
- FAQs
- FormSense
- Grant Access
- Integration Guides & API
- PowerClerk Video Guides
-
- Setting up Roll-up Reports
- New User Video Guide
- Configuring Forms
- Roles and User Administration
- Setting up Business Days
- Formulas and Advanced Visibility Rules
- Visualize Workflows
- Dashboards
- FormSense
- Milestones
- ArcGIS
- Project Summary
- Automation with Formulas in Action Rules
- API
- Edit Forms - Tutorial #1
- SFTP Automatic Data Import
- Calculated Fields
- Web Connector Setup
- Edit Forms - Tutorial #2
- Build A Formula
- Help Articles
- PowerClerk Program Launch
- PowerClerk User Group Sessions (UGS)
- Learning Management System (LMS)
- Join us for Reflow!
- NEW: PowerClerk Certifications
Incentive Design
Locating the Incentive Design
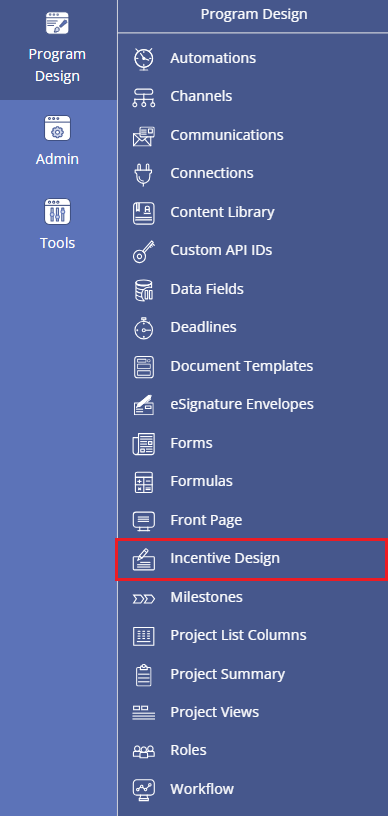
Anyone in a Role with the Edit Incentive Design privilege can edit Incentive Design by opening the PROGRAM DESIGN menu and navigating to Incentive Design. Please note: To be able to assign the Edit Incentives Design option within the Roles section, your Clean Power Research representative will switch on this feature for you.
How to create and edit Incentive Designs
Incentive Design enables the Administrator to configure, enable/disable, copy, paste, and delete incentive calculations.
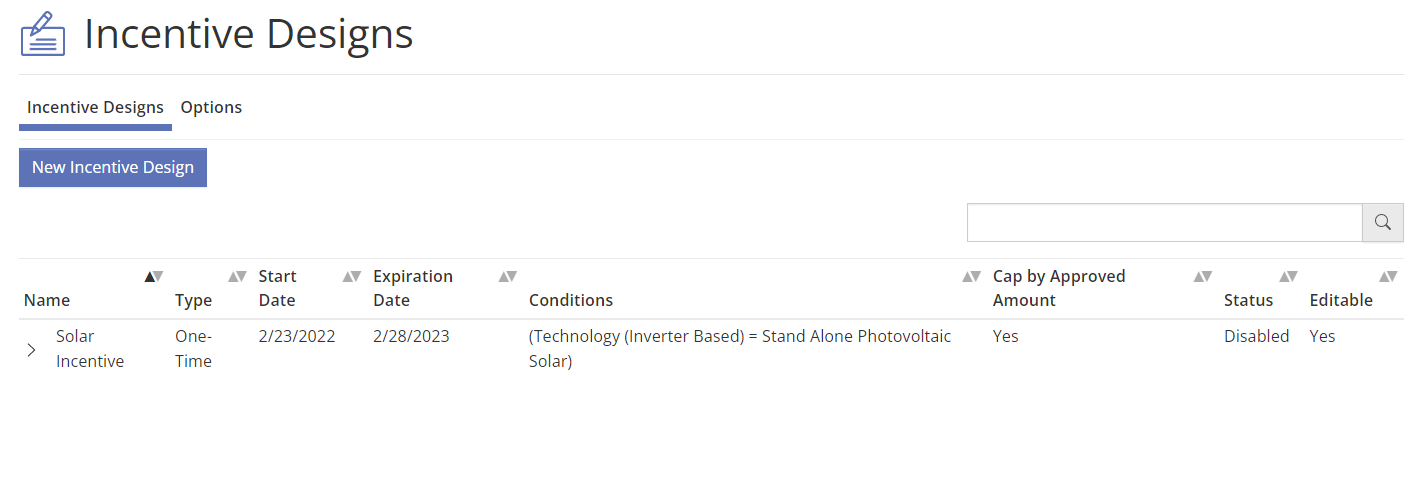
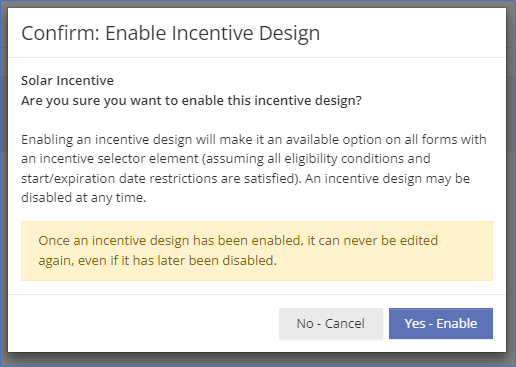
Each saved incentive can be enabled or disabled from the list. Once an incentive has been enabled, it can no longer be edited in order to protect the details (e.g., incentive amount, etc.) for any projects which have selected the given incentive. Instead, the Administrator may disable the current incentive, copy the design, edit as needed, and create a new version of the incentive to enable.
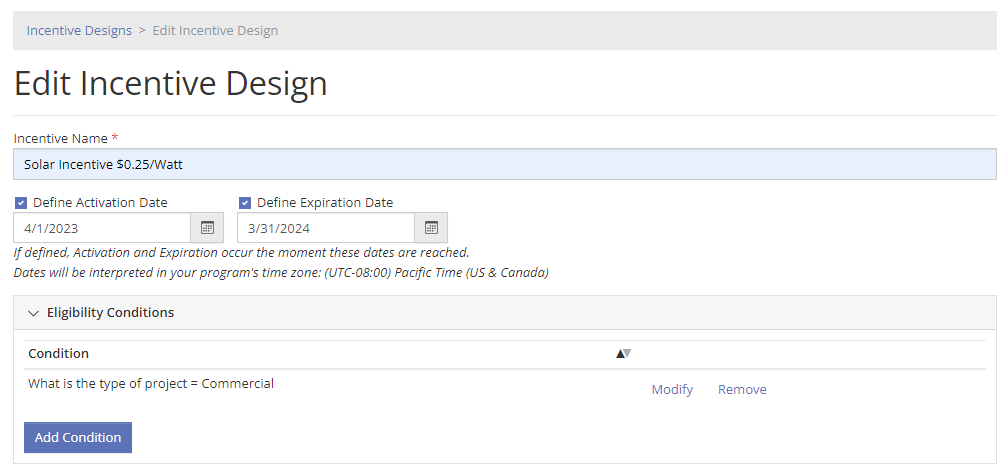
When designing an incentive, the Administrator may choose from a range of options to define that incentive’s eligibility conditions. These can include date ranges and Data Field conditions.
There are three types of incentive designs, selected from a list: One Time, Flat or Formula, and PBI. Within each type, you can define how the incentive amount will be calculated. Based on the type chosen, additional inputs may appear that allow you to specify various aspects of the incentive calculation, such as an incentive rate or an incentive amount cap.
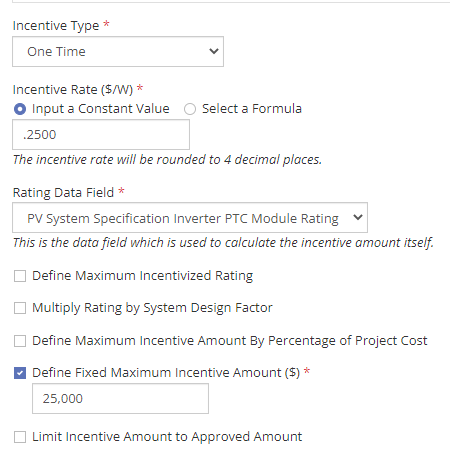
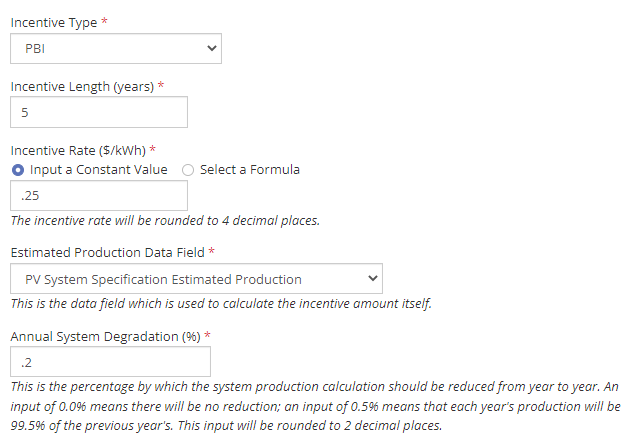
Formulas can be used to calculate an incentive rate for a One-Time or PBI incentive, or to completely calculate the incentive amount for a Formula incentive. For example, perhaps your program needs to calculate an incentive based on the total kW of an EV charger. Please note that once an incentive utilizing that formula has been enabled, the formula will become inalterable as well.

Incentive Options for One-Time Incentive Type
The available incentive options for one-time incentives can be interpreted as follows:
- Define Maximum Incentivized Rating:
This is the maximum value of the selected Rating Data Field that will be used to calculate the incentive:
 Figure 7: Define Maximum Incentive Rating
Please Note: Systems with a higher rating will still be eligible for the incentive but anything above this maximum will not be included in the incentive calculation. - Multiply Rating by System Design Factor:
The Design Factor is the ratio of estimated system production for the proposed system to that of an optimally designed system. Selecting this option will result in higher incentives for more optimally designed systems. - Define Maximum Incentive Amount By Percentage of Project Cost:
If you have a Price data field or a Numeric Calculated Field that is used in your program to hold the Project Cost, you can define an incentive cap based on a percentage of that value. Select that data field and input a percent value (1-100) and the incentive will be capped at that percentage of that data field’s value. In the following example the Incentive Amount would be capped at 75% of the Cost Customer Side data field:
 Figure 8: Define Maximum Incentive Amount By Percentage of Project Cost
 - Define Fixed Maximum Incentive Amount:
This option lets you cap the incentive at a fixed amount:
 Figure 9: Define Fixed Maximum Incentive Amount
 - Limit Incentive Amount to Approved Amount:
If an Approval Status has been defined (see below under Approval Status ) and this box is checked, the calculated Incentive Amount when a project reaches the Approval Status for the first time will become its Approved Incentive Amount. Any subsequent recalculations of this incentive will be capped by the Approved Incentive Amount; the new calculated amount can be less than the Approved Amount but never exceed it. If this box is unchecked, an Approved Incentive Amount cap will not be used for this incentive design, even if an Approval Status has been defined for the program that is applicable to other incentive designs.
Incentive Design Options
Approval Status
A workflow status can be designated as the Approval Status for a program. If the Approval Status is defined, and a project reaches the Approval Status for the first time, its calculated Incentive Amount will be stored as the Approved Incentive Amount for the project. If a project has a Selected Incentive Design which uses the “Limit Incentive Amount to Approved Amount” option (see above), subsequent recalculations of the incentive, such as those triggered when configuration changes are made to the PV system, will be capped by the Approved Incentive Amount.
The Approval Status should occur far enough along in a project’s workflow that it is appropriate to consider the incentive amount at that point “approved”. Subsequent PV system configuration changes can still be permitted, but the Approval Status cap provides a known ceiling on the incentive amount, thereby avoiding unexpected program cost overruns.
If the incentive calculation for a project would have exceeded the Approved Incentive Amount but was capped by it, this will be shown in the Incentive Calculation Details, for instance, “Incentive amount of $2,200.00 was limited to previously approved amount: $2,000.00.”
Setting an Approval Status is not required, and if set, it is only applicable to Incentive Designs that have the “Limit Incentive Amount to Approved Amount” option checked. Note that only a single Approval Status can be defined for the program.
To set the Approval Status (or remove one that was previously set), go to your Incentive Designs page and select the “Options” tab.

Metadata Fields
Incentive Metadata fields are PowerClerk Data Fields that are subfields of the Incentive Selector Data Field Group. A program can have up to three Incentive Metadata fields; each one can be defined as either Text or Decimal. Once Incentive Metadata fields have been defined, each Incentive Design can be given values for any of these fields. Later, when an Incentive Design is selected for a project, the Metadata values for the Incentive Design are written to the Incentive Metadata data fields for the project. These data fields can be utilized like any other data field, such as being used in formula calculations or included in reports.
To add a Metadata field, click the Add Metadata Field button on the Options tab on the Incentive Designs page, and then provide the Name, Data Type, and display Order for the field.

After the Metadata fields have been defined, edit each Incentive Design to provide the values for those fields. Please note you cannot edit the Metadata value after the Incentive Design has been enabled.

These data fields can be utilized like any other field (i.e., can be used in future calculations, reporting, etc.). These metadata fields are associated with the Incentive Selector data field group.
Adding the Incentive Selector to a Form
Once your Incentive Designs have been defined and enabled (as appropriate), add the Incentive Selector form element to the appropriate form(s) in your program. This form element is in the “Special” group of elements.
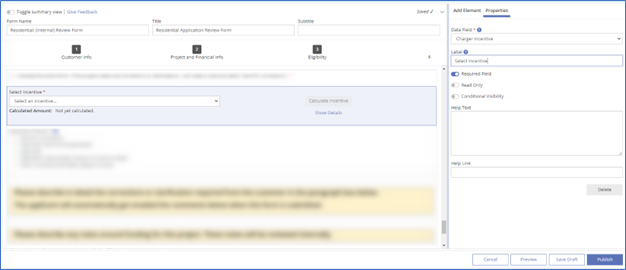
Selecting an Incentive Design on a Form
When selecting an Incentive Design for a project in a form, the Incentive Selector will only display options for which the project is eligible. The ADMIN OVERRIDE will always be available to an Admin that is in a Role with the Edit Incentive Design privilege. Note that if the ADMIN OVERRIDE feature is used, it is recommended that the Reason for Override input be completed to document the reason for later reporting or auditing. The Reason for Override will be stored in the Calculation Details data field.
Selecting an Incentive Design:

Selecting Admin Override:

Reporting on Incentive Designs
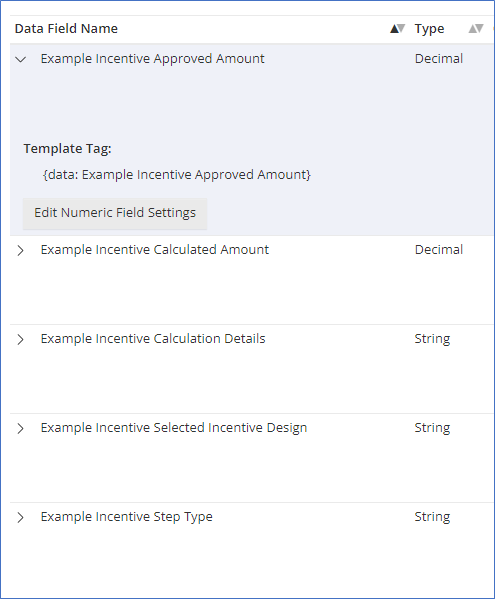
There are up to seven reportable data fields for each Incentive Selector data field group.
- Selected Incentive Design: This data field contains the name of the incentive design selected.
- Calculated Amount: This data field contains the incentive amount calculated by the design chosen or the Admin Override amount.
- Calculation Details: This data field contains the details of the incentive amount calculation, or if an Admin Override is in effect, the Reason for Override that was input. Note that for a Formula incentive, the details of the formula calculation will only be displayed to non-Admins if that option was checked for the Incentive Design.
- Approved Amount:If the program has an Approval Status set, and the project has reached that status, this data field contains the calculated incentive amount the project had at the point it first reached that status. If the project has a Selected Incentive Design which is limited to the Approved Amount, this value will be a cap on any future incentive calculations; it has no effect otherwise.
- Up to 3 Metadata Fields:For each Metadata Field defined for the program, these data fields will hold the values which were assigned for the Selected Incentive Design. Note that the base name of each of these data fields is the name of the Incentive Selector, and the suffix is the Metadata Field Name.
Video Guides
Would a video guide help to better explain Incentive Designs? Contact us and let us know.
A full list of all Video Guides can also be found here.
FAQs
Have additional questions? Contact us to nominate your FAQ and help others find answers to your own questions concerning this feature.
Create A Support Ticket
Not finding your answer here? Submit a question to our support team at the PowerClerk Ticket System and leverage the PowerClerk team’s expertise.