PowerClerk Support Center

Program Design
Automations
Questions to Ask
Locating the Automations feature
How to create an Automation
Automation Triggers
Automation Action Rules
Validation Rules
Scheduled Triggers
Troubleshooting Automations
FAQs
Channels
Questions to ask yourself
Locating the Channels feature
What are Channels?
Types of Channels
Channel Type: Mark as Child
Channel Type: Make Successor
Channel Type: Create Related Project
Channel Type: Submit Related Project
Channel Type: Project Lookup
How to create a Channel
Channel Signals and Automations
Using Channels in Test Environments
FAQs
Communications
Questions to ask yourself
Locating the Communications feature
Creating Communication templates
Finding Data Tags
Bulk Communications via Data Import
Images in Communications
Project Attachments and Content Library Items
Smart Templates
Upgrading to Smart Templates
Upgrading when a Test Environment Exists
Broken Template Tags
Examples of Broken Template Tags
PowerClerk Bulk Email Communication Policy
FAQs
Connections
Questions to ask yourself
Locating the Connections feature
What are Connections
How to Create a Standard Web Adapter
Define Input and Output Fields
Connecting, Testing, and Enabling the Web Adapter
Creating a Standard Web Adapter Configuration
Utilizing Connections on PowerClerk
Maintaining and Editing the Web Adapter
Web Adapter Message Type Format
Supported Message Versions
Error Handling
Custom List Lookup
Create a Custom List Lookup
Utilizing Custom List Lookup
FAQs
Content Library
Questions to ask yourself
Locating the Content Library feature
Uploading content to the Content Library
Use with Communication Templates
Use for Front Page content
FAQs
Custom API IDs
Questions to Ask
Locating the Custom API IDs feature
How to edit a Custom API ID
FAQs
Data Fields
Questions to ask yourself
Locating the Data Fields feature
How to work with Data Fields
Custom Lists and Data Field Groups
Table form element
PV System + batteries element
FAQs
Deadlines
Questions to ask yourself
Locating the Deadlines feature
What are Deadlines
How to Create a Deadline
Deadline Automation Action Rules
Utilizing Project Admin Page for Deadlines
Communication Templates for Deadlines
Deadline Set/Satisfy Options
Program-Wide Deadline Actions
Reporting on Deadlines
Deadlines in Project List Columns
FAQs
Document Templates
Questions to ask yourself
Locating the Document Templates feature
How to define a new Template
How to define a new Merged Document
eSignatures
DocuSign template tags
Mapping eSignature tags
Smart Templates
FAQs
eSignature Envelopes
Questions to Ask
Locating the eSignature Feature
What are eSignature Envelopes?
eSignature Checklist: The Prerequisites to create a new Envelope
How to set up Advanced eSignature Envelopes Step-by-Step
How to add an eSignature Envelope to a form
eSignature Automation Trigger
Viewing Completed eSignature Envelopes
Resending eSignature Notifications
Canceling eSignatures
FAQs
Forms
Questions to ask yourself
Locating the Forms feature
How to create and edit Forms
Adding data fields
Configuring Forms
VersaForms
Sensitive Data Fields
FAQs
Formulas and Calculated Fields
Questions to ask yourself
Locating the Formulas feature
How to work with Formulas and Calculated Fields
Formula Data Dictionary
Dynamic Formula References
Rules of Formula References
Advanced Visibility Rules
Video Guides: Formulas
FAQs
Front Page
Questions to ask yourself
Locating the Front Page feature
How to edit the Front Page
FAQs
Incentive Design
Questions to ask yourself
Locating the Incentive Design feature
How to create and edit Incentive Designs
Incentive Options for One-Time Incentive Type
Incentive Design Options
FAQs
Milestones
Questions to ask yourself
Locating the Milestones feature
How to define a Milestone
FAQs
Project List Columns
Questions to ask yourself
Locating the Project List Columns feature
How to use Project List Columns
FAQs
Project Summary
Questions to ask yourself
Locating the Project Summary feature
How to edit the Project Summary
FAQs
Project Views
Questions to ask yourself
Locating the Project Views feature
How to edit Project Views
FAQs
Roles
Questions to ask yourself
Locating the Roles feature
How to create and edit a Role
Access Groups
Access Groups and Automations
Access Groups and Data Imports
Access Groups and Reports
FAQs
Workflow
Questions to ask yourself
Locating the Workflow feature
How to create and edit the Workflow
Transitions
Workflow Example Overview
FAQs
Administration
Business Days
Questions to ask yourself
Locating the Business Days feature
Setting up Business Days
FAQs
Dashboards
Questions to ask yourself
Locating the Dashboards feature
How to create widgets in your Dashboard
Other Dashboard Actions
Data Import
Questions to ask yourself
Locating the Data Import feature
Steps to Complete a Data Import
Data Import Configurations
Column Header Types
Automatic Data Imports via SFTP
FAQs
Duplicate Check
Questions to ask yourself
Locating the Duplicate Check feature
How to use Duplicate Checks
FAQs
Import Projects
Questions to ask yourself
Locating the Import Projects feature
How to Import From V2
FAQs
Operation Status
Questions to ask yourself
Locating the Operation Status feature
How to use the Operation Status feature
FAQs
Program Info
Project Inquiry
Locating the Project Inquiry feature
How to edit the Project Inquiry Settings
Automating Communications for Project Inquires
Inquiry Summary
Questions to ask yourself
Locating the Program Info feature
How to edit the Program Info menu
Notification Banners
Usage Info
FAQs
Program Statistics
Questions to ask yourself
Locating the Program Statistics feature
How to use Program Statistics
FAQs
Reports
Questions to ask yourself
Locating the Reports feature
How to setup Reports
Multi-instance reports
Sharing Reports
Integrate scheduled Reports
Cross-Program Reports
FAQs
Test Environment
Questions to ask yourself
Locating the Test Environment feature
How to setup a Test Environment
FAQs
User Administration
Questions to ask yourself
Locating the User Administration feature
How to work with User Administration
FAQs
Tools Menu
My Account
Questions to Ask
Locating the My Account feature
How to use the My Account feature
Setting up Multi-Factor Authentication
Missing, lost, or stolen mobile devices: resetting Multi-Factor Authentication
Disabling Multi-Factor Authentication
Recovery Guidelines for MFA Administrators
FAQs
FormSense
Questions to Ask
Locating the FormSense feature
How to use the FormSense feature
FAQs
Grant Access
Questions to Ask
Project Grants vs Broad Grants (i.e. "Grant Access")
Locating the Project Grant feature
Locating the Grant Access feature
How to use the Grant Access feature
FAQs
Integration Guides
ePayments
Questions to ask yourself
Locating the ePayments History feature
How to add ePayments
FAQ
PowerClerk API
Questions to Ask
What is the PowerClerk API?
What can the PowerClerk API do?
Integrating with the PowerClerk API
API Documentation for Developers
Single Sign On (SSO)
Questions to Ask
PowerClerk SSO Configuration
Azure AD Configuration (SAML)
Azure AD Configuration (OIDC)
Okta IDP Configuration (SAML)
SP Configuration
SSO for multiple programs
IDP Configuration Troubleshooting
FAQs
Integration Guide 001: How to configure a Web Adapter – ArcGIS Implementation
Integration Guide 002: How to configure Electric Power Research Institute’s (EPRI) DRIVE Connect software with PowerClerk
PowerClerk Video Guides
New User Video Guide
Setting up Business Days
Dashboards
FormSense
Edit Forms - Tutorial #1
Build A Formula
Edit Forms - Tutorial #2
Automation with Formulas in Action Rules
Configuring Forms
Formulas and Advanced Visibility Rules
Calculated Fields
Milestones
Project Summary
Setting up Roll-up Reports
Roles and User Administration
Visualize Workflows
ArcGIS
API
SFTP Automatic Data Import
Standard Web Adapter Setup
PowerClerk Program Launch
PowerClerk User Group Sessions (UGS)
Learning Management System (LMS)
Join us for Reflow!

Integration Guide 001: How to configure a Web Adapter – ArcGIS Implementation

Use an ArcGIS Web Adapter to sync PowerClerk data to maps and features within ArcGIS.

Web Adapters


Questions to ask yourself about ArcGIS Web Adapters:

What data do I want to pull out of PowerClerk to show in ArcGIS?
Where is this data located within the PowerClerk Workflow?
Do I want changes in PowerClerk to be reflected on the ArcGIS map?

*Note: To set-up these Web Adapters in your program, a Clean Power Research Administrator must first enable the feature and input your ArcGIS credentials. Please reach out to your Account Representative or submit a Ticket in the PowerClerk Ticket System for more information.
 
Difficulty: Advanced.
Duration to review this Tutorial: ~30 minutes.

 
PowerClerk Connections (i.e. Web Adapters) allow you to connect external resources to your program, retrieve data from other databases, and send data back. Web Adapters can be utilized via a Form button or via an Automation Action Rule. Common examples of Web Adapters include ArcGIS, CIS, etc. Use an ArcGIS Web Adapter to sync PowerClerk Data to maps and features within ArcGIS.
 
The PowerClerk ArcGIS integration includes two APIs:

  1. “Lookup Lat/Long” which provides geolocation data
  2. “Update Project on Map” that does not; and is instead for situations where the geolocation step has already occurred in the workflow or scenarios where the utility desires to leverage their own geolocation data


What you will learn in this tutorial:

  1. The two ArcGIS APIs available and their differences
  2. Inputs Required to Start Configuration
  3. Creating and Utilizing the Configurations for each Adapter
  4. ArcGIS Web Adapter-specific FAQs


Locating the ArcGIS Web Adapters

Anyone in a Role with the Define Connections privilege can navigate to the Web Adapter Configurations tab by opening the PROGRAM DESIGN menu and clicking on Connections:
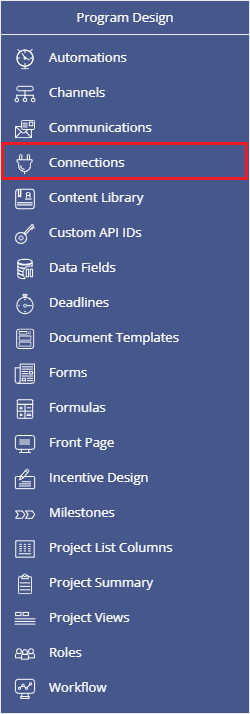
 

Locating the ArcGIS Connection

Figure 1: PROGRAM DESIGN >> Connections


What does each ArcGIS Web Adapter do?
    There are two APIs involved in creating a full connection between ArcGIS and PowerClerk.

  • ArcGIS Lookup Lat/Long: This API converts addresses into coordinates and places PowerClerk projects on an ArcGIS map.
  • ArcGIS Update Project on Map: This API passes chosen data fields from PowerClerk to the ArcGIS project populated on the map.


Getting Started: Required ArcGIS Input Properties

PowerClerk’s ArcGIS integration will connect your PowerClerk program to your existing ArcGIS account. During set-up, you must provide the input properties of your ArcGIS account to a CPR Admin. Input properties include Production credentials and Test credentials.

    Input Properties Required:

  • ArcGIS Account Authentication: Client ID and Client Password + OAuth Token URL
  • ArcGIS Geocode URL
  • Feature Layer URL

Please Note: These input properties will come from ArcGIS. Please visit ArcGIS’s documentation or contact your ArcGIS representative to get the correct input properties.
 

Setting Up: How to create the Configurations

Once the web adapters have been enabled and the input properties have been provided to a CPR Admin, these Connections will be available on the Connections page:
 

ArcGIS Web Adapters

Figure 2: ArcGIS Web Adapters


Configuring the “Lookup Lat/Long” Web Adapter
To utilize the Lat/Long Web Adapter in your program, first ensure you have two single line text data fields created on a Form to hold the two outputs this Connection provides: the Latitude and the Longitude of the project’s address.
 
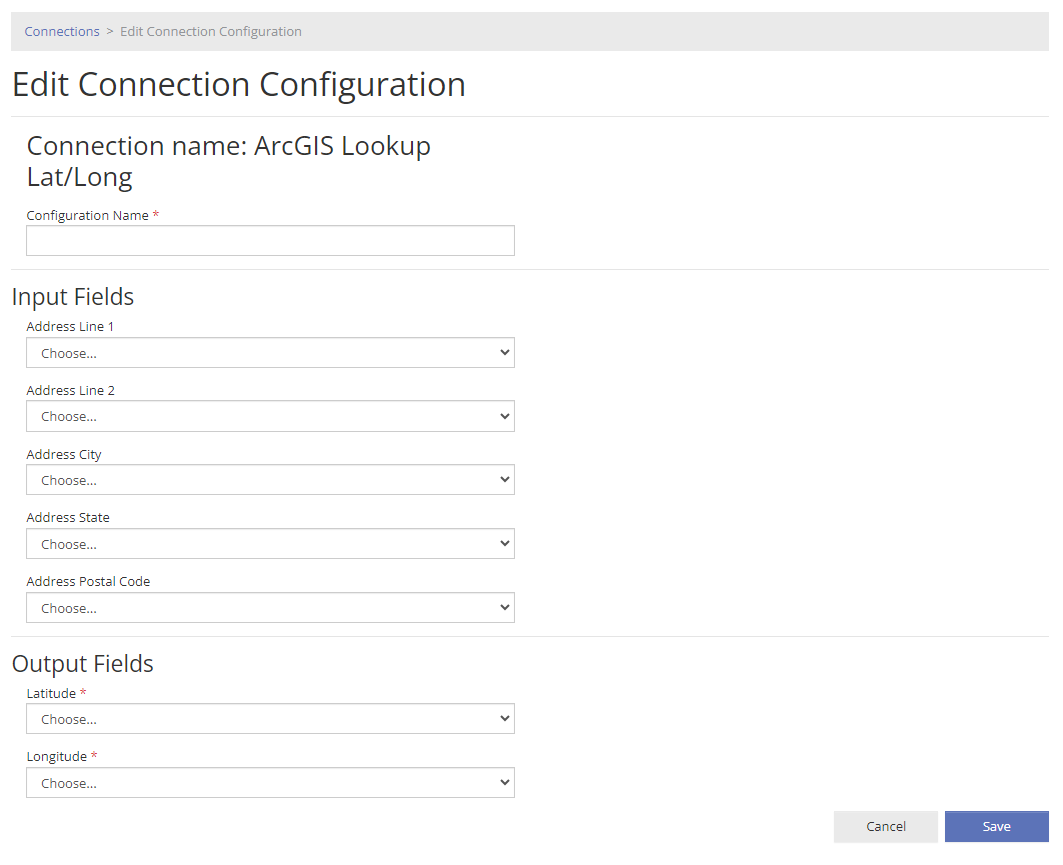
Then, to create a Configuration, select the Connection and then click “Create Configuration” (see Figure 3a, below). Choose the Name of the configuration and map the Input and Output Fields to PowerClerk data fields (Figure 3b, below).
 
The input fields are the data fields that PowerClerk will send to ArcGIS (i.e., the project’s address). The output fields are what ArcGIS will send to PowerClerk (i.e., the Latitude and Longitude of the Project’s Address). Once you have finished mapping the fields, save the configuration.
 

Web Adapter Create Configuration Button

Figure 3a: Web Adapter Create Configuration Button


Lookup Lat/long Configuration

Figure 3b: “Lookup Lat/Long” Configuration


Configuring the “Update Project On Map” Web Adapter
Similar to the first Web Adapter, you will need to create a Configuration. Click on the Connection and click the Create Configuration button.
 

Add ArcGIS Update Project on Map button

Figure 4: Add ArcGIS Update Project on Map button

 
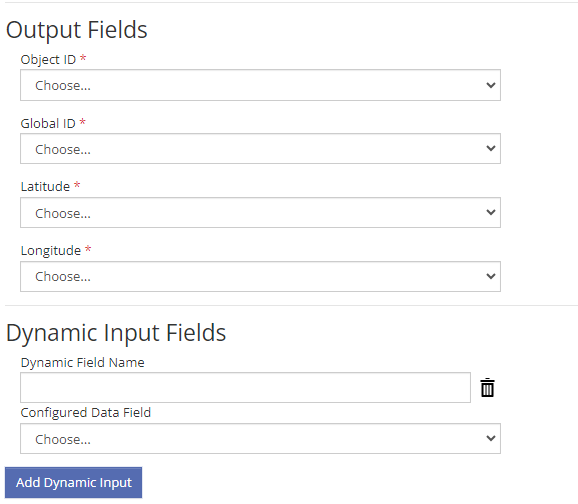
For this Configuration, give it a Name, map the Input and Output fields to PowerClerk fields, and add any Dynamic Fields. Ensure that any PowerClerk data fields already exist on a Form before mapping. You can create multiple configurations for this Connection, if you need to bring in different data from GIS to PowerClerk, based on the status a particular project is in within the workflow. This can be done by configuring different Dynamic Fields for each Configuration.
 
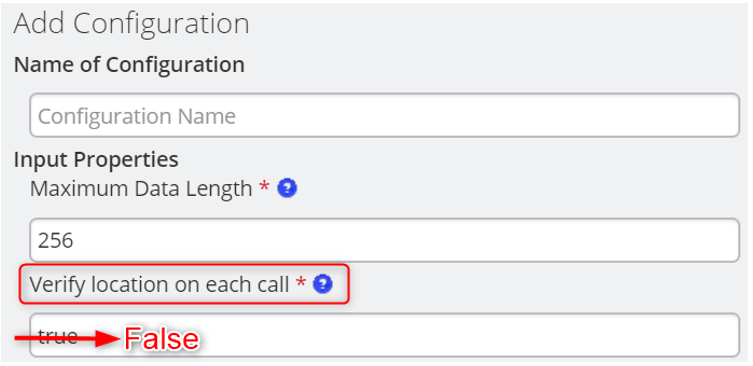
For this Configuration, you will have the option to check “verify location on each call”. If you check this box (i.e. “true”), every time a project is updated through this Web Adapter, the information will run through the ArcGIS Geocoder. If you leave this box unchecked (i.e. “false”), PowerClerk will only send the information to the ArcGIS Geocoder the first time. In this case, for example, if you update the address field in PowerClerk after the first time, it will not update in ArcGIS.
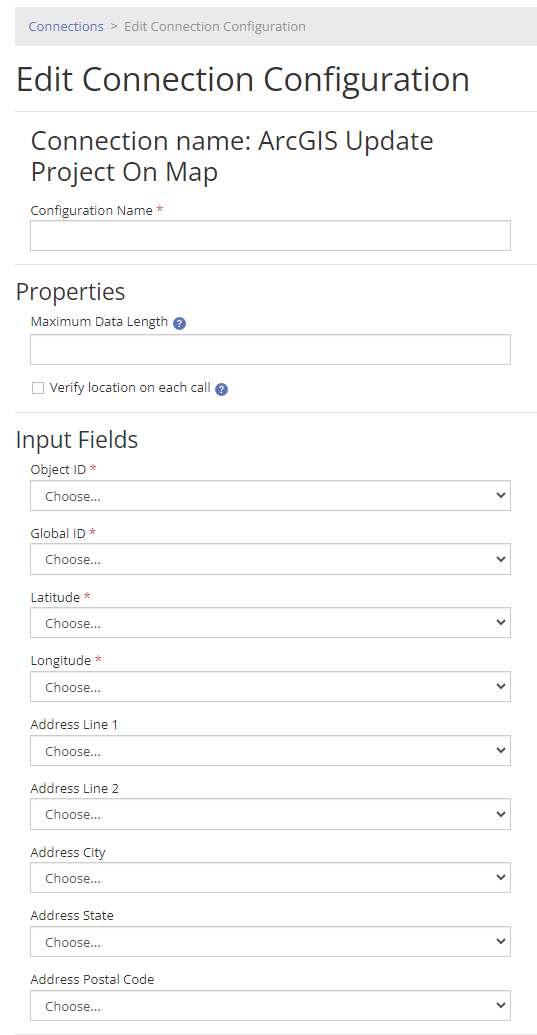
 

Add ArcGIS Update Project on Map Configuration

Figure 5: “Update Project on Map” Configuration


Dynamic Input Fields

Figure 6: Dynamic Input Fields

 
Select Dynamic Input Field(s). Note the name of the field in ArcGIS will need to match exactly what you input for the Dynamic Field Name in PowerClerk. Any spaces in the Dynamic Field Name will be replaced by underscores in the ArcGIS Configure Attributes Table Field Name.
 
For example, if the Dynamic Field Name (in PowerClerk) is “Customer First”, then it will be “CUSTOMER_FIRST” in the ArcGIS table.
 
Input Fields vs Dynamic Input Fields
A “Dynamic Input Field” differs from an “Input Field” in that they are optional for this Configuration. These fields are designed to allow for custom naming conventions and need to exactly match the ArcGIS field names. The Dynamic Input Field will also allow you to add any additional fields if needed.
 

In Practice: Utilizing ArcGIS Connections on PowerClerk

There are two ways to use a Connection in PowerClerk: via a Form Button or via an Automation Action Rule. In this section, we give an example of how to set up the ArcGIS web adapter via Automation Action Rules.
 
The ArcGIS integration allows for two Automation Action Rules to be configured in your program: One for the “Lookup Lat/Long” Connection and one for the “Update Project On Map” Connection. Often only one automation is needed for the Lat/Long Connection, while the latter automation may be used for multiple statuses within the Workflow (for whichever point in the Workflow the ArcGIS map and/or PowerClerk project need to be updated).
 
If you wish to manually call to ArcGIS via a button-click on a Form, simply add the “Call Connection” Form Element to your Form and select the Configuration you wish to utilize. Note you will need at least two form elements, one for each Connection.
 
Utilizing the “Lookup Lat/Long” Connection via an Automation Action Rule
In this example, we want to update our Lat/Long if a project enters the “Corrections” status. Therefore, we will add an Action Rule to call this Connection with the Configuration we created above.
 
Connection Calls can be configured for any Automation Trigger, such as when a Form gets submitted or when a Project enters a Status. We typically recommend setting up these types of Action Rules against status triggers.
 

Automation for Lookup Lat/Long Configuration

Figure 7: Automation for “Lookup Lat/Long” Configuration


Utilizing the “Update Project on Map” Connection via an Automation Action Rule
In this example, we want to update the PowerClerk project details on the ArcGIS map if a project enters the “Approval to Construct” status (in PowerClerk). Therefore, we will add an Action Rule to call this Connection with the Configuration we created before.
 
Connection calls can be configured for any Automation Trigger, such as when a Form gets submitted or when a Project enters a Status:
 

ArcGIS Update Project On Map Automation

Figure 8: ArcGIS Update Project On Map Automation

 
ArcGIS Lookup Example
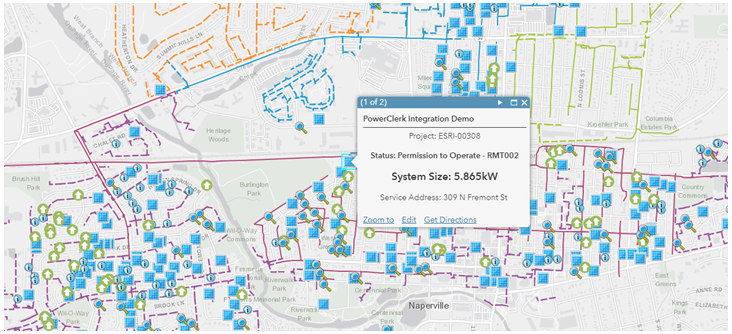
The figure below shows the Connection information that has been passed from PowerClerk to ArcGIS once the Automation Action Rules have been set up.
 
In this example, PowerClerk shared the Project Number, Project Status, System Size (kW), Service Address, and Feature (blue square) with ArcGIS. This information has been populated onto the map.
 
The Latitude, Longitude, and Address fields within the PowerClerk Connection configuration have been translated into an exact location on the map via the ArcGIS geocoding service.
 

ArcGIS Lookup Lat/Long Automation Trigger configuration

Figure 9: ArcGIS Lookup example


Video Guides

ArcGIS

This video guide will show you 3 concepts related to this integration: Looking up latitude and longitude based on an address, triggering an automation to update a map lair to denote that an application for PV interconnection has been submitted, the backend details which show how the PowerClerk ArcGIS is setup.

 
A full list of all Video Guides can also be found here.

FAQs

Q: What is the ArcGIS Web Adapter called in PowerClerk?
A: The Web Adapter is called "Add ArcGIS Update Project on Map", shown here: Label settings
Q: Where can I find the ArcGIS Web Adapter in PowerClerk?
A: Program Design > Automations > Web Adapter Configurations > Add ArcGIS Update Project on Map. Alternatively you may find this feature under Actions, if your program does not use Automations.
Q: Why isn’t the Web Adapter Configurations tab showing under the Actions/Automations section?
A: In order to configure Web Adapters a Clean Power Research Administrator must first enable the feature in your program. Web Adapter Configuration Tab in Actions and Automations
Q: Does the "Verify location on each call" field mean that every time a project is updated it will be run through the ArcGIS Geocoder? At that point, the project already has a location, and therefore attributes should be the only fields that are updated.
A: Yes, setting the "Verify location on each call" field to "true" does mean that every time a project is updated it will be run through the ArcGIS Geocoder. One would want to set this value to “true” if, for example, the Address field (in PowerClerk) used to update the map ends up changing. At this point, the Geocoder is called to update the point on the map (in ArcGIS). One would also want to set this value to “true” if using a separate Dynamic Input Field in PowerClerk to populate an Address in ArcGIS. Otherwise the mapped location would not match the address listed in ArcGIS. However, one can set this field to "false" to prevent this scenario from occurring. In this example, the PowerClerk information will only be sent through the ArcGIS Geocoder the first time it is sent to ArcGIS. In which case the Address field in ArcGIS would NOT be updated if the field changes in PowerClerk. Label settings
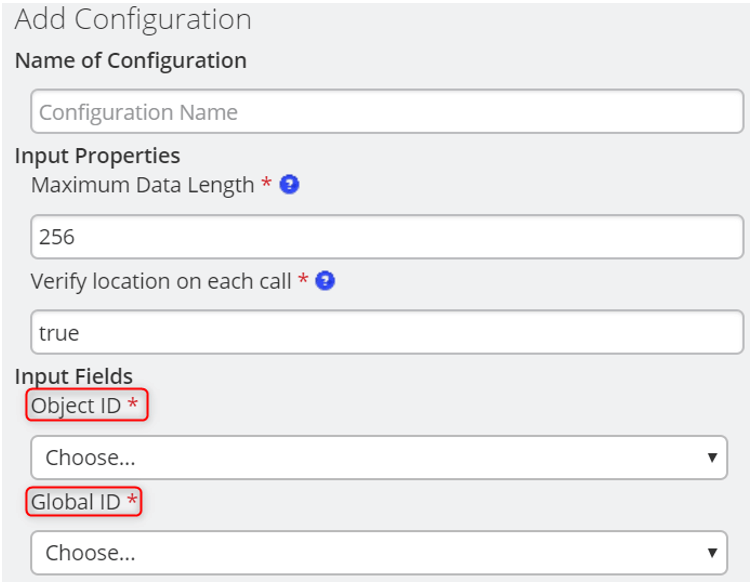
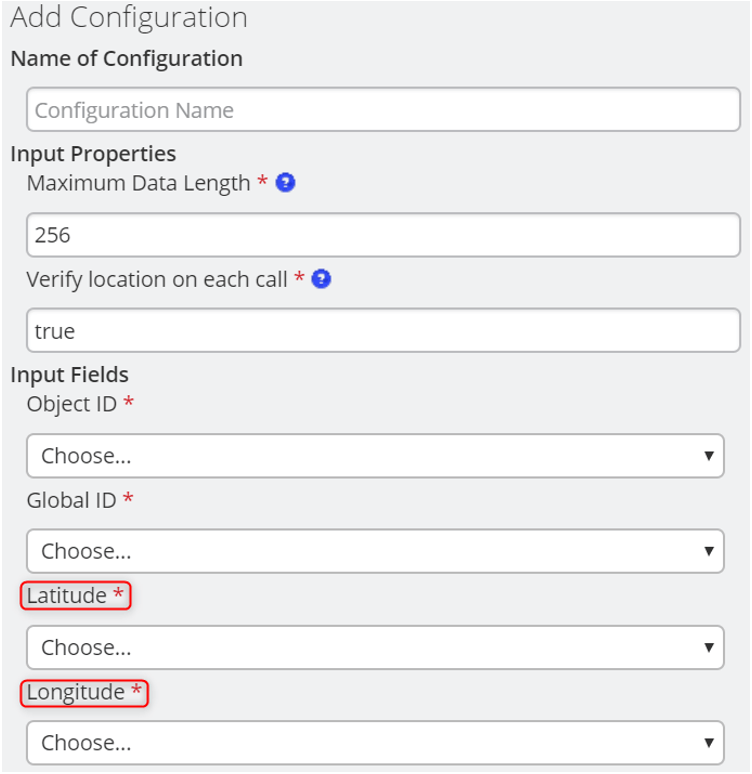
Q: What are the "Object ID" and "Global ID" input fields found on the PowerClerk "Add Configuration" menu in the image shown below?
A: These fields reference the same fields found in ArcGIS. PowerClerk uses these IDs to match up with data in the ArcGIS database. Label settings
Q: Are the "Latitude" and "Longitude" coming from the ArcGIS Geocoder?
A: Yes, the "Latitude" and "Longitude" fields (shown in the image below) will be set in PowerClerk the first time the ArcGIS Web Adapter is called. Label settings
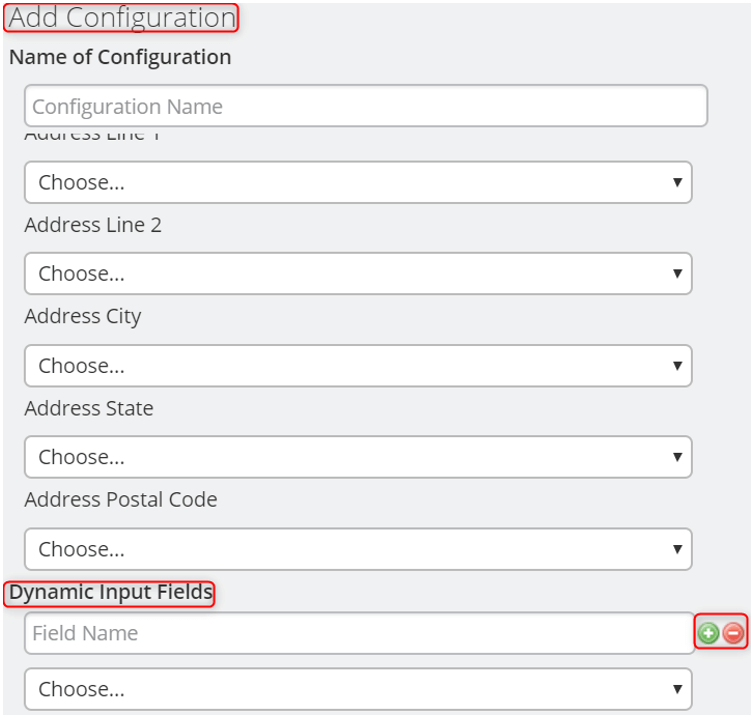
Q: How do I add more input fields for the ArcGIS Web Adapter in PowerClerk?
A: Click the "Add ArcGIS Update Project on Map" button and under this “Add Configuration” menu (image below) click the green "+" circle button under the Dynamic Input Fields section: Label settings
Q: Are the "Input Fields" for data going from PowerClerk to ArcGIS?
A: Correct; the "Input Fields" are what Clean Power Research recommends be designated in order to use the ArcGIS Web Adapter configuration.
Q: Do the "Input Fields" in the PowerClerk "Add Configuration" menu need to match the input fields found in ArcGIS?
A: Yes, the PowerClerk "Input Fields" should match the input fields found in ArcGIS. If, for example, you wanted to send over your own address field from PowerClerk to ArcGIS, one would use a Dynamic Input Field rather than the address Input Field found in the image above.
Q: What are the "Dynamic Input Fields"?
A: A "Dynamic Input Field" differs from an "Input Field" in that they are optional for the PowerClerk ArcGIS Web Adapter configuration. These fields are designed to allow for custom naming conventions.
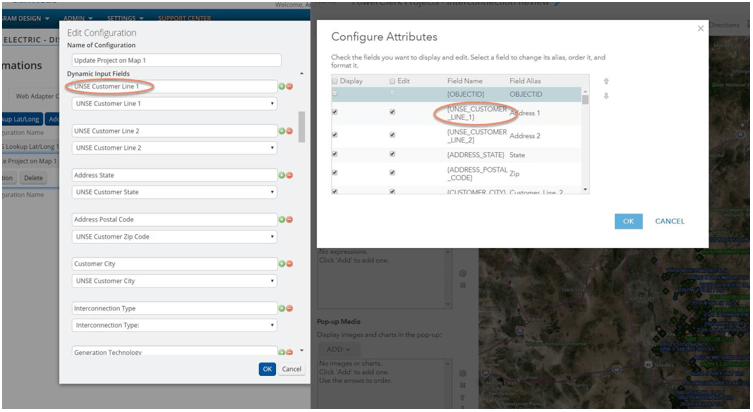
Q: Do Dynamic Input Field names (found in the "Add Configuration" menu of PowerClerk) need to match ArcGIS or my distribution planning software field names?
A: The Dynamic Input Field names need to exactly match the ArcGIS field names. Label settings
Q: Can any of the “Built-in Fields” (Program Design > Data Fields > Built-in Fields) be used for the Web Adapter Configuration?
A: Yes, the following “Built-in Fields” can be used for the Web Adapter: Project_Number, Project_ID, Current_Status, Current_Status_Timestamp, OBJECTID, GlobalID.
Q: How are the “Built-in Fields” used in the configuration?
A: Notice that these fields are not found under “Input Fields” or “Dynamic Input Fields” on the Add Configuration Menu (Program Design > Automations > Web Adapter Configurations > Add [Web Adapter Name]. Instead, these fields are sent from PowerClerk, via the Web Adapter, to ArcGIS automatically (with no configuration needed). In other words, one just needs to configure the fields on the ArcGIS side and the data will be automatically transferred.
Q: Will the same ArcGIS Web Adapter that is set up in PowerClerk be used for each ArcGIS update?
A: Yes, for each ArcGIS update the same Web Adapter, configuration, and automations will be used.
Q: Will a separate ArcGIS Web Adapter be used when a PowerClerk project enters a status, especially if used to trigger a specific distribution planning analysis?
A: In many cases the same ArcGIS Web Adapter will be used. Anytime you want to send the same data to the ArcGIS map, the same configuration should be used. Doing so minimizes the Web Adapter configurations and ensures that stale data is updated. In other words, any time you want to send the same data to the same ArcGIS map, the same configuration should be used.
Q: Should the "database" or "alias" field name in ArcGIS be used to sync with PowerClerk?
A: For the PowerClerk Web Adapter and ArcGIS to properly communicate, the Field Name (database name) in ArcGIS needs to match the Dynamic Input Field name in the PowerClerk Web Adapter "Add Configuration" menu. Note that spaces will be replaced by underscores in the ArcGIS field name. Label settings
Q: What is a “Field Alias” in ArcGIS?
A: Per ArcGIS, the field alias is an alternative name for a field and can be more user-friendly than the actual name of the field. Field alias’ don’t have to adhere to limitations of the database. An example of this use case can be seen in the photo included in the above FAQ. The "ADDRESS_POSTAL_CODE" is setup to have an alias of "Zip". A recommended best-practice would be to make sure that anyone could connect the field alias to the field name. Doing so may avoid mistakes when communicating further down the workstream. Ultimately, the Alias is what users will see when interfacing with the maps in ArcGIS. The Field Name is what ArcGIS and PowerClerk will use to interface with each other.
Q: What is the process for getting a one-time initial load of every project that needs to be synced over to PowerClerk?
A: Projects can be loaded into PowerClerk by using the Import Projects feature.
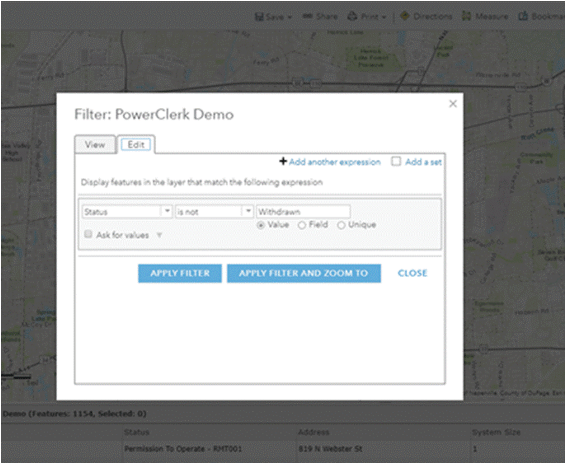
Q: Am I able to configure the ArcGIS Web Adapter to remove projects from our ArcGIS if the status is Withdrawn?
A: If a project’s status changes within PowerClerk, a configuration of the ArcGIS Web Adapter may be set up so that the service is called and a project’s status within the ArcGIS data table is updated. Within ArcGIS a filter can be applied to the data table so that projects in the Withdrawn status are not displayed on the map. These projects cannot be removed from the data table. Label settings
Q: Where can I find information on how to acquire ArcGIS tokens?
A: Please follow this link.
Q: How does PowerClerk's ArcGIS Web Adapter work with tokens?
A: PowerClerk uses the token service to retrieve a token which is then used for both geocoding and for creating features. The three (3) web services (token, geocode, and feature) all need to be working together with the same set of credentials in order to easily integrate with PowerClerk.
Q: Which API does PowerClerk use for the ArcGIS Web Adapter -- REST or Python?
A: PowerClerk makes REST calls through C#.
Q: Can an ArcGIS Web Adapter be created in my PowerClerk Production and Test Environment's?
A: No, an ArcGIS Web Adapter can't be created in both programs because a duplicate Web Adapter would be created in Production when the Test Environment is committed (to Production).
Q: Can PowerClerk statuses be grouped together for ArcGIS?
A: Neither Milestones nor Formulas will accomplish this task. Instead, complete the status grouping within ArcGIS. Projects can be shown differently on the map based upon the status, but multiple statuses can be mapped to the same image.
Q: Can ArcGIS update PowerClerk with revised data (e.g. to replace stale circuit reconfiguration/retirement information)?
A: The PowerClerk Web Adapter makes a web service call into ArcGIS. However, there is no way for ArcGIS to return project data back on that call. However, if there is a way to trigger web service calls from ArcGIS then that call can be used to call the PowerClerk API and update the project data.

Have additional questions? Contact us to nominate your FAQ and help others find answers to your own questions concerning this feature.

Contribute To A PowerClerk Tutorial

Would you like to see a tutorial about a specific subject or contribute your experiences to share them with other PowerClerk Administrators? Contact the PowerClerk Support Team and propose a new tutorial at the PowerClerk Ticket System.


Create A Support Ticket

Not finding your answer here?  Submit a question to our support team at the PowerClerk Ticket System and leverage the PowerClerk team’s expertise.