PowerClerk Support Center
- Project Pages
- Program Design
-
- Automations
- Channels
- Communications
- Connections
- Content Library
- Custom API IDs
- Data Fields
- Deadlines
-
- Questions to ask yourself
- Locating the Deadlines feature
- What are Deadlines
- How to Create a Deadline
- Deadline Automation Action Rules
- Utilizing Project Admin Page for Deadlines
- Communication Templates for Deadlines
- Deadline Set/Satisfy Options
- Program-Wide Deadline Actions
- Reporting on Deadlines
- Deadlines in Project List Columns
- FAQs
- Document Templates
- eSignature Envelopes
-
- Questions to Ask
- Locating the eSignature Feature
- What are eSignature Envelopes?
- eSignature Checklist: The Prerequisites to create a new Envelope
- How to set up Advanced eSignature Envelopes Step-by-Step
- How to add an eSignature Envelope to a form
- eSignature Automation Trigger
- Viewing Completed eSignature Envelopes
- Resending eSignature Notifications
- Canceling eSignatures
- FAQs
- Forms
- Formulas and Calculated Fields
- Front Page
- Incentive Design
- Milestones
- Project List Columns
- Project Summary
- Project Views
- Roles
- Workflow
- Administration
- Tools Menu
- Integration Guides & API
- PowerClerk Video Guides
-
- Setting up Roll-up Reports
- New User Video Guide
- Configuring Forms
- Roles and User Administration
- Setting up Business Days
- Formulas and Advanced Visibility Rules
- Visualize Workflows
- Dashboards
- ArcGIS
- FormSense
- API
- Edit Forms - Tutorial #1
- SFTP Automatic Data Import
- Calculated Fields
- Web Connector Setup
- Build A Formula
- Milestones
- Edit Forms - Tutorial #2
- Project Summary
- Automation with Formulas in Action Rules
- PowerClerk Program Launch
- PowerClerk User Group Sessions (UGS)
- Learning Management System (LMS)
- Join us for Reflow!
- NEW: PowerClerk Certifications
Data Fields
Search and find all your Data Fields throughout the program, making it easy to reference in other features like Communication Templates.
Locating the Data Fields feature
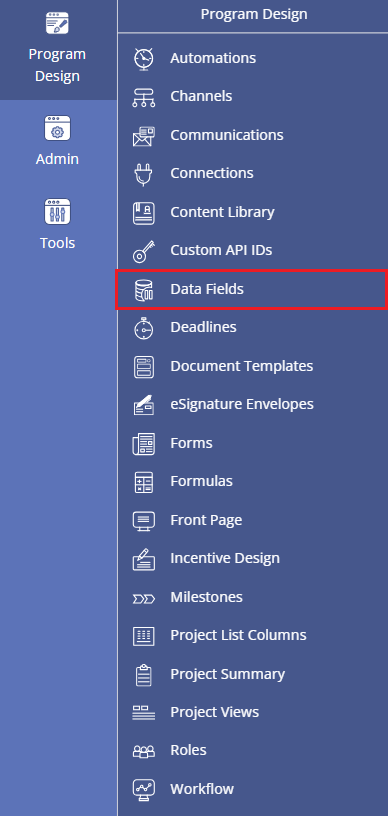
Anyone in a Role with the View Data Fields privilege can view your program’s Data Fields by opening the PROGRAM DESIGN menu and clicking on Data Fields:
How to work with Data Fields
The Data Fields feature allows you to conveniently retrieve a list of all your program’s available Data Fields. Use the search bar at the top to search Data Fields text and narrow down the list. PowerClerk also has a subset of Data Fields which are built-in and as such are always available across programs:
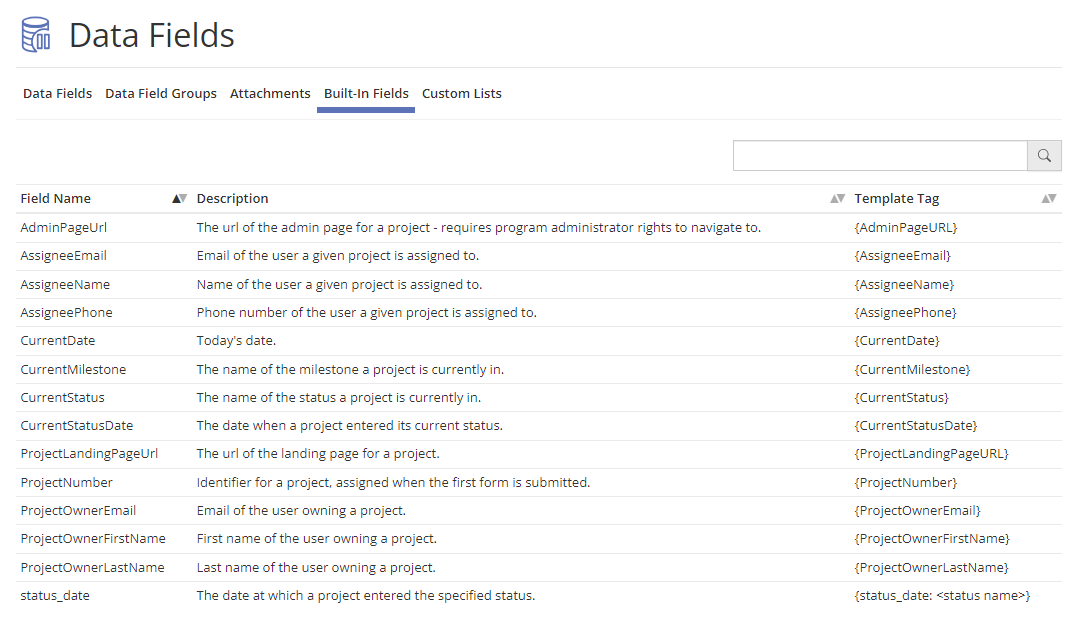
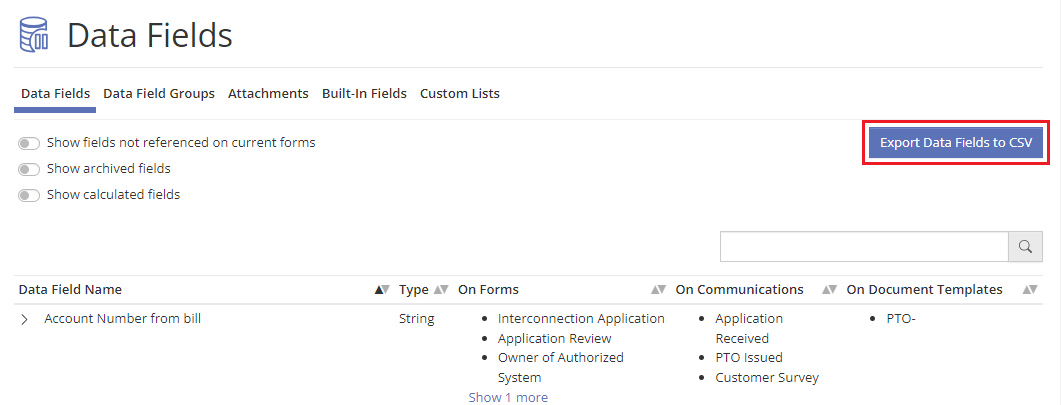
Template Tags will be used to reference the data field and populate it in features like Communication Templates. Template Tag naming is set in the Forms feature when you’re adding fields to capture necessary program inputs. See Forms for information on how to edit the Template Tags to make sure they are consistent with how you want to name Data Fields that require reference. You can also filter the list of Data Fields by selecting the Only show fields referenced on current forms option. This will filter out older or unused Data Fields in the list and in an exported CSV file, limiting unnecessary or defunct data fields. Exporting can be done by clicking the Export to CSV button as shown in Figure 3 below:
Custom Lists and Data Field Groups
PowerClerk’s Data Fields functionality allows you to define Custom Lists under the Custom Lists-tab. If you do not see this tab present, please contact PowerClerk’s Support Team to request this feature to be enabled for your PowerClerk program. A Custom List can be any kind of hierarchical list of data, that you would like your applicants to be able to select pre-defined data from. Each Custom List supports a maximum of 50,000 rows, and 60 list-attributes (columns).
To initialize a Custom List you need to create a .csv file with the columns you desire as your hierarchical fields in the Custom List. A sample file can be seen in Figure 4: CSV template for a Custom List:

Now please navigate within PowerClerk to Program Design >> Data Fields, click on the Custom Lists tab, and click on the Add Custom List button to upload your template CSV file as the Custom List data source:

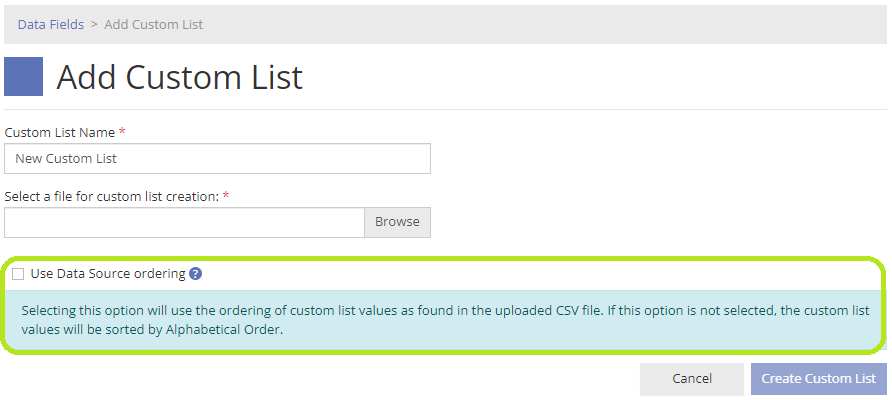
Custom Lists can be setup to retain the ordering for the primary key value column as denoted in the original CSV file by clicking the following option Use Data Source Ordering in the setup dialog:
In the subsequent dialog you will be able to configure your data source columns to make them Key Columns (selectable within your Forms), or to exclude certain columns, or to define the data type of your output column to either be string, integer, decimal, or email, or to rename the display of the column name:
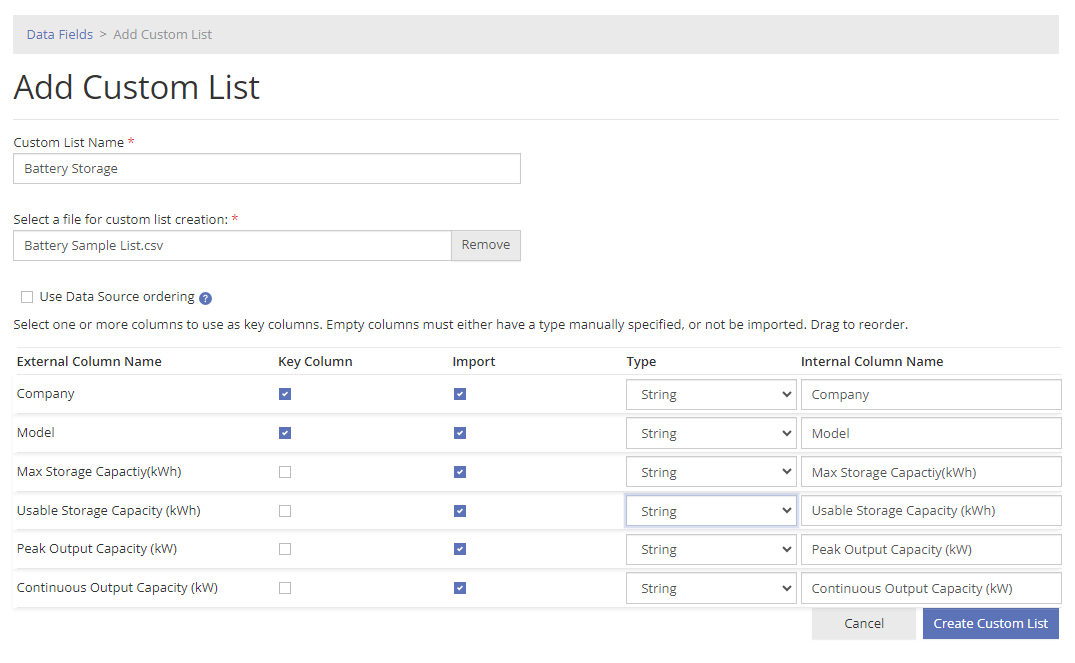
Click on Create Data Source to create your Data Field based on your Custom List Data Source.
Please note: If you import a custom list from a .csv file that has a column solely consisting of email addresses, then PowerClerk will automatically recognize this column as emails and set the Custom List data type for the respective output column to “email”. This enforces the email format of the data to be xxx@yyyy.zzz and allows you to further process this output field within your Communication Templates in the To, CC, and BCC email fields. For required fields that are Email Type, no@email.com can be placed in values where you do not have a valid email for that entry. PowerClerk recognizes no@email.com as an indicator to not send a communication to no@email.com.
When ingesting a custom list from a .csv file, empty values will not automatically convert the field type to a String Type when an empty value is found. A warning will be displayed noting the empty values but the desired Type will be retained. If you require a field on a Custom List this can result in a user selecting an entry with no data preventing submission with that selection.
Next, please navigate to the Data Field Group-tab and click on Add Custom List Group:

The dialog that follows will present you with options to configure your new Custom List Field Group as shown in Figure 7 below:
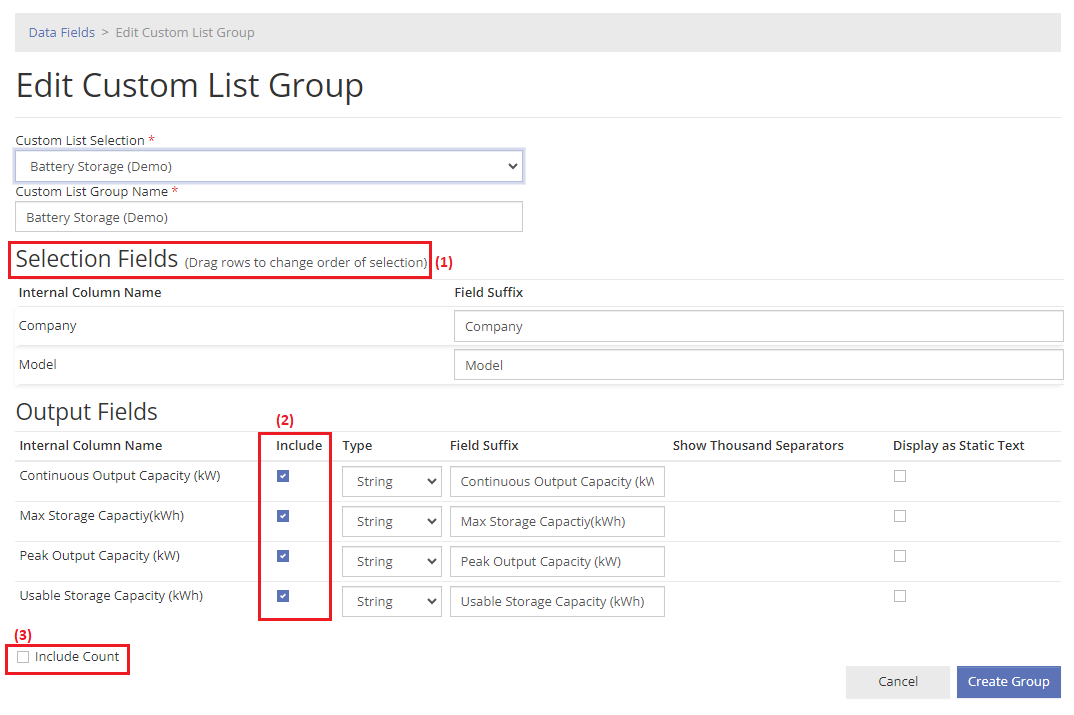
- Set your hierarchy order here. This controls which selection controls which list that appears in the other field.
- Uncheck Include to exclude certain columns from the group. This allows you to use the same data source for multiple lists for different purposes.
- Allows you to add an editable. Count field for the list in case you want to express multiples of selections in the list.
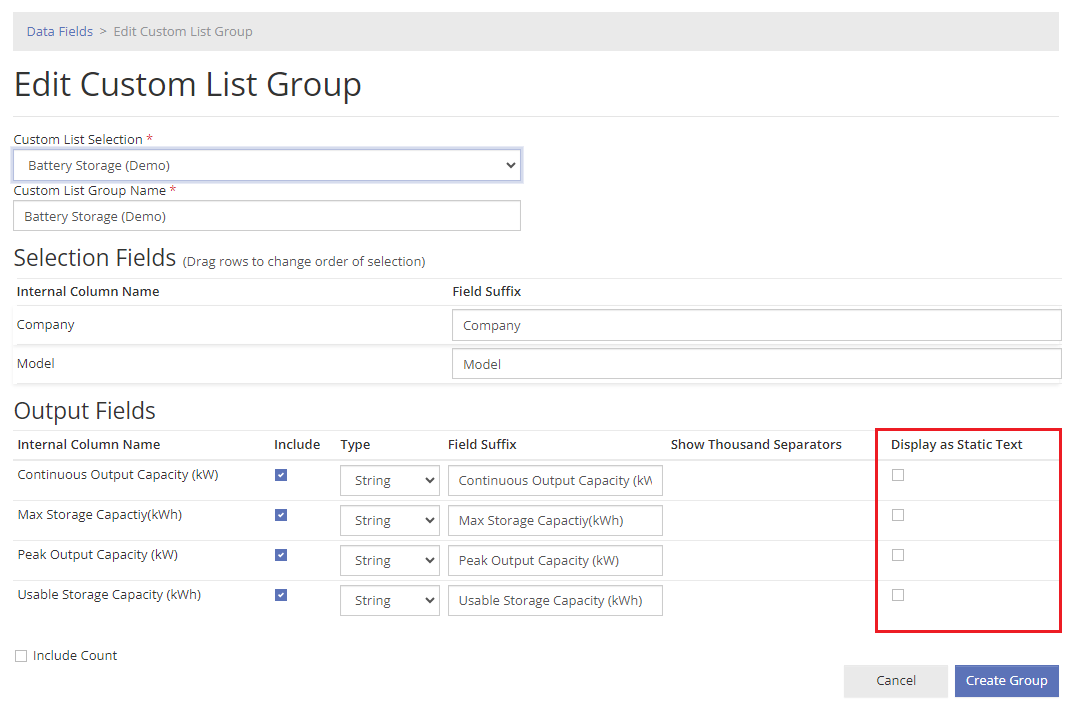
You can also select to display Custom List output columns as static text by choosing the following option:
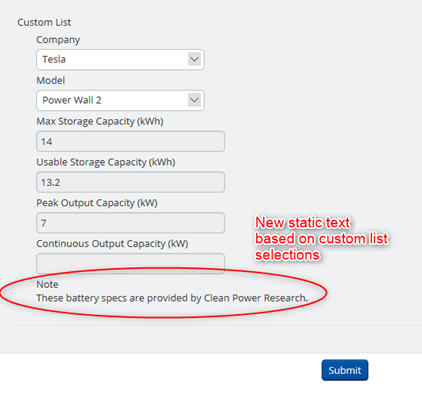
To use your Custom List within a Form you will be able to drag the “Custom List” data type onto your Forms once you have at least one Custom List Data Field Group defined as shown in Figure 9 below:
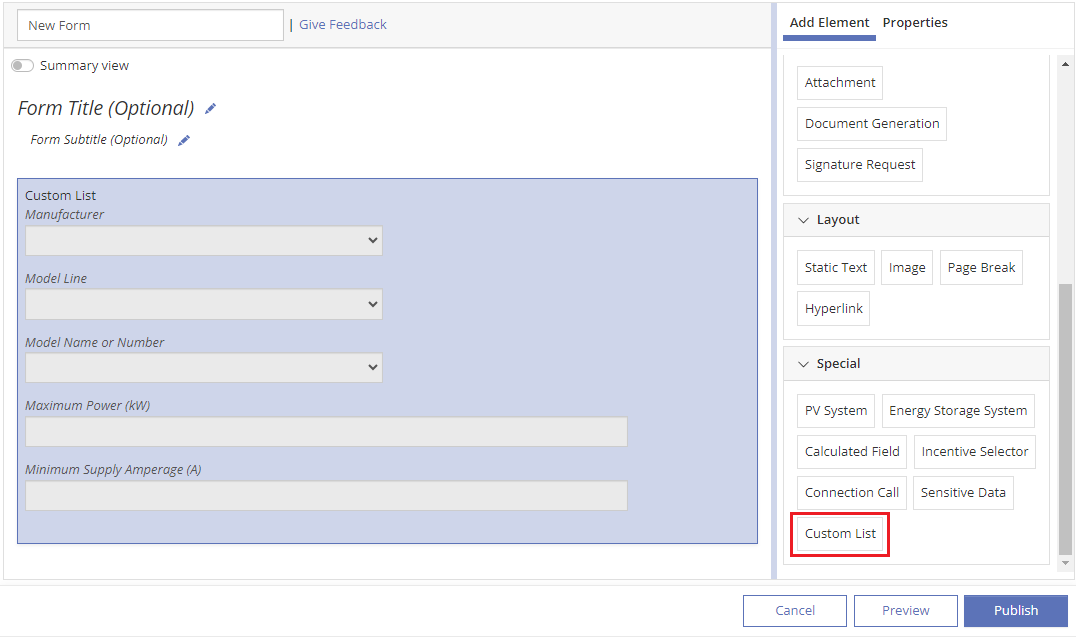
Table form element in Data Field Groups
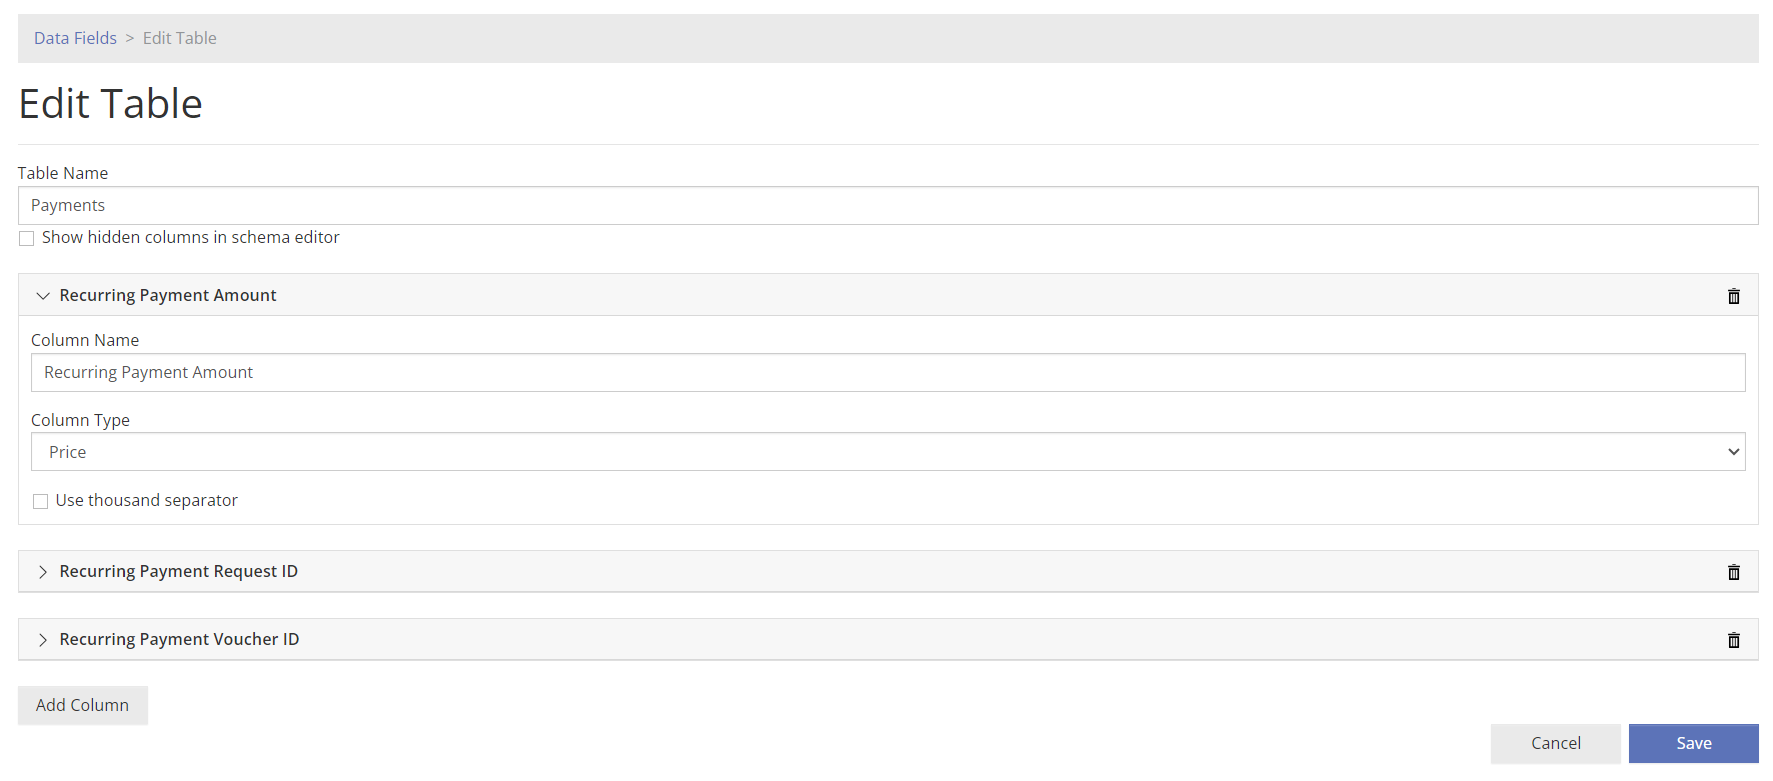
PowerClerk’s Table Element allows users to input data into individual cells organized by Columns and Rows. To establish a Table, navigate to Program Design >> Data Fields >> Data Field Groups Tab and select “Add Table”. If you do not see this option, please submit a Support Ticket through PowerClerk Ticket System and request this feature.

Create your Table’s schema by naming the table (you will be able to edit the Table’s label on the form) and adding Columns. Each Column requires a name and data field type. The Column name will appear on the Form.
Save the Table. Please note that you will be able to edit your table in the future (see subsequent section).
Now that the Table is saved, you will need to add it to a Form for use. This newly created Table can be seen under the Data Field Groups tab if the display option “Show groups not referenced on current forms” is toggled on.
Adding a Table to a Form
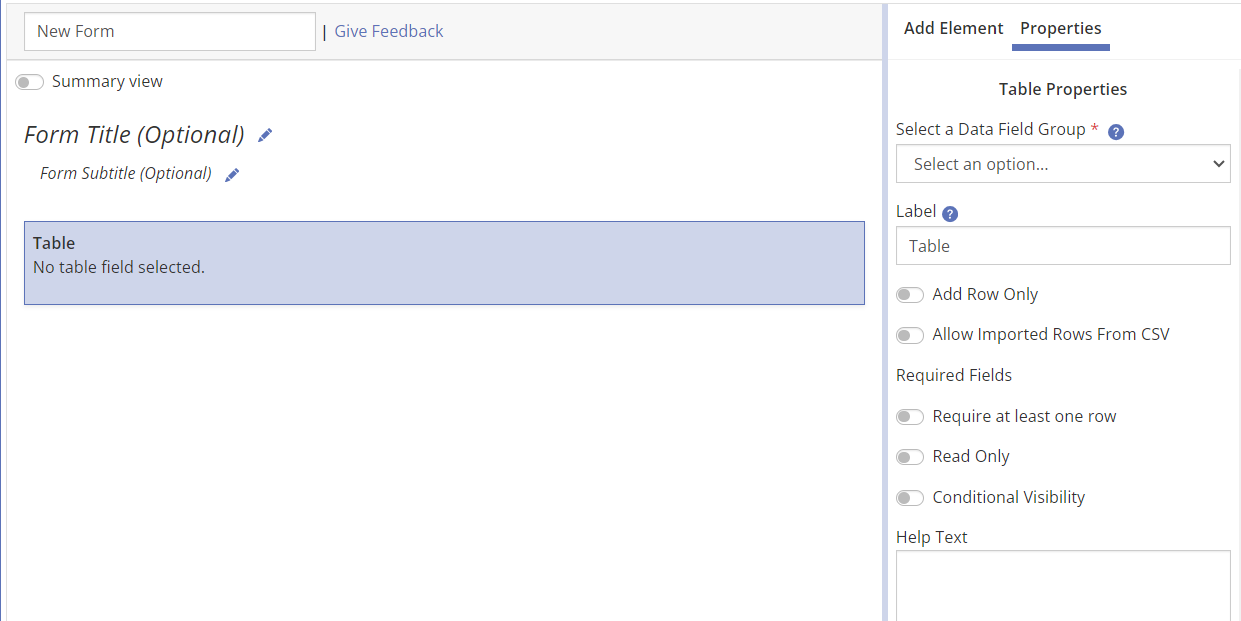
In the Form Editor, a new form element type “Tables” will appear under the “Special” category. Drag the Table form element over and select your Table Data Field Group.
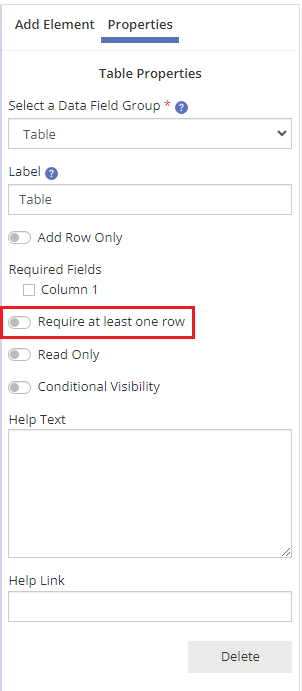
- The Table Form Element has various properties available:
- Only allow adding of Rows (block deleting or editing of previously submitted Rows).
- Allow imported Rows from CSV*
- Make certain Columns required or optional for each Row added.
- Require that at least one Row is entered onto the Table.
- And other typical form element properties.
*Learn more about importing Rows in the section below.
Editing a Table
Once Table Groups are created, their schema can be edited by navigating to Program Design >> Data Fields >> Data Field Groups >> Edit Table Group.

In the ‘Edit Table’ menu, you can rename a column, add a new column, or ‘Hide’ existing column(s). There is a limit of 10 visible Table columns, meaning hidden columns do not count towards the total column count (e.g. a Table can have 10 visible columns, and 10 hidden columns).
Columns can only be hidden if they are not currently required on a Form or referenced elsewhere in Program Design. Once a Column is hidden, it will no longer appear on Forms that contain the Table element. Hidden columns can still be reported on for past projects.

If a column has previously been ‘hidden’, you can select the option to ‘Show hidden columns in schema editor’ and choose to ‘Restore Column’. NOTE: Tables MUST contain between 1 and 10 visible columns. If the Table has reached the 10 column limit, the Restore Column button will be displayed, but inaccessible for hidden columns.

Any changes made to the Table schema will be immediately reflected on the Form(s) that the Table is present on.
Import Rows onto a Table
Tables have the option to allow import Rows of data using a data file. This option streamlines the process of adding multiple Rows. To request this feature, please submit a Support Ticket through PowerClerk’s Ticket System.
This feature allows users to upload a properly formatted .CSV file into their project’s Form through the User-Interface.
Formatting the Import File
The .CSV file should be formatted by adding Column headers to match the Table Columns exactly. For example, if your Table’s first Column is named “Charger Type”, the file’s Column header should also be “Charger Type”. Then, add the cell data in each Row as needed. Each Row on the .CSV file will create a new Row on the Table.

Importing the File
In the project’s Form, the user will click “Import New Rows” and upload the .CSV file. PowerClerk will validate the file’s formatting and provide a preview of the upload. Click “OK” and the data will import and appear on the Table. This feature will add Rows only. It will not edit existing Rows.
Note: Microsoft .CSV files intentionally remove leading zeros and transform numeric digits longer than 13 characters to scientific notation. To prevent this, simply include an apostrophe ( ‘ ) in front of the digits and import. Example: Input [0123456789] as [‘0123456789]

Configuring this Feature to be available to all users
Once this feature has been enabled for your program, enable it for the Table on under the Form Element’s properties. Toggle on the “allow imported Rows from CSV” functionality. A new button will appear on the Table.

Using the Content Library to Provide a Pre-Formatted Template
You may wish to provide users with a pre-formatted template file. To do so, create a file and upload it to the Content Library. Then, you can provide the link to the file in Static Text of your Form. Users can click the link to download the file, input the data, and upload.
Learn more about how to embed a link in Static Text in our Forms Support Center Article
Reporting Table Data
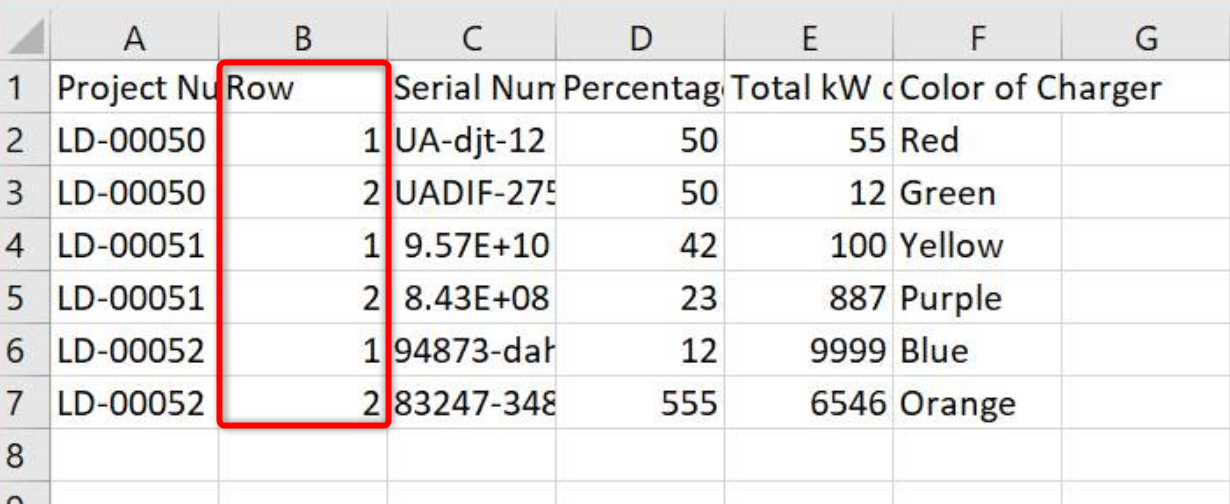
When generating Table data using Reports, each row of data will appear as a new row in Excel, with the instance (row number) listed.
Data Import into a Table
A .csv file can be set up to add a row to a Table Data Field. Per data import, only one row per project may be added. If you need to add multiple rows to a single project, you will need a separate .csv file per row.
Each column of the table has its own data field template tag, which follows this schema:
- {data: <TableName> <ColumnName>}
For more information on tables, please visit our Data Imports page.
Note: If you require the ability to modify existing table rows or add more than one row at a time, you may utilize the PowerClerk API.

Enabling PV System + batteries element (“Add Battery” button)
CPR recommends as a best-practice to only have one, single PV System element in your program to ease reporting, and to enable the battery component on their program’s *existing* PV System element (as opposed to adding an additional PV System Data Field Group). This will streamline reporting and help minimize program changes. Please note: once the “Show Battery Component?” switch is turned on for a PV System element this setting *cannot* be reversed or turned off. To switch the battery component on for an existing PV System Data Field Group, please navigate to PROGRAM DESIGN >> Data Fields >> tab Data Field Groups, then use the Edit PV System Group button to enable switch “Show Battery Component?” and confirm your selection with the OK button:

The separate Energy Storage System form element can be used to capture stand-alone energy storage system specifications, or as a separate field in AC-Coupled scenarios where PV + Energy Storage System specifications need to be captured. To capture battery equipment tied into systems where the battery module is sharing an inverter with the PV arrays (DC-Coupled) enable the Show Battery Component option of the PV system element. Please note: Please contact support@powerclerk.com to request the Energy Storage System element to be enabled for your PowerClerk program:

Learn more about the Built-in DER form element; the PV System element.
Lean more about program-wide PV System Element Options.
Sensitive Attachments
The Attachments tab offers you insight into existing attachment slots present in your program. You do have the option to mark an attachment slot as sensitive as shown below in case you are capturing sensitive document uploads from your applicants such as W-9 forms or otherwise personally identifiable information (PII) that you wish to protect. Please note: setting an attachment slot as sensitive is irreversible and cannot be unchecked once set:
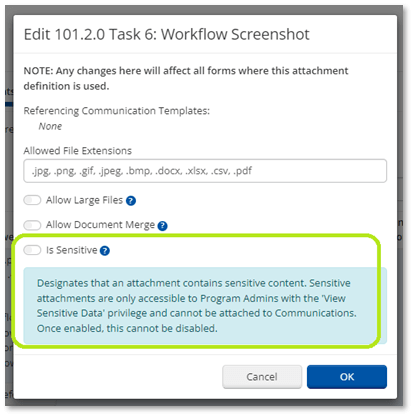
Please also note in above screenshot that you can denote which file extensions you wish to allow for the respective attachment slot to accept, and you can also denote in this dialog if you wish to Allow Large Files to be accommodated. In order to allow files of sizes greater than the default 5 MB, please reach out to support@powerclerk.com. Once enabled for this program, this toggle will allow attachments of sizes greater than the 5 MB default and should only be used when unusually large files are expected. The option to enable Allow Document Merge is explained in more detail within the Support Center here.
Text Validation Rules
Text Validation Rules can be created to define custom validation rules and apply them to individual text data fields, including single line and multi-line text fields. This ensures the input matches the configured rules for text data fields when updated via Form entry and Automation Action rule. For example, a numeric data field can be configured to only accept values that have a maximum of nine numeric digits.
- There are two types of Text Validation Rules:
- Character Set: Each character in the text input must belong to an allowed character set. This can include configuring a variation of character sets (uppercase letters, lowercase letters, numeric digits, or punctuation characters) and enforcing a character limit.
- Pattern Match: The text input must match the defined pattern.
Users with the role permission enabled to “Edit Data fields” will be able to create new Text Validation Rules. To have Text Validation Rules enabled, contact the Support Inbox.
How to Create Text Validation Rules
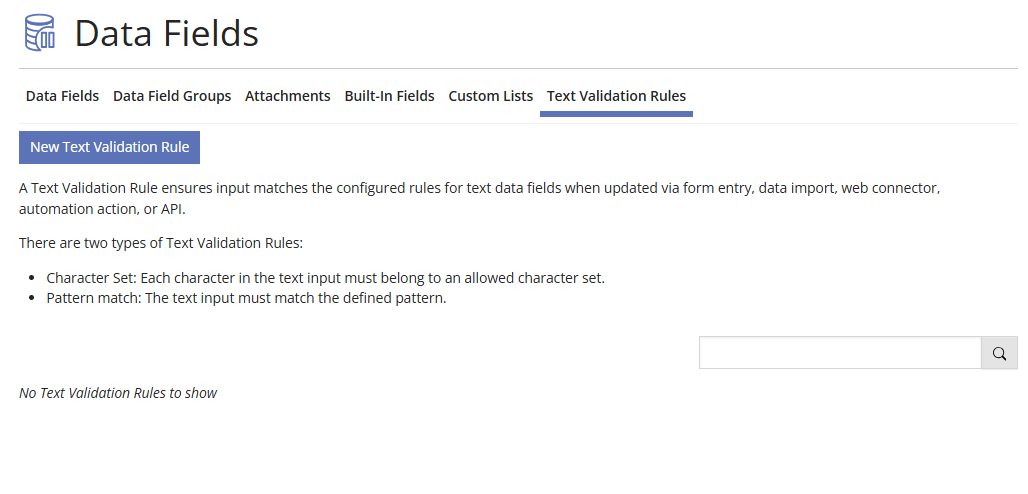
To create a Text Validation Rule, go to Program Design >> Data Fields. On the top of the Data Fields bar, select the tab Text Validation Rules.
Create a new rule by selecting the button New Text Validation Rule.
Validation Rule Type: Validate with Character Sets
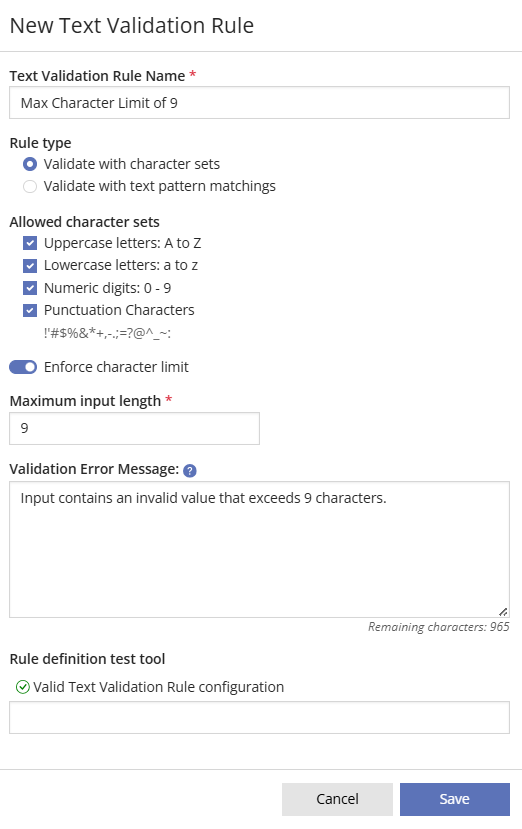
Rules that validate with character sets are configured to allow one or multiple character sets. This type of rule can be applied to Single Line Text Fields and Paragraph Text Fields. Currently, the character sets that PowerClerk supports are:
- Uppercase letters: A to Z
- Lowercase letters: a to z
- Numeric digits: 0-9
- Punctuation Characters: !’#$%&*+,-.;=?@^_~:
Additionally, these rules can be configured to limit the length of text by enabling Enforce character limit. PowerClerk will then allow a maximum input length to be set.
The figure below demonstrates an example of a Text Validation Rule that will accept all character sets with a max input length of 9.
Validation Rule Type: Validate with Text Pattern Matchings
Rules that validate with text pattern matching allow one or more defined patterns. This type of rule can only be applied to Single Line Text Fields.
Pattern rules can be configured to accept either a single pattern, or multiple patterns by clicking the Add Pattern button.
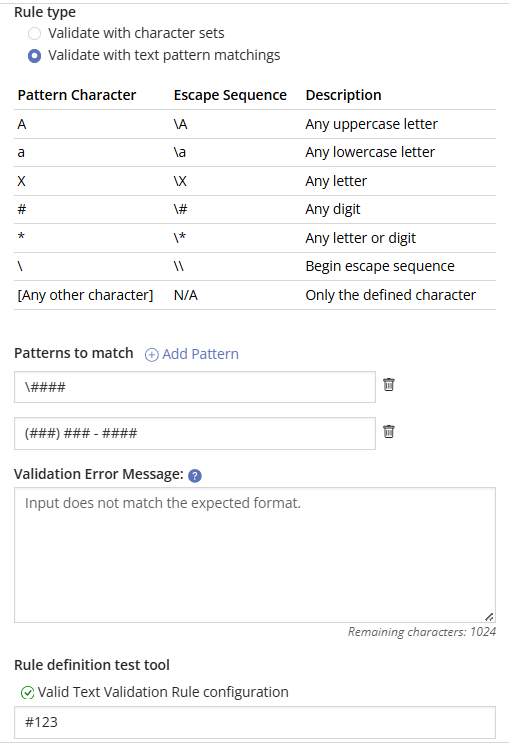
The Pattern Character column defines the character used to match any value of that character type. The Escape Sequence value is used to match the pattern character itself. For example, consider the following patterns:
Pattern: \####
- This pattern will only accept inputs that start with the # character and are followed by three digits of any value. A valid input for this pattern could be: #123.
Pattern: 0011AAA
- This pattern will only accept inputs that start with the exact digits 0011 and are followed by three upper case characters. A valid input for this pattern could be: 0011ABC or 0011XYZ.
Pattern: \AAAA
- This pattern will only accept inputs that start with the upper-case letter A and are followed by any 3 upper case letters. A valid input for this pattern could be: AZXY.
Pattern: (###) ###-####
- This pattern would match the standard American telephone number format. A valid input for this pattern could be: (123) 456-7890.
Pattern: ********-****-****-****-************
- This pattern would match a 128-bit Universally Unique Identifier (UUID). A valid input for this pattern could be: 6b9e7175-2699-433a-a295-8b9ccc637e4b
Validation Rule: Error Message and Test Tool
Once the Validation Rule Type has been configured, users are able to add a custom Validation Error Message. This will be the red error message that appears if the input is not valid. If not configured, the default validation error message is used: “Input does not match the expected format”.
Additionally, the Validation Rule can be tested in this module by using the Rule definition test tool. This tool allows users to test the Text Validation Rule they created to ensure that it is correctly configured to accept the intended input.
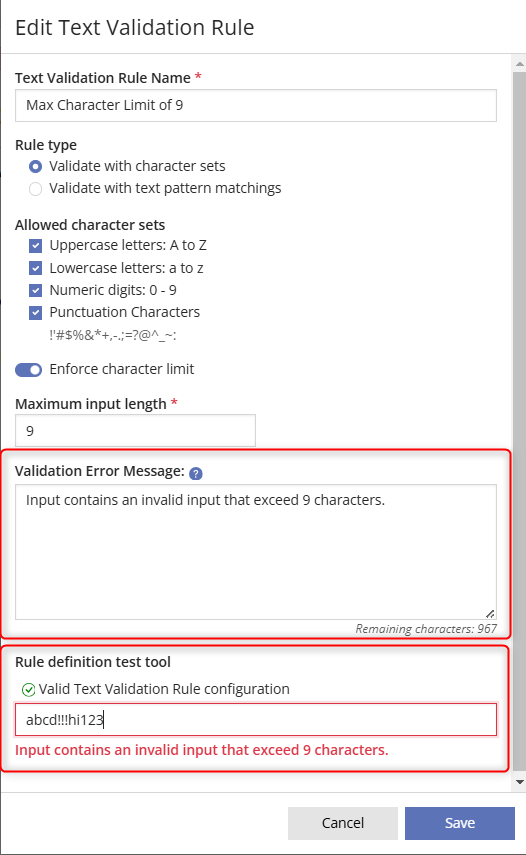
Once you have created a Validation Rule you will be able to edit the rule by clicking on the created rule and selecting the button Edit. Adding or updating a Validation Rule will not affect existing data unless it is re-inserted to a data field using the new rule.
Configuring Validation Rules to Text Data Fields
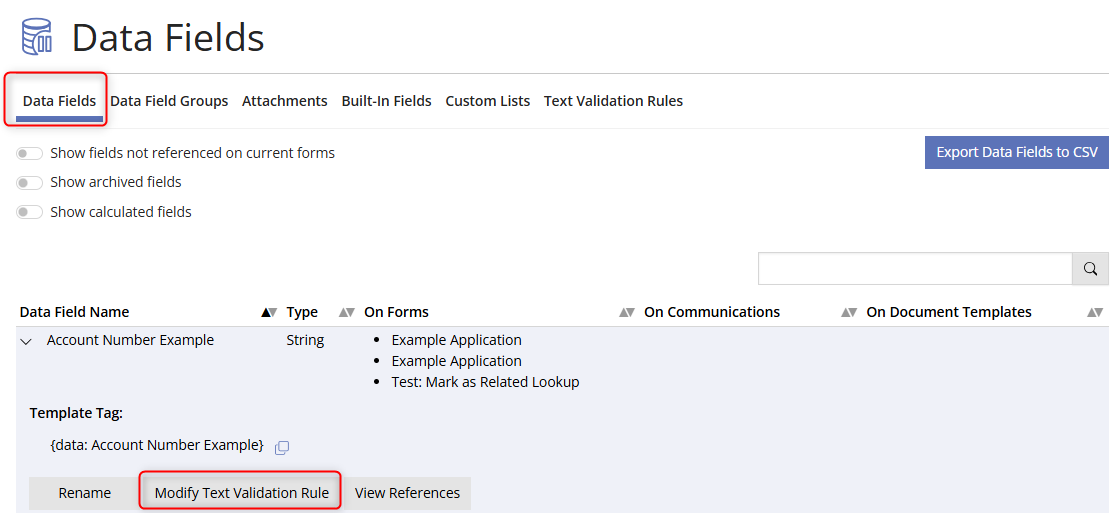
Once the Text Validation Rule has been saved, they can be added to a Data Field by selecting the Data Fields tab on the Data Fields page. Then select a string data field type and press Modify Text Validation Rule.
A module will appear to select and apply a Text Validation Rule to a data field. To save the configuration press Ok.
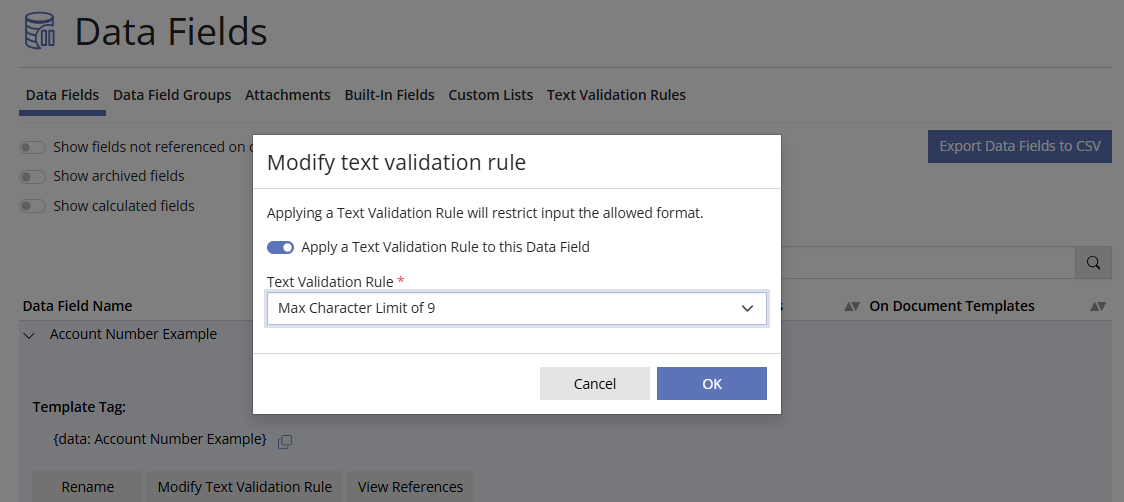
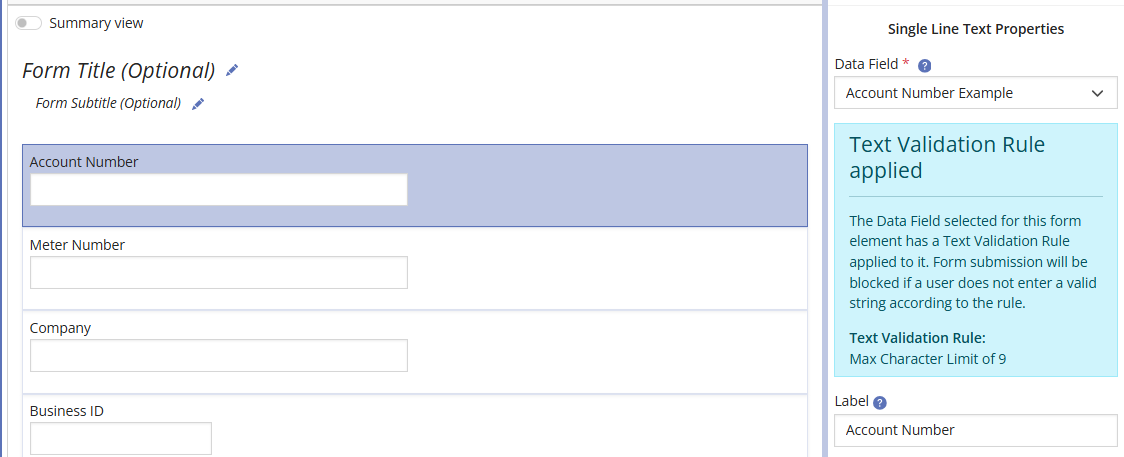
Once the Text Validation Rule has been applied to a data field, on the edit Form page, help text will appear to confirm the data field has had a rule applied.
Video Guides
Would a video guide help to better explain Data Fields? Contact us and let us know.
FAQs
Have additional questions? Contact us to nominate your FAQ and help others find answers to your own questions concerning this feature.
Create A Support Ticket
Not finding your answer here? Submit a question to our support team at the PowerClerk Ticket System and leverage the PowerClerk team’s expertise.