PowerClerk Support Center
- Program Design
-
- Automations
- Channels
- Communications
- Connections
- Content Library
- Custom API IDs
- Data Fields
- Deadlines
-
- Questions to ask yourself
- Locating the Deadlines feature
- What are Deadlines
- How to Create a Deadline
- Deadline Automation Action Rules
- Utilizing Project Admin Page for Deadlines
- Communication Templates for Deadlines
- Deadline Set/Satisfy Options
- Program-Wide Deadline Actions
- Reporting on Deadlines
- Deadlines in Project List Columns
- FAQs
- Document Templates
- eSignature Envelopes
-
- Questions to Ask
- Locating the eSignature Feature
- What are eSignature Envelopes?
- eSignature Checklist: The Prerequisites to create a new Envelope
- How to set up Advanced eSignature Envelopes Step-by-Step
- How to add an eSignature Envelope to a form
- eSignature Automation Trigger
- Viewing Completed eSignature Envelopes
- Resending eSignature Notifications
- Canceling eSignatures
- FAQs
- Forms
- Formulas and Calculated Fields
- Front Page
- Incentive Design
- Milestones
- Project List Columns
- Project Summary
- Project Views
- Roles
- Workflow
- Administration
- Tools Menu
- Integration Guides & API
- PowerClerk Video Guides
-
- New User Video Guide
- Setting up Business Days
- Dashboards
- FormSense
- Edit Forms - Tutorial #1
- Calculated Fields
- Build A Formula
- Milestones
- Edit Forms - Tutorial #2
- Project Summary
- Automation with Formulas in Action Rules
- Setting up Roll-up Reports
- Configuring Forms
- Roles and User Administration
- Formulas and Advanced Visibility Rules
- Visualize Workflows
- ArcGIS
- API
- SFTP Automatic Data Import
- Standard Web Adapter Setup
- PowerClerk Program Launch
- PowerClerk User Group Sessions (UGS)
- Learning Management System (LMS)
- Join us for Reflow!
- NEW: PowerClerk Certifications
Automations
Automations streamline your Workflow to save time on the most repetitive steps in processing applications and reduce human error.
Locating the Automations feature
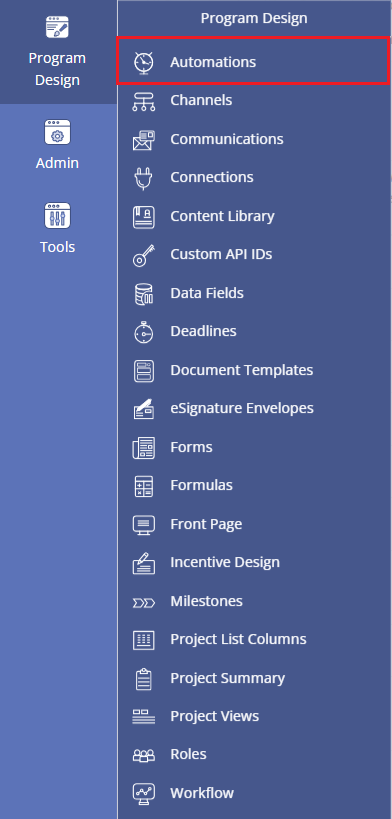
Anyone in a Role with the Edit Automations privilege can use the Automations feature by opening the PROGRAM DESIGN menu and clicking on Automations:
How to create an Automation
Automations allow you to automatically trigger PowerClerk to perform different actions or validate user input on your Forms. For example, an automation action rule could advance a project’s status, send out a Communication Template, Set Data Fields, start a Deadline, and more. The general approach for Automations in PowerClerk is:
- When [a trigger happens], if [a condition is met], then [perform an action automatically].
Automations consist of three parts: Triggers, Action Rules/Validation Rules, and Enabling. First, establish a trigger for PowerClerk to process the rules. Then, configure the action rules and/or validation rules associated with that trigger. Finally, enable the trigger to become active.
Automation Triggers
There are six trigger options for Automations:
- Status: Enters, Exits, and Transitions
- Form: Submission
- Inquiry: New thread creation and Thread reply
- Channel: Signal received
- eSignature Envelope:* Complete. For more information, please see the eSignature Envelopes Article
- Scheduled: for automated run reports. Please see the section “Scheduled Triggers,” below.

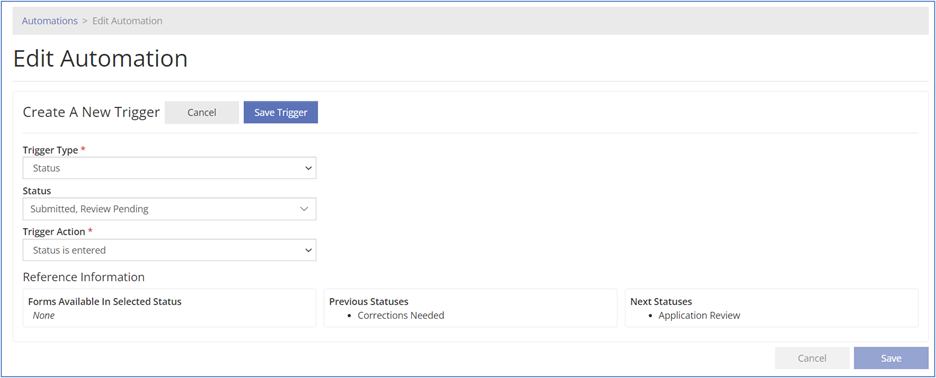
Once a trigger type is selected, you will be prompted to configure the properties for that trigger. For example, I would like to create an Automation that is based on when a form is submitted. The “Trigger Type” for this example would be “Form” followed by the form I wish to add this automation to, followed by the “Trigger Action” of “Form is submitted.
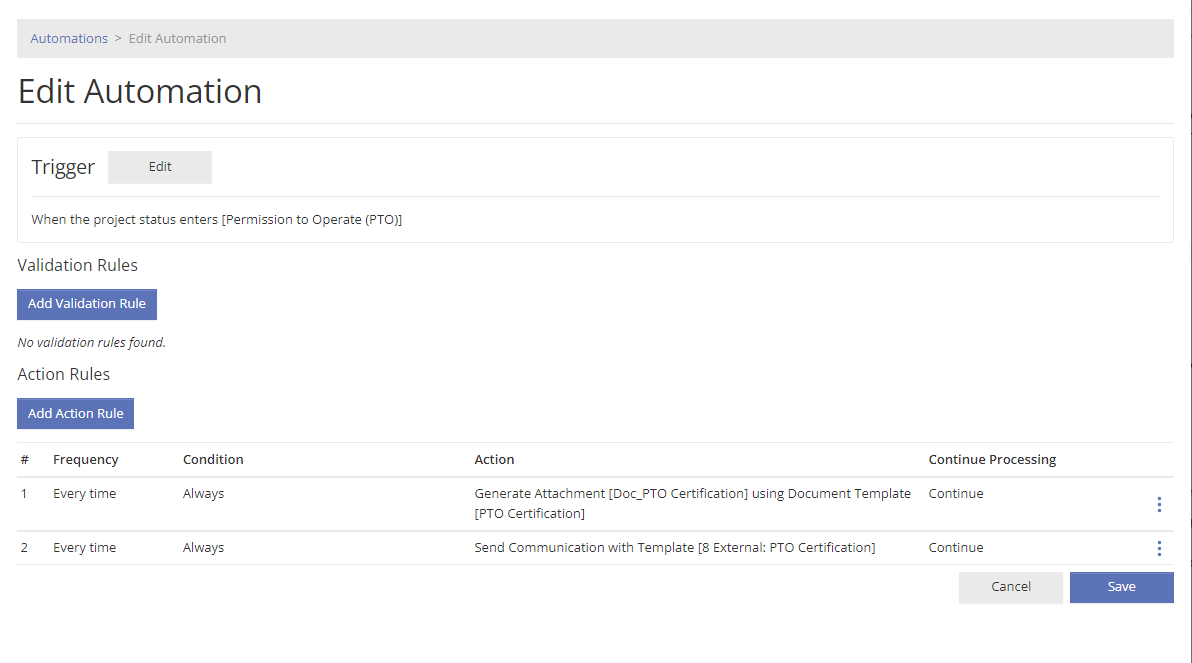
Automation Action Rules
A variety of Action rules within PowerClerk allow you to model a broad range of business scenarios and streamline process steps tailored to your needs.
The action rule configuration will allow you to set:
- The Frequency of the Action Rule
- The Condition to Process the Action Rule
- The Type of Action Rule
- The Processing Property of the Action Rule
- The Order of all the Action Rules
Step 1: Select the Frequency of the Action Rule
An action rule may attempt to run every time the automation is triggered or only the first time for Status and Form triggers.
The only the first time property is for the first time the automation is triggered, not the first time the condition is met for the action rule. Note that condition still must be met for an action rule to process.
Step 2: Select the Condition for the Action Rule
There are two types of Conditions for Action Rules: “Always” or ” When the following formula is true”. If you use a formula, PowerClerk will skip the action rule if the project does not meet the condition.
A common example for an “always” action rule is sending the same ‘Application Received’ communication to all projects that submit the first form.
The second type of condition “Fire Action when the following formula is true” allows the condition to be based on a specific formula rule established within PowerClerk’s “Formulas” feature. Basing the condition on a formula allows the project to take a multitude of different paths. The Formula result type must be a Boolean formula that returns a true or false result.

Step 3: Select the Type of Action Rule
There are several action rules that can assist with workflow automations, streamlining processes, assisting admins, and decreasing human error.
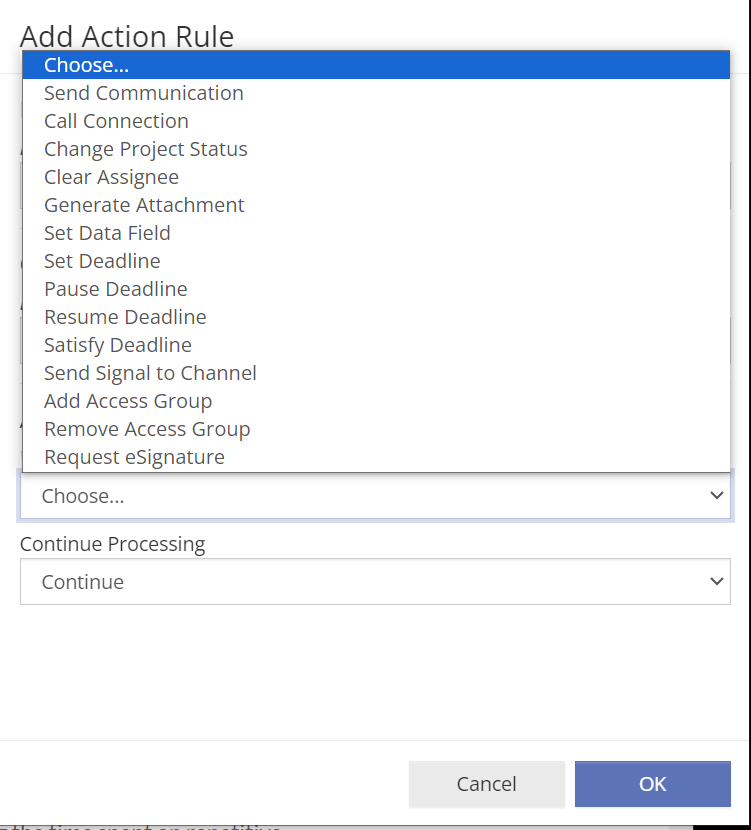
Send Communication: Automatically send a communication based on an action that has been taken on a project (i.e., a form submission or status change). This allows you to keep all stakeholders continuously informed on important aspects of your projects without requiring your admin to keep track of emails.
Change Project Status: Change the status of a project (used for Form and Channel triggers). Note that if you also have a status trigger associated with this change status, that automation will run as well.
Clear Assignee: This Action Rule allows you to remove a project’s assignee. Note that you cannot automatically designate an assignee due to possible load balancing implications for projects that could get routed inadvertently to a backlogged assignee queue.
Generate Attachment: Triggering this Action rule allows you to automatically generate a document template and store the generated document in an attachment field. If desired, you can then utilize the attachment field on a communication template.
Set Data Field: You can set String, Integer, Decimal, and Boolean data field types. This can be a pre-defined value. You may also set Date values, which in turn can trigger Validation Rules or denote expiration deadlines. You may also copy data values from one data field to another or copy a Formula result into a data field.
Set Deadline: Deadlines configured to ‘when deadline is set’ will start.
Satisfy Deadline: Satisfy a specific or all deadlines will this action rule. Helpful for Deadlines that may have more than one status path to become satisfied.
Pause or Resume Deadline: You may wish to pause a deadline when it enters specific statuses and resume them later. Use these two action rules to accomplish a pause and resume.
Send Signal to Channel: Signal to a previously configured channel through this Action Rule to receive data or output data.
Call Web Adapter: You have the option to call a previously configured web adapter through this Action rule to receive the web adapters response for further processing.
Request eSignatures: In order to successfully send an eSignature request via an Action Rule, a project must contain the Envelope Definitions’ specified contact data fields. The action will not be able to be completed if these fields are missing or otherwise invalid (ex. not a valid email).
Step 4: Select the Processing Property
Select whether PowerClerk should continue processing or stop processing subsequent action rules after this one has been processed. This action rule must be taken (i.e., the frequency and condition has been met and the action rule was processed) for PowerClerk to follow the processing property.
Note that all “change project status” action rules end with the “stop processing rules” property.
Step 5: Verify Order of All Action Rules
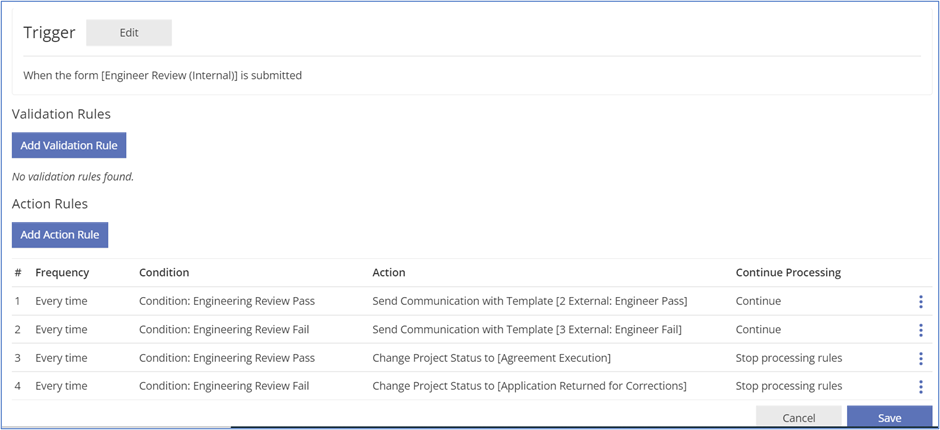
PowerClerk will attempt to process action rules in order. If an action rule is successfully processed and has a “stop processing rules” property, PowerClerk will not attempt to process subsequent action rules.
Certain action rules may also need to be processed prior to subsequent action rules and must be ordered accordingly. For example, if you wish to generate an attachment and attach the document to a communication to send, then the Generate Attachment action rule must come before the Send Communication action rule.
Validation Rules
PowerClerk supports Validation Rules to ensure specific criteria have been met for data entry on specific data fields on a form. If the criteria have not been met, the form submittal will be blocked, and a custom error message will display.
Validation Rules are a type of Automation Rule that utilizes a formula to test a criterion of a data field. Validation Rule formulas need to be Boolean formulas, or true/false formulas. The formula should be structured such that the criteria that needs to be met will resolve as “true” when the data field has passed the validation test. If the formula resolves as “false”, the validation rule will block form submission and allow an error message to display on the form to guide the user on how to resolve the invalid data entry.
Form Validation Rule Example
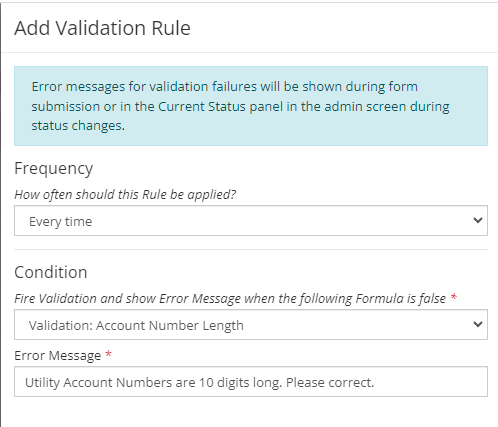
For example, a form may request an “account number” in which all “account numbers” are required to be 10 digits long. A Boolean formula to test for this criterion would be structured as follows. Note that this formula resolves as “true” when the length of the data field is 10 digits and “false” when the length does not equal 10 digits.

Once the formula has been created, a Validation Rule can be added to the form submittal Automation. In this example, the Validation Rule will be as follows. Validation Rule for [Application Form is Submitted], if [Validation: Account Number Length formula is FALSE], then [block the form submission and display a custom error message]. The Validation Rule will block form submission and guide the user to correct the account number if the data field does not have exactly 10 digits.
Scheduled Triggers
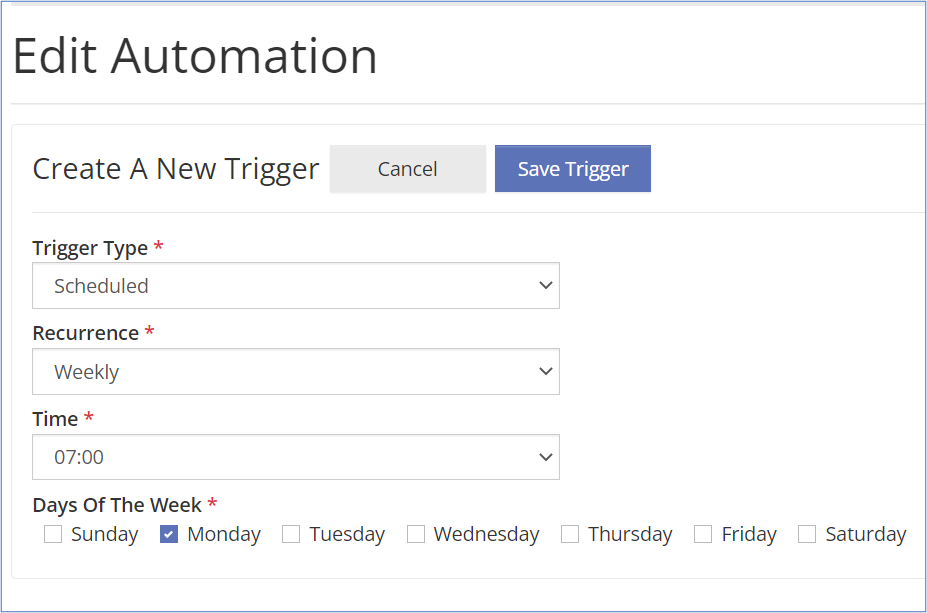
PowerClerk offers the option to set up a Scheduled Trigger. These triggers allow you to run Reports on a scheduled basis set to either daily, weekly, monthly, or yearly. You can also denote the time of day when you require your Report to run. Please note reports may take several minutes to process depending on the size.
Once a report is set to automatically run, it can be downloaded through the Reports page, integrated with Microsoft Excel or PowerBI, or sent via secure file transfer protocol (SFTP) to a specified location. Learn more about Automated Reports here.
Please Note: A scheduled trigger must be created by a CPR Admin. To request a trigger, create a ticket in the PowerClerk’s Ticket System. Include the program name and desired schedule.
Troubleshooting Automations
Utilize the Project’s Event History on the Project’s Admin Page to review how PowerClerk processed a project’s automation. Utilizing this page can assist with testing and troubleshooting.
The Project’s Event History will showcase the Automation Trigger and highlight all action rules that:
- Green/Taken: the frequency and condition were met and the action rule was processed.
- Yellow/Satisfied but not taken: the project met the action rule properties, but the action rule was not processed (i.e., a stop processing rule property from a previous action rule was taken).
- Red/Error: an error occurred in processing the action rule.
- Blank/Skipped: The frequency/condition were not met for this project and PowerClerk skipped the action rule.

Video Guides
Would a video guide help to better explain Automations? Contact us and let us know.
A full list of all Video Guides can also be found here.
FAQs
Have additional questions? Contact us to nominate your FAQ and help others find answers to your own questions concerning this feature.
Create A Support Ticket
Not finding your answer here? Submit a question to our support team at the PowerClerk Ticket System and leverage the PowerClerk team’s expertise.