PowerClerk Support Center
- Program Design
-
- Automations
- Channels
- Communications
- Connections
- Content Library
- Custom API IDs
- Data Fields
- Deadlines
-
- Questions to ask yourself
- Locating the Deadlines feature
- What are Deadlines
- How to Create a Deadline
- Deadline Automation Action Rules
- Utilizing Project Admin Page for Deadlines
- Communication Templates for Deadlines
- Deadline Set/Satisfy Options
- Program-Wide Deadline Actions
- Reporting on Deadlines
- Deadlines in Project List Columns
- FAQs
- Document Templates
- eSignature Envelopes
-
- Questions to Ask
- Locating the eSignature Feature
- What are eSignature Envelopes?
- eSignature Checklist: The Prerequisites to create a new Envelope
- How to set up Advanced eSignature Envelopes Step-by-Step
- How to add an eSignature Envelope to a form
- eSignature Automation Trigger
- Viewing Completed eSignature Envelopes
- Resending eSignature Notifications
- Canceling eSignatures
- FAQs
- Forms
- Formulas and Calculated Fields
- Front Page
- Incentive Design
- Milestones
- Project List Columns
- Project Summary
- Project Views
- Roles
- Workflow
- Administration
- Tools Menu
- Integration Guides & API
- PowerClerk Video Guides
-
- New User Video Guide
- Setting up Business Days
- Dashboards
- FormSense
- Edit Forms - Tutorial #1
- Calculated Fields
- Build A Formula
- Milestones
- Edit Forms - Tutorial #2
- Project Summary
- Automation with Formulas in Action Rules
- Setting up Roll-up Reports
- Configuring Forms
- Roles and User Administration
- Formulas and Advanced Visibility Rules
- Visualize Workflows
- ArcGIS
- API
- SFTP Automatic Data Import
- Standard Web Adapter Setup
- PowerClerk Program Launch
- PowerClerk User Group Sessions (UGS)
- Learning Management System (LMS)
- Join us for Reflow!
- NEW: PowerClerk Certifications
Channels
Use Channels to synchronize data across programs and projects and create a hierarchy of relations between the two.
Locating the Channels feature
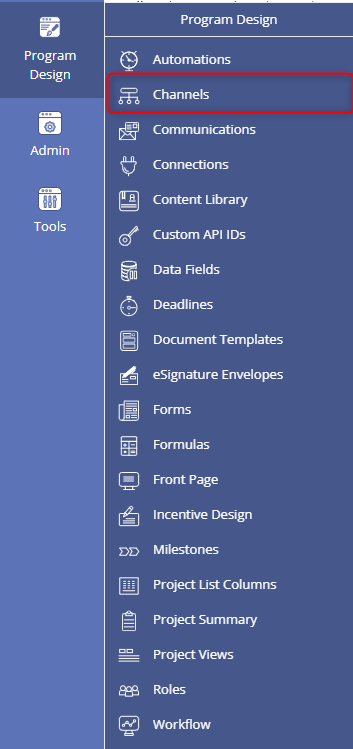
Anyone in a Role with the Manage Channels privilege can edit Channels by opening the PROGRAM DESIGN menu and clicking on Channels.This privilege can be granted by a CPR-Admin. Please submit a Ticket to the PowerClerk Ticket System if required.
What are Channels?
Channels create relationships between two projects. These relationships can exist for projects within the same program or between different programs. There are many different types of Channels. All Channels have the common goal of enabling project-level data to be de-siloed, typically through the action of relating projects to one another. Some Channel Types can share data or take action on a related project.
- Common use-cases for channels may include:
- A move in/move out process
- Applicants can submit multiple projects under the same Account
- Project Lookups
- Create sub-projects that follow their own workflow from a larger parent-project
Types of Channels
It is important to identify which Channel Type works best for your use-case. Each type has different attributes. For example, some types can exchange data values, some can be automated, and some create new projects while others relate existing projects. Below is a table with seven types of Channels and a brief description of each. To learn more about each Channel Type, their typical use-cases, and how to configure the Channel in your program(s), please navigate to that Channel’s configuration section.
| Type of Channel | Description | Common Use-Cases | How to Create Relationship |
|---|---|---|---|
| Mark as Child | Allows an admin to declare a project to be the child of another project. No data sharing. Multiple projects can become the children of one parent project. | Adding additions to an existing PV system An applicant submits multiple viable projects under the same account. |
Project’s Admin Page |
| Make Successor | Allows an admin to declare a project to be the successor of an existing project. Allows copying data from the previous project to the successor. Allows a Signal to be sent back to the previous project to take action. | Similar to Mark as Child, and: Move in/move out process Updates to an existing system where you want to copy information over and/or take action on the original project. |
Project’s Admin Page |
| Create Related Project | Allows creating a new, unsubmitted draft project with data copied over from the original project. Links the new project as related to the original. Allows the user to complete the new project’s first form with additional information. | A homeowner starts an application in an informational program about solar and needs to apply in the Interconnection program. A business needs to submit an application for EVSE Make Ready program and Incentive Program. | Project’s Admin Page or Project’s View/Edit Page |
| Submit Related Project | Allows creating a new, submitted project with data copied over from the original project. Links the new project as related to the original. Requires the original to have all the data necessary for the new project to submit its first form. | Similar to Create Related Project, and: Applying for an EV Incentive and subsequently applying for a Time-Of-Use Charging program. | Project’s Admin Page or by Automation Action Rule |
| Project Lookup | Finds a project within a program and outputs specific data fields. | To look up and verify Contractor or Customer account information.To look up a Pole Attachment work order | On Form Button or by Automation Action Rule |
| Mark as Related Lookup | Finds a project within a program and outputs specific data fields. Links the new project as related to the original. | Looking up which permits are associated with a certain project | Project’s Admin Page or Automation Action Rule |
| Create Related Project Table* | Allow adding information to a Project Table, creating one project per row in a secondary program and carrying data over. These sub projects undergo their own workflow and signal back to the parent project in the primary program. *CPRAdmin only design, requires set-up assistance. |
EV Rebate Programs: One application hosts multiple chargers for rebate. Pole Attachment Programs: A main project requires different work orders for each work item. |
On Form Project Table |
How to Create a Channel
Channels may be used to relate projects within a single program (intraprogram) or across multiple programs (interprogram). Either way, a CPR-Admin will need to add your program(s) to a Channel Group. Before creating a channel, please submit a Ticket to the PowerClerk Ticket System and request that your program(s) be added to their own Channel Group. Outline all the programs that should be included in this group.
Once your program(s) have been added to a Channel Group, every new Channel configuration has four major steps to complete set-up.
Step 1: Create a new Channel in the Publishing Program and configure.
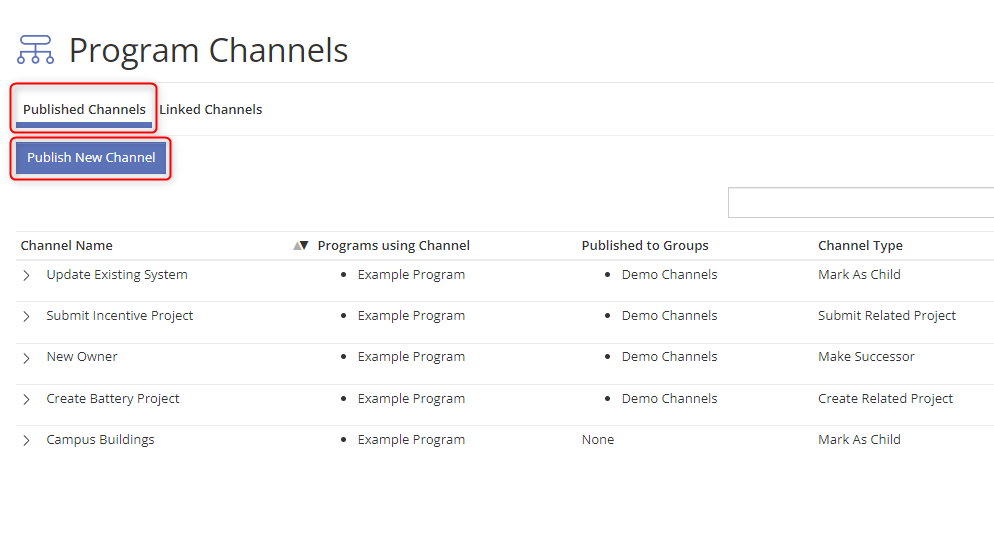
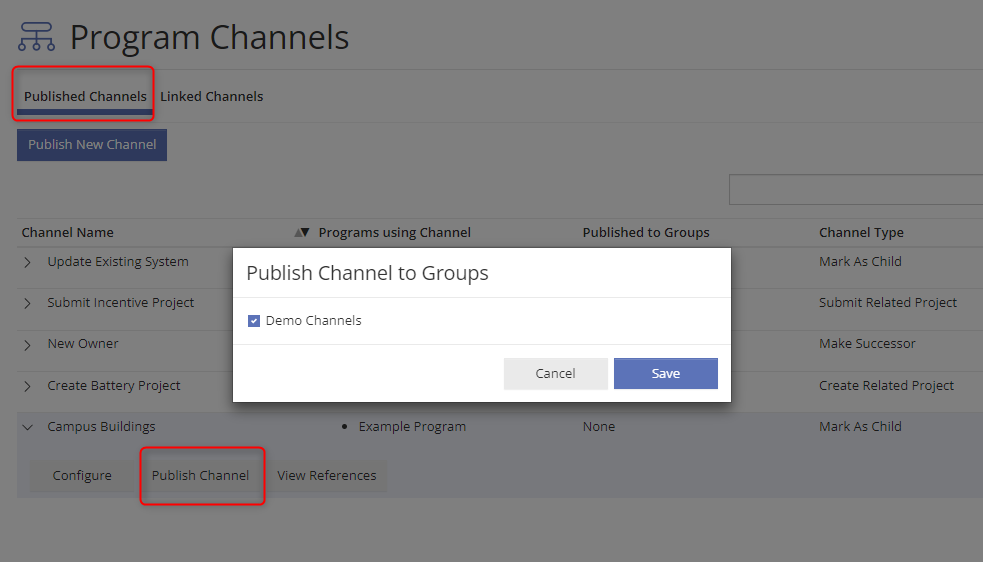
Step 2: Publish your Channel to the Channel Group.
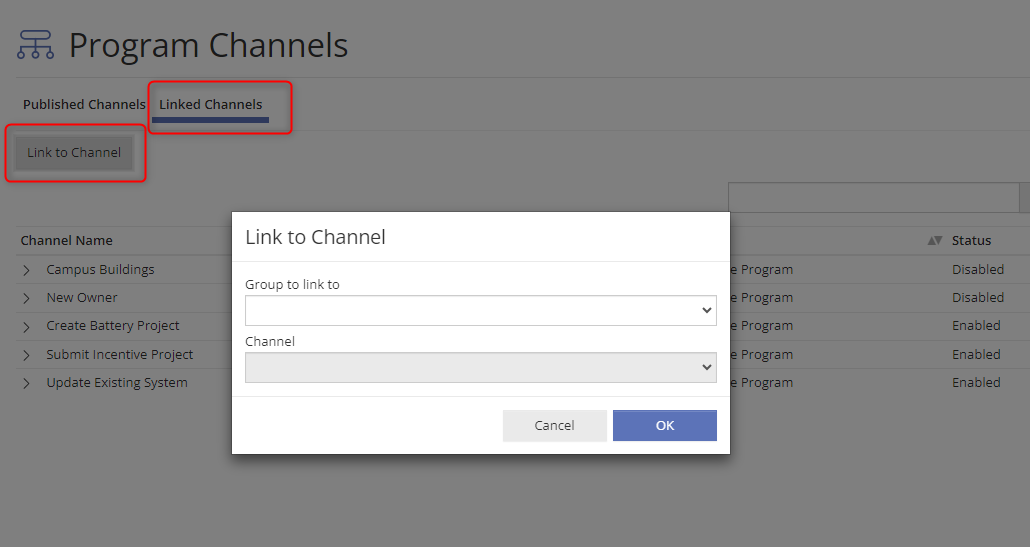
Step 3: Link your Channel in the Linked Program (or in the same program, if an intraprogram configuration). Complete configuration and enable the Channel.
Step 4: Add the Channel to your program’s processes. This may include adding it to Forms, creating Automation Action Rules and Triggers, and more.
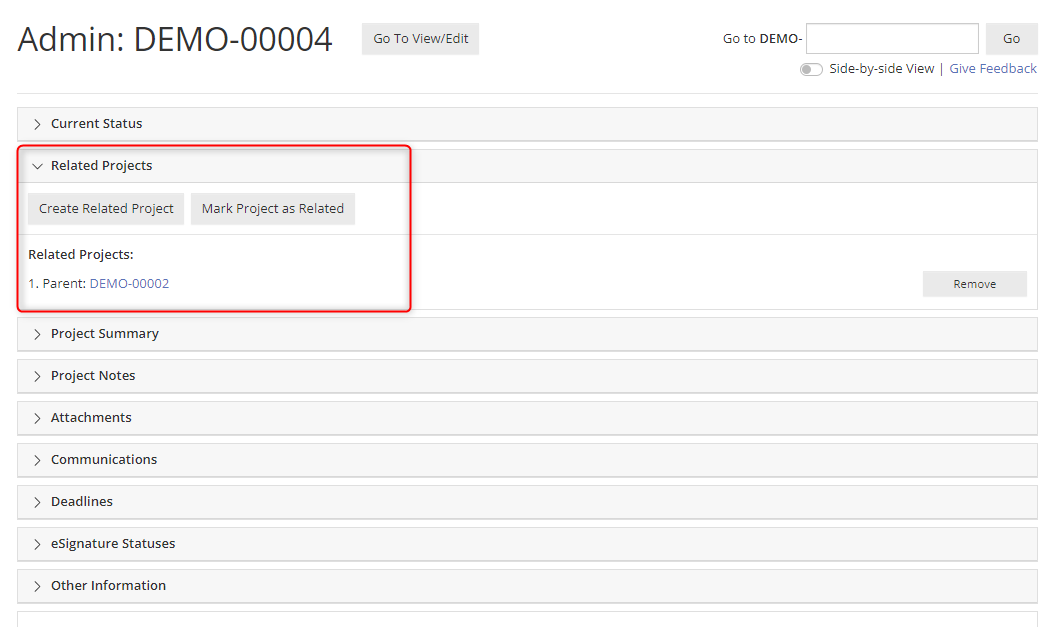
More information on the different Channel Types and their respective process for configuring can be found below.
Channel Signals and Automations
Many Channel Types, such as the Create Related Project channel can send and receive signals. Signals can be configured under Automations to take action on the project. Signals have two parts: when a signal can/should be sent, and what to do when a signal is received.
Sending Signals: Signals can be sent from the Publishing Program to the Linked Program or from the Linked Program to the Publishing Program. For example, in the Make Successor Channel Type, a signal can be sent from the Successor project to the Predecessor project.
- Immediately following the creation of the relationship. For example, as soon as you make a project a successor, you can send a signal to the predecessor project. This is automatic and no Automation Action Rules are required.
- Via Automation Action Rule. Set up an Action Rule under a specific Trigger, such as a Form Submit or Status Change to send a signal to the related project at a specific time. For example, when the successor project enters the status “PTO”, send a signal to the predecessor project.
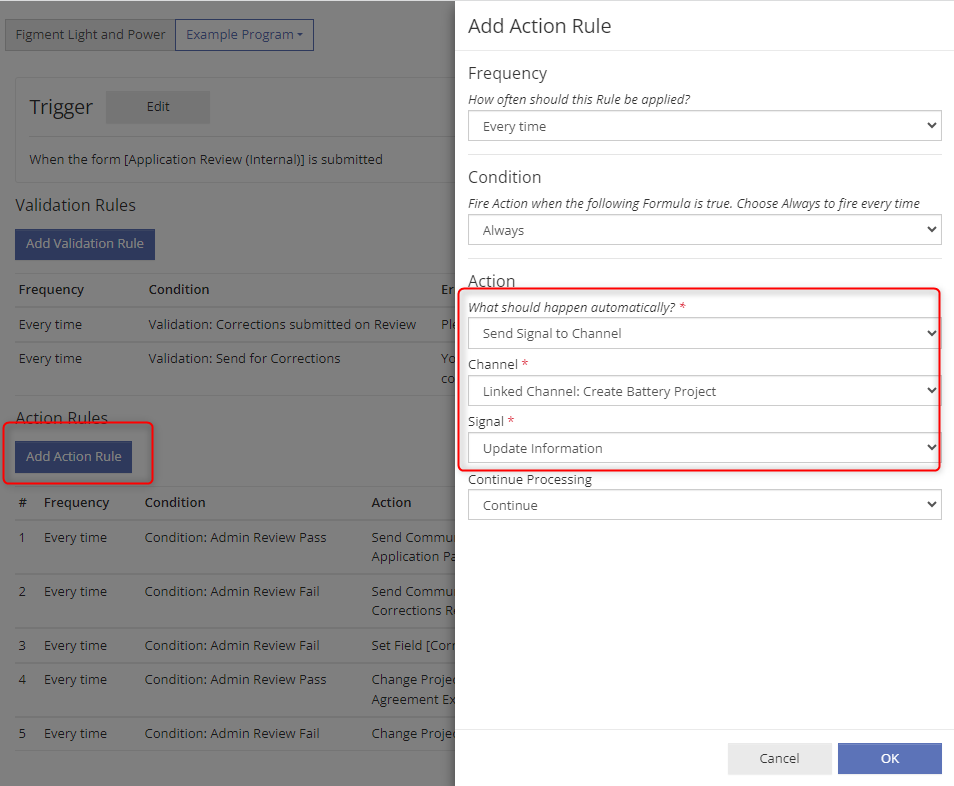
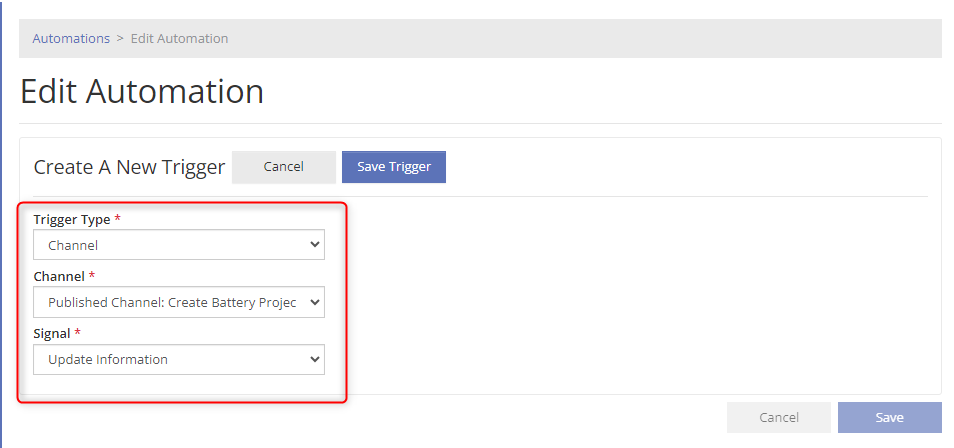
Receiving Signals: After you set up a signal send, configure what happens when a related project receives the signal. You will need to configure what actions the project should take once a signal is received from the related project. A received signal acts as an Automation Trigger and various action rules can be configured to run once the signal is received.
Using Channels in Test Environments
Creating a Channel in a Test Environment and Committing to Production
If you are creating a Channel in a Test Environment, please follow the same steps as described above for its creation. A few extra steps are required once the Test Environment is committed to Production.
Once the Channel has been created and tested, submit a Ticket through the PowerClerk Ticket System for your Test Environment(s) to be committed. When you submit a ticket, please also request that the Production Program(s) be added to a Channel Group by a CPR-Admin (if not already). You cannot access your Channel until it is added to a Channel Group.
Once the Test Environment is committed, please take the following steps in the Production Program(s):
- In the Publishing Program, navigate to Program Design >> Channels. On the tab “Published Channels”, publish the newly created Channel to the Channel Group.
- In the Linked Program, navigate to Program Design >> Channels and click on the “Linked Channels” tab.
- If a Linked Channel was created in the Test Environment, re-link the Channel to the Production Program. Locate the “Link Pending” option on the Table and complete the linking. Do not start a new link.
- If a Linked Channel was not created in the Test Environment, you will need to click “Link to Channel” to start a new link to the published channel.
- After the Channel has been linked, enable the Channel on the Linked Channel tab.
Note:
Intra-program Channel: If you are creating a Channel that is within this one program, the “publishing program” and “linked program” will be the same.
Inter-program Channel: If you are creating a channel that connects two programs, we recommend opening a Test Environment in both programs and requesting that the program with the publishing channel be committed first, followed by the program with the linked channel.
Testing an already-created Channel in a Test Environment
If you wish to open a Test Environment to test a Channel that already exists in Production, please follow the following steps in the Test Environment(s):
- Open Test Environment(s):
- Inter-program Channel: open the Test Environment for this program.
- Intra-program Channel: open Test Environments for both the Publishing program and the Linked program.
- Submit a Ticket through the PowerClerk Ticket System and request a CPR-Admin add the Test Environment(s) to a Channel Group.
- In the Publishing Test Environment Program, Navigate to Program Design >> Channels. On the tab “Published Channels”, publish the Test Environment Channel to the Channel Group.
- In the Linked Test Environment Program, navigate to Program Design >> Channels and click on the “Linked Channels” tab.
- Inter-program Channel: you will see the Channel on the Table already linked. Simply enable the Channel.
- Intra-program Channel: locate the “Link Pending” option on the Table. Re-link the Channel and enable. Do not start a new link.
- If the Channel was not previously linked in Production, create a new link by clicking “Link to Channel”. Only start a new link if the Channel was not previously linked.
After the Channel is enabled, use the Channel for testing purposes. If no edits were made to the Channel, no action is required when you commit your Test Environment(s). If edits are made to the Channel, please see the section above for actions to complete once the Test Environment(s) have been committed.
Video Guides
Would a video guide help to better explain Channels? Contact us and let us know.
A full list of all Video Guides can also be found here.
FAQs
Have additional questions? Contact us to nominate your FAQ and help others find answers to your own questions concerning this feature.
Create A Support Ticket
Not finding your answer here? Submit a question to our support team at the PowerClerk Ticket System and leverage the PowerClerk team’s expertise.