PowerClerk Support Center
- Program Design
-
- Automations
- Channels
- Communications
- Connections
- Content Library
- Custom API IDs
- Data Fields
- Deadlines
-
- Questions to ask yourself
- Locating the Deadlines feature
- What are Deadlines
- How to Create a Deadline
- Deadline Automation Action Rules
- Utilizing Project Admin Page for Deadlines
- Communication Templates for Deadlines
- Deadline Set/Satisfy Options
- Program-Wide Deadline Actions
- Reporting on Deadlines
- Deadlines in Project List Columns
- FAQs
- Document Templates
- eSignature Envelopes
-
- Questions to Ask
- Locating the eSignature Feature
- What are eSignature Envelopes?
- eSignature Checklist: The Prerequisites to create a new Envelope
- How to set up Advanced eSignature Envelopes Step-by-Step
- How to add an eSignature Envelope to a form
- eSignature Automation Trigger
- Viewing Completed eSignature Envelopes
- Resending eSignature Notifications
- Canceling eSignatures
- FAQs
- Forms
- Formulas and Calculated Fields
- Front Page
- Incentive Design
- Milestones
- Project List Columns
- Project Summary
- Project Views
- Roles
- Workflow
- Administration
- Tools Menu
- Integration Guides
- PowerClerk Video Guides
-
- New User Video Guide
- Setting up Business Days
- Dashboards
- FormSense
- Edit Forms - Tutorial #1
- Build A Formula
- Edit Forms - Tutorial #2
- Automation with Formulas in Action Rules
- Configuring Forms
- Formulas and Advanced Visibility Rules
- Calculated Fields
- Milestones
- Project Summary
- Setting up Roll-up Reports
- Roles and User Administration
- Visualize Workflows
- ArcGIS
- API
- SFTP Automatic Data Import
- Standard Web Adapter Setup
- PowerClerk Program Launch
- PowerClerk User Group Sessions (UGS)
- Learning Management System (LMS)
- Join us for Reflow!
My Account
Locating the My Account feature
All users can edit My Account information by opening the top profile icon menu and clicking on My Account:

How to use the My Account feature
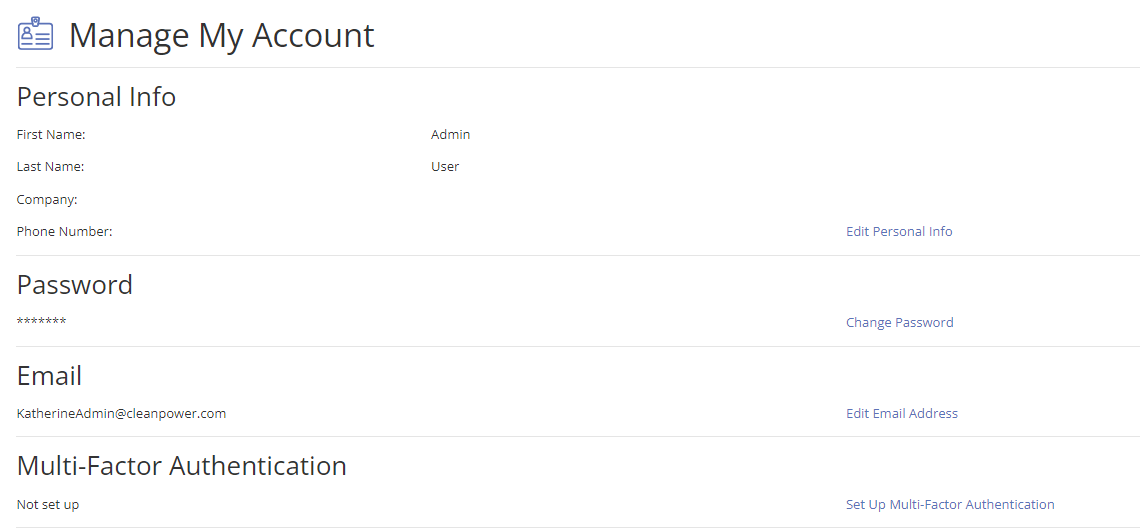
The My Account dialog allows you to edit personal info, change your password, or edit your email address for your PowerClerk account:

Please note: A secure password for PowerClerk must be at least 8 characters long and include at least one uppercase letter, one lowercase letter, and one number.
Setting up Multi-Factor Authentication
Certain features within PowerClerk, for example Sensitive Data Fields, require Multi-Factor Authentication (MFA) to confirm your identity within PowerClerk. Multi-Factor Authentication makes your account more secure by requiring a second factor in addition to your password to log into your account. In general, MFA requires you to provide ‘something you know,’ like a password, and ‘something you have,’ like a secret code stored uniquely on your mobile device. PowerClerk uses two-factor authentication:
FACTOR 1: Your regular PowerClerk username and password.
FACTOR 2: A 6-digit code that is generated on your mobile device every 30 seconds based on the secret shared between your device and PowerClerk. These codes are nearly impossible for anyone else to guess unless they have access to your mobile device.
Setting up your mobile device to provide this second factor of MFA requires you to install an authentication app on your mobile device. Multi-Factor Authentication has become a common standard to strengthen user login procedures. Below is a list of common authentication apps for Android, iOS, and Windows Phones, which will all work with PowerClerk:
- Android
- iOS
- Windows Phone
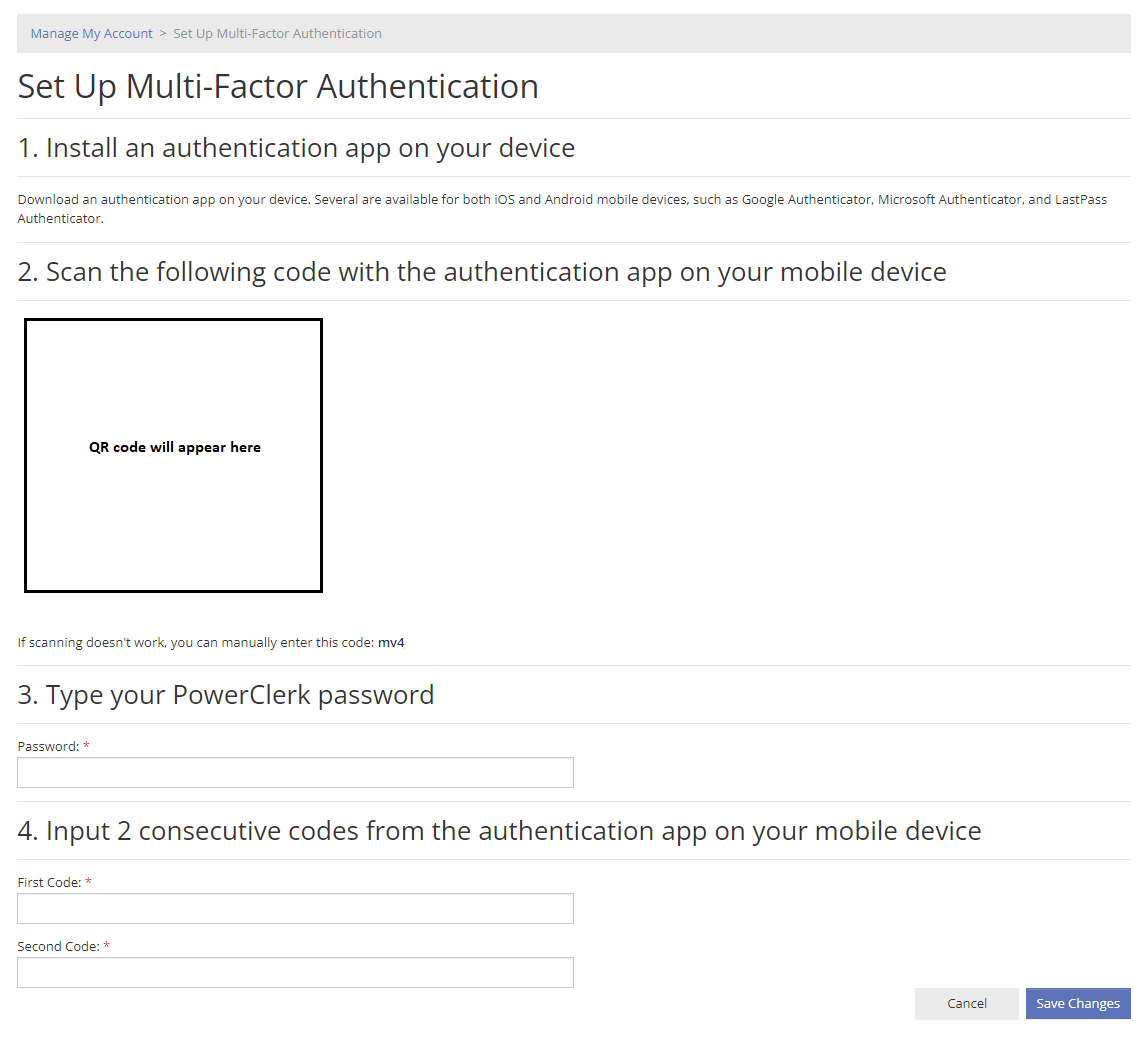
Once you have installed your authentication app, you can setup Multi-Factor Authentication by navigating within PowerClerk to The top profile icon>> My Account >> Set Up Multi-Factor Authentication:

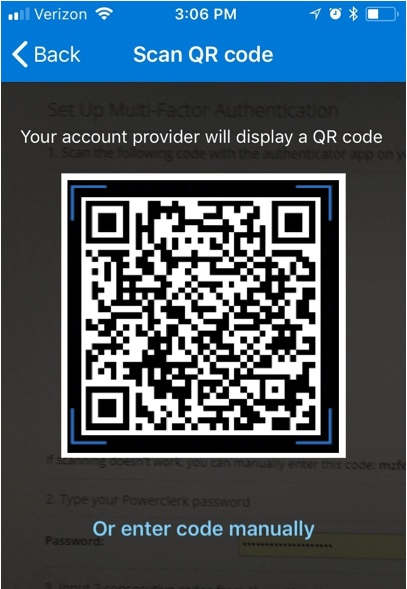
The setup dialog will present you with a QR Code for your convenience, which you can scan with your authentication app to ease this setup procedure. Alternatively you can also enter your individual setup code manually within your authentication app (which in the above screenshot is obfuscated as mzfyeh*********). See below in Figure 4 an example of how to scan the QR Code offered by PowerClerk within the Microsoft Authenticator app:

After you finished the above steps, your authentication app should be in sync with PowerClerk’s MFA and you can finalize Step 2 and Step 3 of this setup procedure within PowerClerk. Step 2 requires you to enter your usual PowerClerk password credential. Step 3 is where your mobile device’s authentication app can now provide you with two consecutive codes to be entered as shown in Figure 5 below (your codes will differ):

This completes your Multi-Factor Authentication setup and PowerClerk will be able to prompt you to authenticate using your mobile device authentication app.
Missing, lost, or stolen mobile devices: resetting Multi-Factor Authentication
If you have lost access to your authentication app (missing, lost, or stolen mobile device), please contact your program’s administrator immediately to reset your account’s Multi-Factor Authentication configuration. This will render your prior MFA setup obsolete and you must undergo the above setup procedure again once you have regained access to your mobile device or installed the authentication app on a new mobile device.
Disabling Multi-Factor Authentication
To disable Multi-Factor Authentication, please navigate to Top Profile Icon>> My Account >> Set Up Multi-Factor Authentication and click on Disable Multi-Factor Authentication. You will have to enter your regular PowerClerk password and a 6-digit Code from your mobile device’s authentication app to disable Multi-Factor Authentication for your PowerClerk account as shown below. Click on the Save Changes button once you are ready to remove Multi-Factor Authentication:

NOTE: Once you have removed Multi-Factor Authentication you will no longer be able to access data in some fields such as Sensitive Data Fields.
Recovery Guidelines for MFA Administrators
To implement Multi-Factor Authentication (MFA) for your program you will need to carefully consider your recovery options for MFA Users requiring assistance with their MFA setup. The general procedure for helping a user who has enabled MFA regain access to their account has 3 steps:
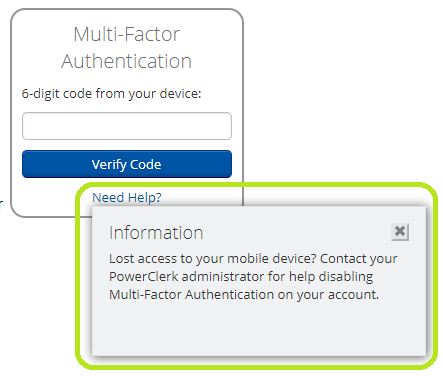
- The user attempts to log into PowerClerk but cannot provide an MFA code without access to their device, so they click the “Need Help” link. The “Need Help” link reveals a popup which informs the user who they can contact for help regaining access to their account.
- The user contacts the appropriate PowerClerk administrator offline for support disabling MFA on their account so they can regain access. The method of offline contact could be email, phone, or in-person if the user and administrator are located at the same physical facility.
- The administrator is responsible for authenticating the request, so for instance if the request comes via email or phone and the administrator is not personally acquainted with the requestor, the administrator should contact the requestor at a known phone number or email address to confirm the validity of the request before acting on it. Once the authenticity of the request has been verified, the administrator can disable MFA on the user’s account from the “Edit User” page for the requestor. (Note that the administrator must also have MFA enabled on their own account at least temporarily to disable MFA for another user.)
When implementing this procedure for your organization, you need to ensure that users who lose their mobile devices know whom to contact within your program, and how to provide valid identification to the administrators responsible for handling MFA support requests. The text of the “Need Help” message can be configured in the “Program Info” page to provide users with the appropriate contact information for MFA support requests.
Please review the following guidelines to implement a secure and tamper-proof MFA recovery procedure for your program:
- Any administrator role with the “Edit Users” privilege is capable of resetting MFA on the accounts of all users, and therefore should be treated as an MFA Administrator role. Your program must have at least two MFA Administrators to be able to reset Multi-Factor Authentication for users seeking MFA assistance within your program. It is important to have two administrators in case one is unavailable, or in the event that one of them loses access to their device and needs to regain access to their own account.
- Keeping the group of MFA Administrators small is key to minimize risk exposure of having too many administrators share the responsibility of MFA Administration. We recommend to limit this group’s size to 2 to 4 MFA Administrators, who are allowed to reset the MFA Configuration for your MFA Users.
- MFA Users losing access to their mobile device need to know how to restore access to their accounts by contacting your MFA Administrators. The MFA Support Text can be configured under Admin >> Program Info within PowerClerk as shown in Figure 7 and Figure 8 below:
 Figure 7: Program Info > MFA Support Text
 Figure 8: MFA Support Text
 - Your MFA Administrators need to adhere to a set recovery procedure to fail-safely verify MFA User’s identity before resetting the MFA Configuration for the user account in distress. This recovery verification procedure needs to include a tamper-proof form of identity verification, such as:
- Direct phone conversation with the MFA User on their new mobile device requiring the MFA User to provide sufficient proof of identity verbally.
- Submission of a previously stored master reset key phrase or a master reset password generated within your program’s infrastructure outside of PowerClerk, which had been confidentially delivered to each of your MFA Users during their initial MFA setup. This master reset password/phrase needs to be stored in a secure location and provided to the MFA Administrator to proceed with the recovery procedure.
- Face-to-Face authentication within the premises of your program’s utility headquarters.
You can choose the degree of safety requirements for your MFA recovery procedures according to your legislative requirements. Any of your MFA Administrators will have to have their own account secured with MFA to be able to initiate the recovery procedure for MFA User Accounts in distress.
If you have further questions on how to implement a secure and tamper-proof MFA recovery procedure for your program, please contact the PowerClerk Support Team for further information.
FAQs
Have additional questions? Contact us to nominate your FAQ and help others find answers to your own questions concerning this feature.
Create A Support Ticket
Not finding your answer here? Submit a question to our support team at the PowerClerk Ticket System and leverage the PowerClerk team’s expertise.
