PowerClerk Support Center

Program Design
Automations
Questions to Ask
Locating the Automations feature
How to create an Automation
Automation Triggers
Automation Action Rules
Validation Rules
Scheduled Triggers
Troubleshooting Automations
FAQs
Channels
Questions to ask yourself
Locating the Channels feature
What are Channels?
Types of Channels
Channel Type: Mark as Child
Channel Type: Make Successor
Channel Type: Create Related Project
Channel Type: Submit Related Project
Channel Type: Project Lookup
How to create a Channel
Channel Signals and Automations
Using Channels in Test Environments
FAQs
Communications
Questions to ask yourself
Locating the Communications feature
Creating Communication templates
Finding Data Tags
Bulk Communications via Data Import
Images in Communications
Project Attachments and Content Library Items
Smart Templates
Upgrading to Smart Templates
Upgrading when a Test Environment Exists
Broken Template Tags
Examples of Broken Template Tags
PowerClerk Bulk Email Communication Policy
FAQs
Connections
Questions to ask yourself
Locating the Connections feature
What are Connections
How to Create a Standard Web Adapter
Define the Standard Web Adapter
Connecting, Testing, and Enabling the Web Adapter
Creating a Standard Web Adapter Configuration
Utilizing Connections on PowerClerk
Maintaining and Editing the Web Adapter
Web Adapter Payload Type Format
Supported Message Versions
Error Handling
Custom List Lookup
Create a Custom List Lookup
Utilizing Custom List Lookup
FAQs
Content Library
Questions to ask yourself
Locating the Content Library feature
Uploading content to the Content Library
Use with Communication Templates
Use for Front Page content
FAQs
Custom API IDs
Questions to Ask
Locating the Custom API IDs feature
How to edit a Custom API ID
FAQs
Data Fields
Questions to ask yourself
Locating the Data Fields feature
How to work with Data Fields
Custom Lists and Data Field Groups
Table form element
PV System + batteries element
FAQs
Deadlines
Questions to ask yourself
Locating the Deadlines feature
What are Deadlines
How to Create a Deadline
Deadline Automation Action Rules
Utilizing Project Admin Page for Deadlines
Communication Templates for Deadlines
Deadline Set/Satisfy Options
Program-Wide Deadline Actions
Reporting on Deadlines
Deadlines in Project List Columns
FAQs
Document Templates
Questions to ask yourself
Locating the Document Templates feature
How to define a new Template
How to define a new Merged Document
eSignatures
DocuSign template tags
Mapping eSignature tags
Smart Templates
FAQs
eSignature Envelopes
Questions to Ask
Locating the eSignature Feature
What are eSignature Envelopes?
eSignature Checklist: The Prerequisites to create a new Envelope
How to set up Advanced eSignature Envelopes Step-by-Step
How to add an eSignature Envelope to a form
eSignature Automation Trigger
Viewing Completed eSignature Envelopes
Resending eSignature Notifications
Canceling eSignatures
FAQs
Forms
Questions to ask yourself
Locating the Forms feature
How to create and edit Forms
Adding data fields
Configuring Forms
VersaForms
Sensitive Data Fields
FAQs
Formulas and Calculated Fields
Questions to ask yourself
Locating the Formulas feature
How to work with Formulas and Calculated Fields
Formula Data Dictionary
Dynamic Formula References
Rules of Formula References
Advanced Visibility Rules
Video Guides: Formulas
FAQs
Front Page
Questions to ask yourself
Locating the Front Page feature
How to edit the Front Page
FAQs
Incentive Design
Questions to ask yourself
Locating the Incentive Design feature
How to create and edit Incentive Designs
Incentive Options for One-Time Incentive Type
Incentive Design Options
FAQs
Milestones
Questions to ask yourself
Locating the Milestones feature
How to define a Milestone
FAQs
Project List Columns
Questions to ask yourself
Locating the Project List Columns feature
How to use Project List Columns
FAQs
Project Summary
Questions to ask yourself
Locating the Project Summary feature
How to edit the Project Summary
FAQs
Project Views
Questions to ask yourself
Locating the Project Views feature
How to edit Project Views
FAQs
Roles
Questions to ask yourself
Locating the Roles feature
How to create and edit a Role
Access Groups
Access Groups and Automations
Access Groups and Data Imports
Access Groups and Reports
FAQs
Workflow
Questions to ask yourself
Locating the Workflow feature
How to create and edit the Workflow
Transitions
Workflow Example Overview
FAQs
Administration
Business Days
Questions to ask yourself
Locating the Business Days feature
Setting up Business Days
FAQs
Dashboards
Questions to ask yourself
Locating the Dashboards feature
How to create widgets in your Dashboard
Other Dashboard Actions
Data Import
Questions to ask yourself
Locating the Data Import feature
Steps to Complete a Data Import
Data Import Configurations
Column Header Types
Automatic Data Imports via SFTP
FAQs
Duplicate Check
Questions to ask yourself
Locating the Duplicate Check feature
How to use Duplicate Checks
FAQs
Import Projects
Questions to ask yourself
Locating the Import Projects feature
How to Import From V2
FAQs
Operation Status
Questions to ask yourself
Locating the Operation Status feature
How to use the Operation Status feature
FAQs
Program Info
Project Inquiry
Locating the Project Inquiry feature
How to edit the Project Inquiry Settings
Automating Communications for Project Inquires
Inquiry Summary
Questions to ask yourself
Locating the Program Info feature
How to edit the Program Info menu
Notification Banners
Usage Info
FAQs
Program Statistics
Questions to ask yourself
Locating the Program Statistics feature
How to use Program Statistics
FAQs
Reports
Questions to ask yourself
Locating the Reports feature
How to setup Reports
Multi-instance reports
Sharing Reports
Integrate scheduled Reports
Cross-Program Reports
FAQs
Test Environment
Questions to ask yourself
Locating the Test Environment feature
How to setup a Test Environment
FAQs
User Administration
Questions to ask yourself
Locating the User Administration feature
How to work with User Administration
FAQs
Tools Menu
My Account
Questions to Ask
Locating the My Account feature
How to use the My Account feature
Setting up Multi-Factor Authentication
Missing, lost, or stolen mobile devices: resetting Multi-Factor Authentication
Disabling Multi-Factor Authentication
Recovery Guidelines for MFA Administrators
FAQs
FormSense
Questions to Ask
Locating the FormSense feature
How to use the FormSense feature
FAQs
Grant Access
Questions to Ask
Project Grants vs Broad Grants (i.e. "Grant Access")
Locating the Project Grant feature
Locating the Grant Access feature
How to use the Grant Access feature
FAQs
Integration Guides
ePayments
Questions to ask yourself
Locating the ePayments History feature
How to add ePayments
FAQ
PowerClerk API
Questions to Ask
What is the PowerClerk API?
What can the PowerClerk API do?
Integrating with the PowerClerk API
API Documentation for Developers
Single Sign On (SSO)
Questions to Ask
PowerClerk SSO Configuration
Azure AD Configuration (SAML)
Azure AD Configuration (OIDC)
Okta IDP Configuration (SAML)
SP Configuration
SSO for multiple programs
IDP Configuration Troubleshooting
FAQs
Integration Guide 001: How to configure a Web Adapter – ArcGIS Implementation
Integration Guide 002: How to configure Electric Power Research Institute’s (EPRI) DRIVE Connect software with PowerClerk
PowerClerk Video Guides
New User Video Guide
Setting up Business Days
Dashboards
FormSense
Edit Forms - Tutorial #1
Build A Formula
Edit Forms - Tutorial #2
Automation with Formulas in Action Rules
Configuring Forms
Formulas and Advanced Visibility Rules
Calculated Fields
Milestones
Project Summary
Setting up Roll-up Reports
Roles and User Administration
Visualize Workflows
ArcGIS
API
SFTP Automatic Data Import
Standard Web Adapter Setup
PowerClerk Program Launch
PowerClerk User Group Sessions (UGS)
Learning Management System (LMS)
Join us for Reflow!

Single Sign On (SSO)

SSO provides added security and improves the login experience for utility program administrators. When admins are logged on to their internal networks, they can access PowerClerk without having to log in again.

SSO feature


Questions to ask yourself about SSO:

What SAML 2.0 SSO provider can I use?
Why would I want to use SSO for my PowerClerk program?
How can I configure SSO for my program?

PowerClerk SSO Configuration

Single sign-on (SSO) is a session and user authentication service, which allows a user to create only one set of login credentials to access multiple applications. The service authenticates the end user for all the applications the user has been given rights to and eliminates the need to further prompt the user when switching applications during the same session.
 

Please note: SSO is available as an additional feature for PowerClerk (like web adapters). Please contact your PowerClerk Account Executive if you would like to add the SSO feature to your program. Implementing your SSO solution is possible with a variety of identity providers (IDPs). For example you can use the services of the following IDPs:

 
Before you begin configuration, make sure that you have a user account for the PowerClerk program you intend to configure. This will allow you to properly test the configuration, including the SAML responses.
 
The remainder of this webpage describes how to set up SSO for a PowerClerk program. The setup requires creating and configuring an application within your IDP. Also, certain information must be provided to CPR to configure PowerClerk as the Service Provider (SP). The sections below provide directions for configuration through Azure AD and Okta.
 

Azure AD Configuration (SAML)

To configure Azure AD for PowerClerk, follow the steps outlined in the following Microsoft tutorial:
 
https://docs.microsoft.com/en-us/azure/active-directory/manage-apps/configure-single-sign-on-non-gallery-applications.
 
In Step 1.6, the “Identifier (Entity ID)” needs to be configured is as follows:

  • Sandbox: https://<program_name>.cleanpowerdemo.com/PCITrial/
  • Production: https://<program_name>.powerclerk.com/

…and the “Reply URL” is:

  • Sandbox: https://<program_name>.cleanpowerdemo.com/PCITrial/MvcAccount/Login/Acs
  • Production: https://<program_name>.powerclerk.com/MvcAccount/Login/Acs

[where program_name is the host name of the PowerClerk program, found in the browser URL].
 
Please note: the other three (3) settings in Step 1.6 (i.e. Sign-on URL, Relay State, Logout URL) *do not* need to be configured (i.e. they should be left blank).
 
In Step 2, the following five (5) attributes need to be configured:

  • FirstName
  • LastName
  • Email
  • UserId
  • PowerClerkRoles (optional)

Please note: Within Azure >> Entra administrative interfaces, please ensure any optional Attributes and Claims >> Namespace fields are left unset and empty.
 
The optional PowerClerkRoles attribute will contain the name of the role in PowerClerk that the user should be assigned to (look to Figure 7 of the Okta configuration, below, for an example). This attribute may be omitted by setting up a default role that will automatically be assigned to new users, reach out to your PowerClerk representative to configure. See the following link for details on setting up application-defined roles:
 
https://docs.microsoft.com/en-us/azure/active-directory/develop/active-directory-enterprise-app-role-management
 
If you are unsure on what roles need to be set up on your side, either 1.) ask your internal colleagues who are administering the PowerClerk program, or 2.) log in to PowerClerk and navigate to Program Design > Roles. If you don’t have a PowerClerk account, please request one from an internal colleague that has a PowerClerk user account with administrative privileges.
 
Please note: Azure AD will give an error when the role called “Program Designer” has a space in between “Program” and “Designer”. The workaround is to rename the role (in both PowerClerk and Azure AD) to a naming convention similar to the following examples: “ProgramDesigner”, “Program-Designer”, or “Program_Designer”.
 
From Step 3, CPR needs to be given the SAML Signing Certificate (click the blue “Download” hyperlink for “Certificate (Base64)”). Please note: never send us your private Certificate key, only the public key. Please ensure that the SAML Signing Certificate provided is trusted by a public Certification Authority (CA).
 
From Step 4, CPR needs to be given the “Login URL” and “Azure AD Identifier“.


Azure AD Configuration (OIDC)

To configure Azure AD as an OIDC provider to use with PowerClerk, follow the steps in the following Microsoft tutorial: https://learn.microsoft.com/en-us/azure/active-directory/develop/quickstart-register-app
When setting up redirect uris, use values as follows:

  • Sandbox: https://<program_name>.cleanpowerdemo.com/PCITrial/MvcAccount/Login/OAuth2Redirect
  • Production: https://<program_name>.powerclerk.com/MvcAccount/Login/OAuth2Redirect


Redirect URIs

Figure 1: Redirect URIs


In Token Configuration, add the following claims to the access token:

  • email
  • family_name
  • given_name

 
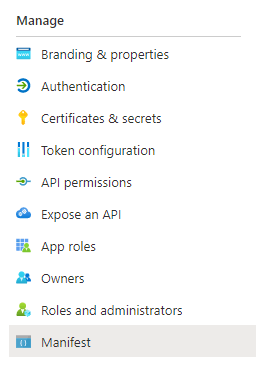
Click Manifest:
 

Manage Manifest

Figure 2: Manage Manifest


Set accessTokenAcceptedVersion to 2. Click Save. Click Expose an API:
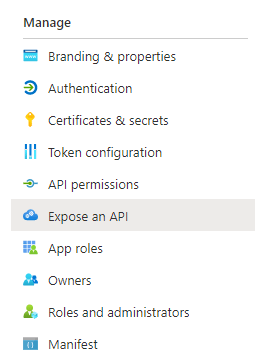
 

Expose an API

Figure 3: Expose an API

 
Add a scope, give it a name to inform users the permissions they are giving to PowerClerk (email, first, and last name). Share the scope name with your PowerClerk representative, something like “api://00000000-0000-0000-0000-000000000000/PowerClerk”
Under Certificate & Secrets, create a Client Secret, share the value with your PowerClerk representative, along with the Client Id.
 

Okta IDP Configuration (SAML)

Create a new application in Okta and choose SAML as the sign on method.
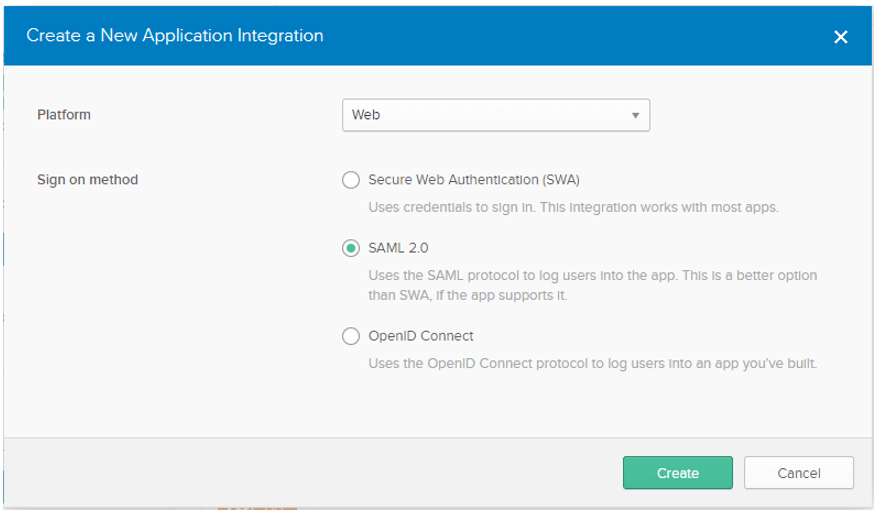
 

Choose SAML as sign on method

Figure 4: Choose SAML as sign on method

 
In Figure 5, below, the Single sign-on URL and Default RelayState, need to be configured as follows:

  • Sandbox: https://<program_name>.cleanpowerdemo.com/PCITrial/MvcAccount/Login/Acs
  • Production: https://<program_name>.powerclerk.com/MvcAccount/Login/Acs

[where program_name is the host name of the PowerClerk program, found in the browser URL].
 
and the “Audience URI (Entity ID)” is:

  • Sandbox: https://<program_name>.cleanpowerdemo.com/PCITrial/
  • Production: https://<program_name>.powerclerk.com/

…and for the “Name ID format” select “EmailAddress”.
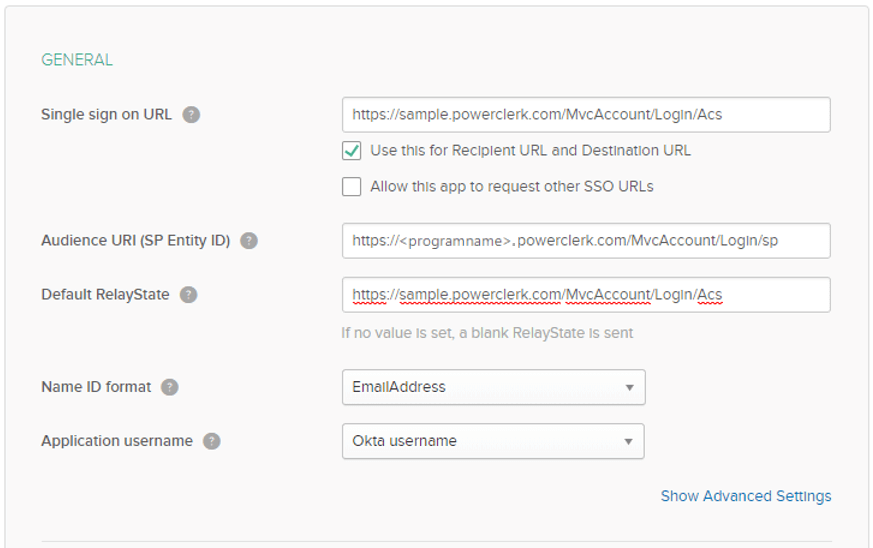
 

Setting Default RelayState

Figure 5: Configuration Settings


Add 4 entries to the Attribute Statements section for the first name, last name, email, and user id, as shown below:
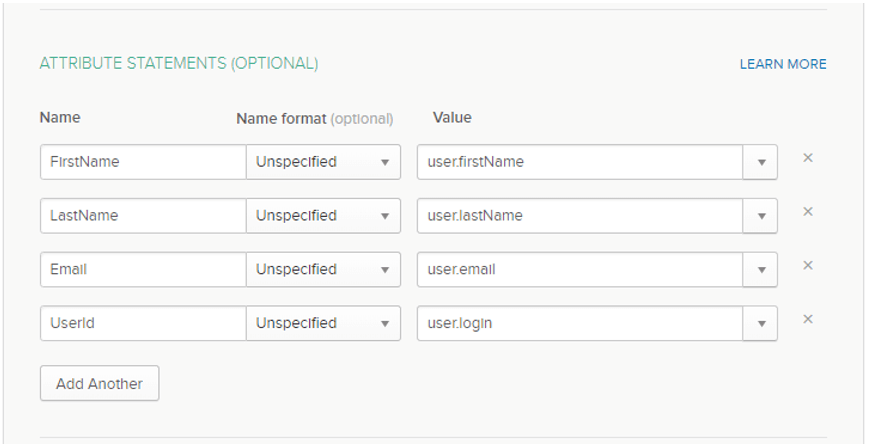
 

Adding Attribute Statements

Figure 6: Adding Attribute Statements


If you are using IDP-configured roles, add 1 entry to the Group Attribute Statements section with the name “PowerClerkRoles”. This will be a regular expression which selects Okta Group Names to pass to PowerClerk to use as the Role. For example, if the PowerClerk Roles are Administrator, Applicant, and Program Designer, the regular expression would be “(Applicant|Administrator|Program Designer)”. Each user must belong to exactly 1 Okta group which has a name that matches the name of a Role in PowerClerk.


Group Attribute Statements

Figure 7: Group Attribute Statements


SP Configuration

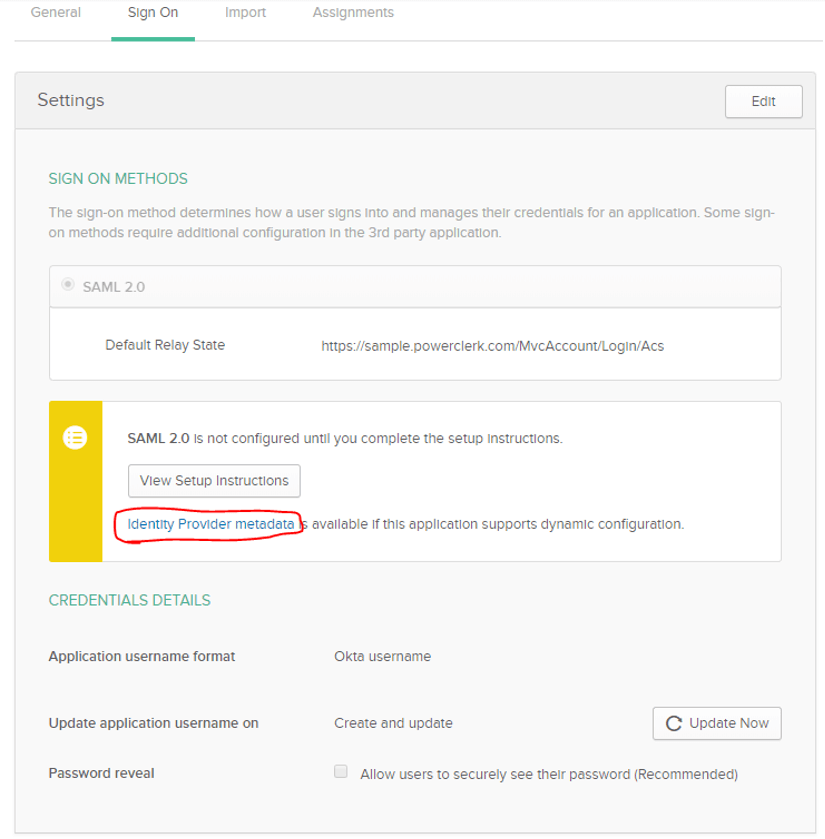
After creating the Okta application, click the “Identity Provider metadata” link in the Settings section. This will generate an XML file that should be sent to CPR. The XML contains the data required to configure PowerClerk to communicate with the IdP application.


SP Configuration

Figure 8: SP Configuration


By default, if a user is not logged in, the front page in PowerClerk will show a link to Okta’s login page. After logging in through Okta, the user is redirected back to PowerClerk. Alternatively, a program can provide a custom URL that the user will be used instead of PowerClerk’s front page.


Configuring SSO for use with multiple PowerClerk Programs

PowerClerk supports multiple IDPs from the same directory, so that you can use SSO with more than one PowerClerk program. Specifically, PowerClerk does not require the login page of a specific program to unconditionally redirect to the page starting the IdP-initiated login. If you use the same EntityID for both programs, you must also use the same Certificate for both programs.
 
Individual/unique Certificates and EntityIDs can also work. Your IDP should be running in IDP-initiated mode. Note that if you want to be able to login by clicking anything in PowerClerk (which in SAML terminology is the Service Provider == SP), SP-initiated MUST also be enabled.
 

Using Azure AD as an example:

In addition to CPR requiring the Login URL (i.e. SignOnURL), Azure AD Identifier (i.e. EntityID), and Certificate for each PowerClerk Program, we will also need the User Access URL from you, which is what we use as the redirect URL for PowerClerk. Allowing CPR to configure your redirect URL on our end will prevent the user from being booted back to the login page (when switching between programs) where they would be forced to click the “SSO” hyperlink to log into the 2nd program (see image below):
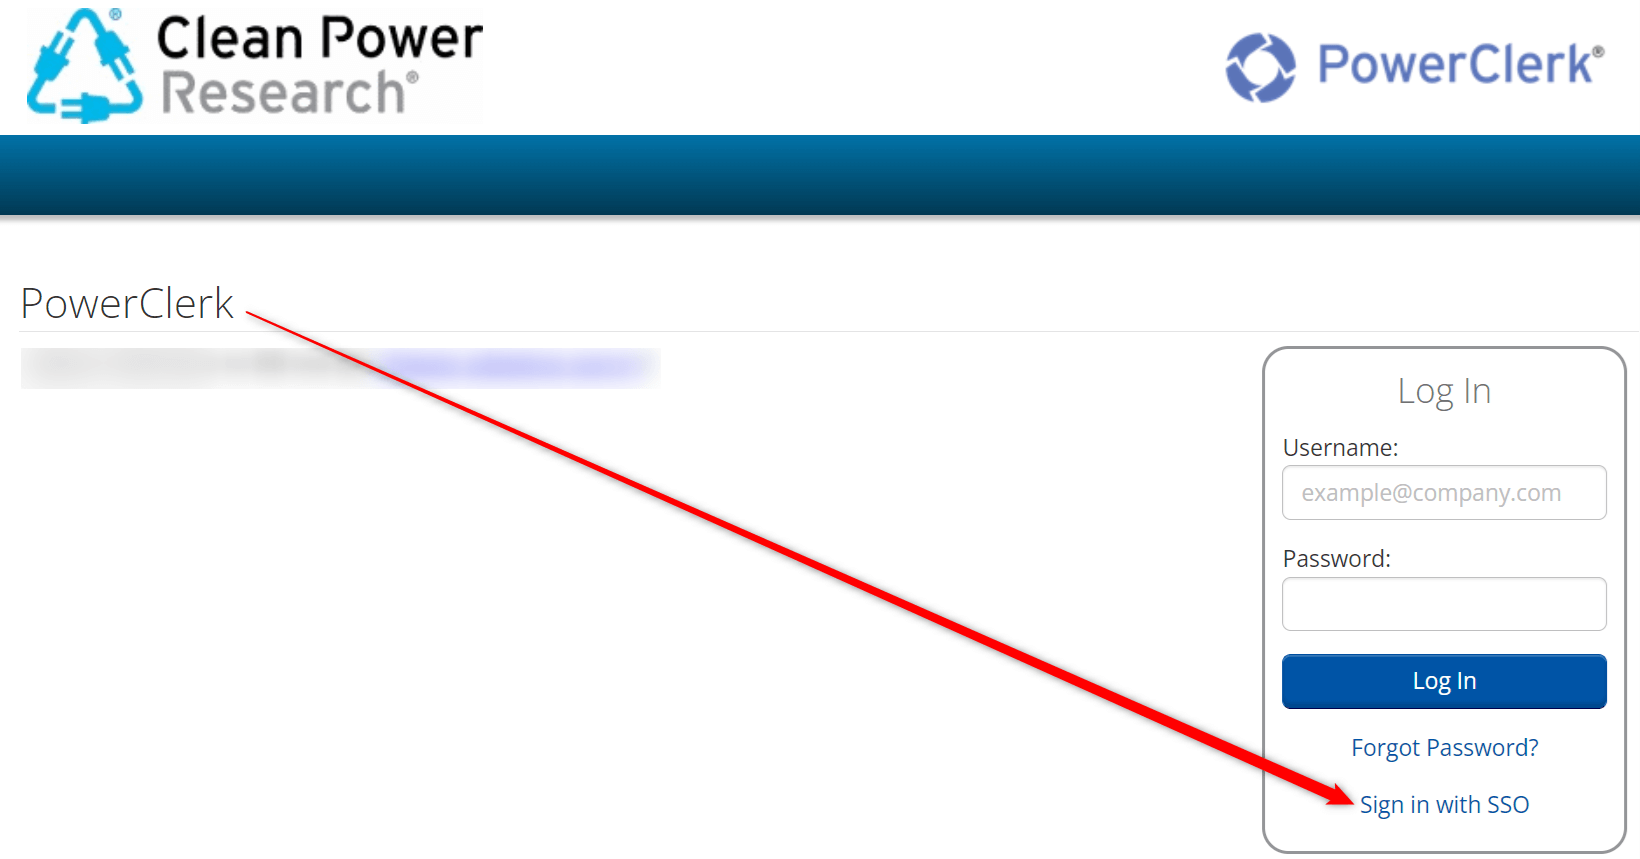
 

Sign in with SSO

Figure 9: Sign in with SSO


Configuring the redirect URL removes this intermediate step and allows the switching between programs to be seamless from a UI perspective, to mimic how it works without using SSO, when using the “Change Program” drop-down menu inside PowerClerk:
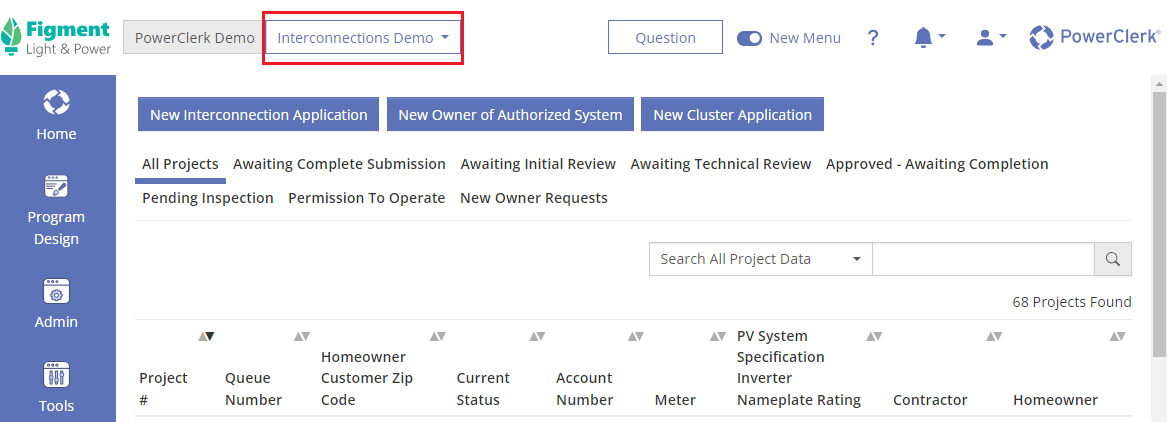
 

Change Program

Figure 10: Change Program


Please note that the “User Access URL” is found outside of the SSO configuration and in the IDP app properties itself. To find the “User Access URL”, follow these steps for Azure (other IDPs will differ):
 

  1. Navigate to Azure Enterprise apps and click the app that has the User Access URL (e.g. this should be the name of your PowerClerk program):
     

    Azure Enterprise apps

    Figure 11: Azure Enterprise apps


  2. Then click “Properties” on the left-hand panel:
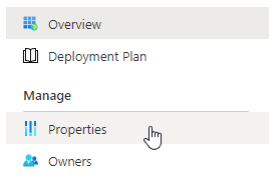
     

    Azure Enterprise apps - Properties

    Figure 12: Azure Enterprise apps – Properties


  3. On the right side, the User Access URL will be shown for apps with SSO configurations:
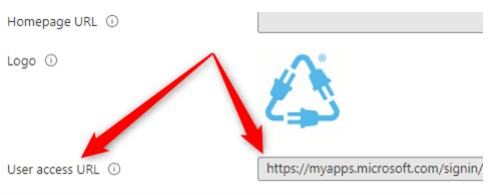
     
  4.  

    User Access URL

    Figure 13: User Access URL


IDP Configuration Troubleshooting

To troubleshoot your IDP configuration, there are extensions available, such as the Chrome “SAML Tracer” extension, which is a tool for viewing SAML and WS-Federation messages sent through the browser during single sign-on and single logout. Such SAML tracer will let you watch what claims are sent when you go to login to PowerClerk, which would look similar to the below:

If you are having trouble getting your IDP configuration to work, plan on reaching out to your PowerClerk support representative (or support@powerclerk.com) to work through the following steps:

  • Step 1: Send us a screenshot of your IDP configuration, so we can cross-check what you have configured in terms of the Entity ID, Reply URL, etc.
  • Step 2: Send us a screenshot of the SAML error message you are receiving and attach the SAML Response and SAML Request .xml files.
  • Step 3: If possible, create an account in your IDP and send us the credentials so that we can login to further troubleshoot your configuration.
  • Step 4: CPR will set up a screenshare session with you to go over the configuration.

FAQs

Q: I am getting error “Attempted to call SAML ACS without valid ‘UserId’”. What does this mean?
A: The error means that the UserID attribute (discussed in the Azure AD configuration, Step 2) has not been configured. In this case, the .xml file shows: The attribute needs to be configured to read “UserId”.
Q: Should my installers use SSO?
A: Since installers could potentially be submitting applications in your program as well as another customer’s program, CPR’s recommended best practice is that installers use “local login” to log in via the PowerClerk login page (so that they can access multiple programs within their portal). In other words, if the installer was part of two (2) programs, and logged into your PowerClerk via your SSO IDP, they would only be able to see your program (not both programs). Your CPR representative can turn “local login” on, which would allow users in your program to log in via SSO or the PowerClerk login page (with traditional username and password credentials).
Q: Is there more than one way to log in via SSO?
A: Yes, there are two (2) ways to log in to PowerClerk with SSO:
  • SP initiated: click the “Sign in with” SSO link on the PowerClerk login page
  • IDP initiated: log into your IDP, click the link, and you're in PowerClerk
Q: Can PowerClerk accommodate multiple IDP configurations, to separate groups (e.g. Internal Administrators, External Installers, etc.)?
A: Yes, but before considering this approach, see if these groups can be delineated by using PowerClerk Roles instead.
Q: Once our SSO IDP integration redirects our customers to PowerClerk, does the user need to remain authenticated at our website or does PowerClerk take up the user engagement/ session within PowerClerk at that point?
A: Once the SSO login is complete, PowerClerk manages the session and the user no longer needs to be logged in to your utility website.
Q:Will the user need to log out of the session? Or is the expectation that the user’s session be terminated at our website?
A: The PowerClerk session will last until the user logs out, closes the window, or the session times out.  The users actions at your website will not affect the PowerClerk session.
Q: Will the session timeout due to inactivity? How long?
A: It's a sliding expiration window of one hour which is refreshed after half an hour. So worst case is 31 minutes.
Q: Do you have a preference if the users are connected to PowerClerk in a new tab or a new window?
A: No preference; but if you launch a new tab for PowerClerk, we can close that tab when the user logs off. This is a better user experience.
Q: While configuring SSO for PowerClerk on our side, my IDP is asking me for a metadata file. Can CPR provide a metadata file?
A: No, CPR does not have a PowerClerk metadata file to provide. Rather, you just need to configure the IDP with the sign-on URL and the Entity ID.
Q: I received the following error: “No providers recognized that match the issuing IDP”
A: This happens when the IdP sends you to one PowerClerk program with the assertion meant for another program. In other words, whatever entity is in the incoming assertion is not configured as a SSO provider for the program.
Q: Should the “UserID” attribute be set to be the user’s email address
A: No, because the typical IdP will change that if the email address of the user changes. Instead, if the email address is “samplename123@gmail.com”, set the “UserID” attribute to “samplename123”. Alternatively, you can just use GUIDs (e.g. “6d977409-b213-4c96-a738-1bbb10e9e742”) or a string similar to PowerClerk’s public IDs (e.g. “83L0p3z17901”) – anything that sticks with the account even in the case of email/name changes.
Q: I am receiving the following error: "SP-Initiated SSO is not enabled”
A: This error is an example of a message contained in the SAML assertion that YOUR side is sending to us. It is not us claiming that SP-initiated SSO is off; rather, it is the assertion you are sending.
Q: What is the Issuer ID?
A: The Issuer ID = EntityID; this needs to match between what is configured inside the IDP on the utility side and what is configured on the PowerClerk side.
Q: What is an example of a correct role attribute to be sending from your IDP SAML?
A: Please note: Taking the above syntax as a direct example would mean there would need to be a role called “SampleRoleName” inside the PowerClerk Program, under the “Roles” page.
Q: On the User Administration page, I show up as an SSO user. But when I am in the Test Environment, I show up as NOT a SSO user – why?
A: You don’t show up as an SSO user in the Test Environment unless you logged into the Test Environment with a separately configured IDP.
Q: I am receiving an error saying "SAML recipient doesn’t match the local service provider name or assertion consumer service URL"
A: Your SAML assertion doesn’t include a “Destination”. This is what your assertion may look like: - screenshot placeholder- And here is what our other customer’s assertion looks like, that are using SSO successfully with PowerClerk. We would recommend matching this: - screenshot placeholder- For example, Okta has this checkbox: - screenshot placeholder- In terms of the “PowerClerkRoles” attribute, let’s add some additional clarity. In between “Please note….” and “From Step 3…..”, include the following: -screenshot placeholder - If you are receiving this error message: -screenshot placeholder - Your IDP (e.g. Azure) will need to set the attribute, as outlined in Step 2. PowerClerk roles need to be mapped to Azure groups so that you can manage access to PowerClerk based on membership. See this Microsoft article for details on setting up application-defined roles. Here is an example showing defined PowerClerk custom roles inside your Azure IDP: - screenshot placeholder - Here are some example users added to the roles inside Azure: - screenshot placeholder - The IDP needs to pass these roles back to PowerClerk when signing in so the IDP knows what access each user should have. Here is a SAML trace example, so you can see how the “PowerClerkRoles” attribute is delineated: - screenshot placeholder - We are looking for Azure to show the authentication was successful. The SAML will need to have attributes that look like the following: - screenshot placeholder -
Q: Once I have all the Roles, and before I go to PATCH and “Run Query” in Graph – am I copying everything (all the code) in the bottom half, pasting in the top half (Request Body) and replacing the “AppRoles” section? Or am I just copying the AppRoles section (that I just created with all the roles) and pasting the new one into the top half (Request Body) of the page and then running the PATCH/Run Query?
A: You are only pasting the appRoles section into the request body. That's the only section you're patching.
Q: Also, the “id” is different for each, I am assuming that I will user the Object ID for that field in each?
A: No, the objectID you have highlighted is for the group. That's not needed for anything here. You are not using the Azure generated Object ID for those groups in PowerClerk. Simply use https://www.guidgenerator.com/ to create a unique value for each and add that to the AppRoles code.
Q: I am getting the following error: "Malformed JSON body - Review the request body and fix any malformatted JSON..."
A: Check for a dangling comma and make sure to enclose the whole thing in brackets. Here is an example from Google: -screenshot placeholder-
Q: I ran the patch to add the appRoles section to what is displayed in the request body, and now the appRoles are reflected in the image below, on the right side column, however, I am now getting this error from Run Query: "Bad Request - 400"
A: Change the “isEnabled” value to “false” then go back in and set the correct AppRoles. Change your query to the original GET and look at the appRoles section to make sure. After all that, you can go and add groups to your app in the gui and choose a role. You must be sure you've got your syntax right or you'll get an error. Also, the syntax needs to be enclosed in brackets (but cross-check this with sources available on the internet to be sure). Then add the roles in your IDP and then assign the role, for example: - screenshot placeholder -

Have additional questions? Contact us to nominate your FAQ and help others find answers to your own questions concerning this feature.

Create A Support Ticket

Not finding your answer here?  Submit a question to our support team at the PowerClerk Ticket System and leverage the PowerClerk team’s expertise.