PowerClerk Support Center
- Project Pages
- Program Design
-
- Automations
- Channels
- Communications
- Connections
- Content Library
- Custom API IDs
- Data Fields
- Deadlines
-
- Questions to ask yourself
- Locating the Deadlines feature
- What are Deadlines
- How to Create a Deadline
- Deadline Automation Action Rules
- Utilizing Project Admin Page for Deadlines
- Communication Templates for Deadlines
- Deadline Set/Satisfy Options
- Program-Wide Deadline Actions
- Reporting on Deadlines
- Deadlines in Project List Columns
- FAQs
- Document Templates
- eSignature Envelopes
-
- Questions to Ask
- Locating the eSignature Feature
- What are eSignature Envelopes?
- eSignature Checklist: The Prerequisites to create a new Envelope
- How to set up Advanced eSignature Envelopes Step-by-Step
- How to add an eSignature Envelope to a form
- eSignature Automation Trigger
- Viewing Completed eSignature Envelopes
- Resending eSignature Notifications
- Canceling eSignatures
- FAQs
- Forms
- Formulas and Calculated Fields
- Front Page
- Incentive Design
- Milestones
- Project List Columns
- Project Summary
- Project Views
- Roles
- Workflow
- Administration
- Tools Menu
- Integration Guides & API
- PowerClerk Video Guides
-
- Setting up Roll-up Reports
- New User Video Guide
- Configuring Forms
- Roles and User Administration
- Setting up Business Days
- Formulas and Advanced Visibility Rules
- Visualize Workflows
- Dashboards
- ArcGIS
- FormSense
- API
- Edit Forms - Tutorial #1
- SFTP Automatic Data Import
- Calculated Fields
- Web Connector Setup
- Build A Formula
- Milestones
- Edit Forms - Tutorial #2
- Project Summary
- Automation with Formulas in Action Rules
- PowerClerk Program Launch
- PowerClerk User Group Sessions (UGS)
- Learning Management System (LMS)
- Join us for Reflow!
- NEW: PowerClerk Certifications
Project Inquiry
Use the Project Inquiry feature to configure Dynamic Customer Messaging.
Locating the Project Inquiry feature
Anyone in a Role with the ‘Edit Program Info’ privilege can edit this setting by opening the Admin menu and clicking on Program Info:
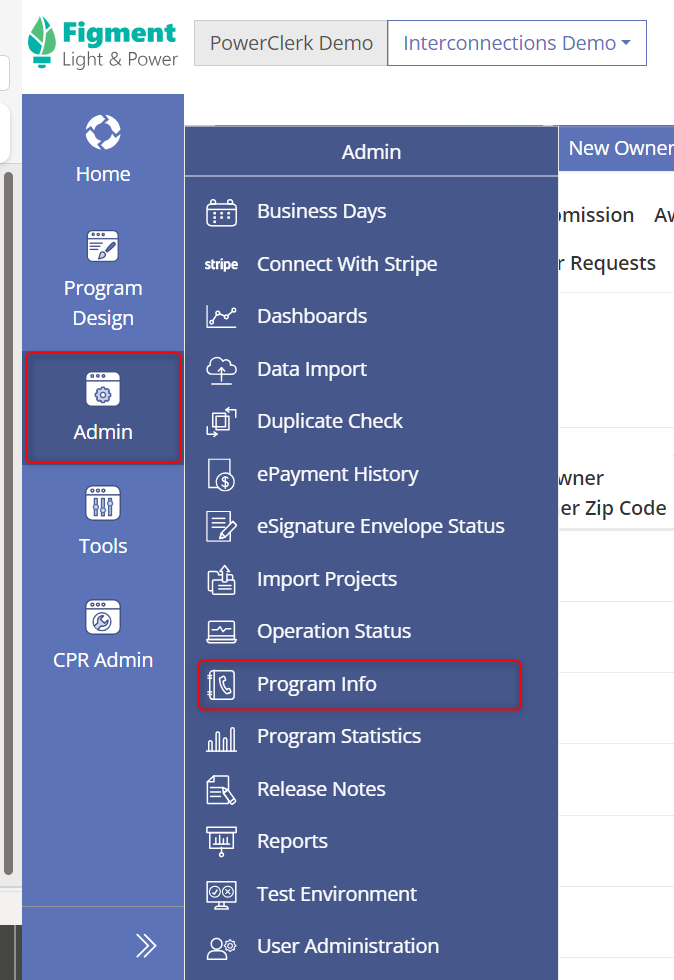
How to edit the Project Inquiry Settings
If you do not see the Program Inquiries section, a Program Admin will need to submit a ticket via the ticket system in PowerClerk in order to have the feature enabled.
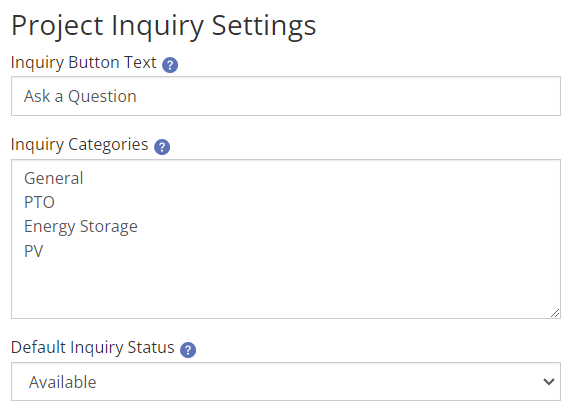
The Project Inquiry settings allow you configure the information the users see when selecting the “Inquiry Button”.
The “Inquiry Button Text” allows a custom text to appear for the button on the menu bar that users select when creating a new project inquiry thread.
The “Inquiry Categories” setting allows you to create available categories for users to select when creating a new project inquiry thread. NOTE: You must enter at least one “Inquiry Category” into this field to enable the Project Inquiry feature.
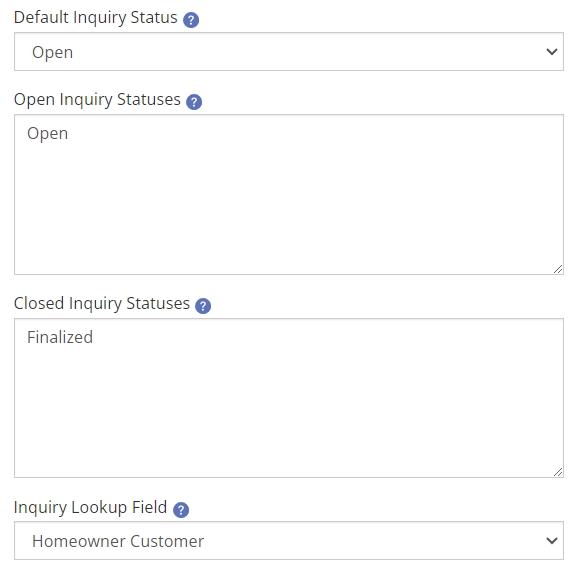
The statuses an inquiry can be moved to can be customized. Statuses configured in the ‘Open Inquiry Statuses’ will be selectable by admin users to keep the inquiry thread open. Statuses configured in the ‘Closed Inquiry Statuses’ will be selectable by admin users to close the inquiry thread, preventing further notes from being added.
The “Inquiry Lookup Field” is an optional data field that is displayed when a project is selected while a user is creating a new project inquiry thread. For example, the “Homeowner Customer” data field selected below will show the Homeowner Customer’s contact information when a new thread is being created.
By default, inquiry threads will be visible to both the project owner and admin users on the View/Edit Page of a project. Checking the ‘Show Project Inquiries on the Project Admin Page?’ will also show the Inquiries section on the Admin Page.
The checkbox “Allow program administrators to create new Project Inquiry threads?” will enable the “Project Inquiry Button” to appear on admin users PowerClerk Portal, allowing admin users to create new inquiry threads on projects.

Once these settings are saved, the PowerClerk user will now see the Project Inquiry button appear in the menu bar (“Ask a Question” in this example).

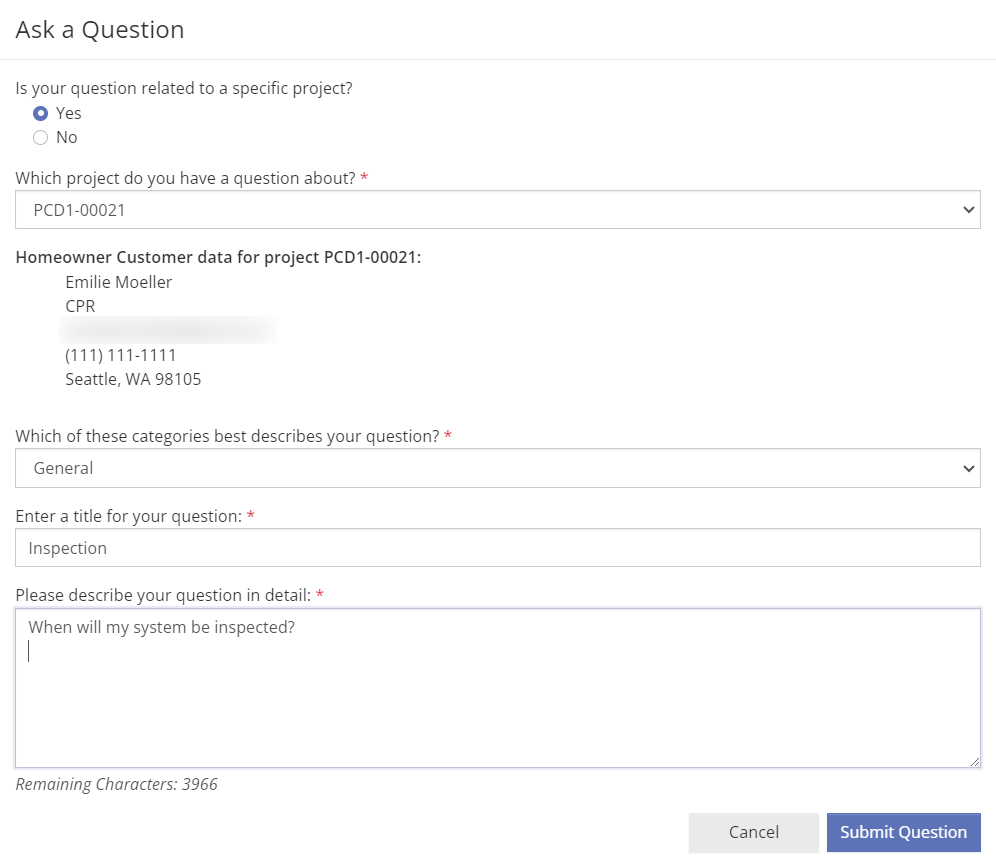
The Project Inquiry button allows a user to “Ask a Question” in regard to a specific project within PowerClerk.
When the inquiry button is selected from a project page, it will select the current project as the topic for the inquiry. Otherwise, the project drop down menu will allow the user to select the specific project in question and will populate with the settings you chose within the Project Inquiry settings page. As you can see below, since we selected the “Homeowner Customer” data field, that customer’s contact information appears within the inquiry thread.
The user must select an Inquiry Category from the drop-down to submit their question.
The “Ask a Question Threads” will now be visible within the View/Edit project page for any user that has access to the project.
To reply to an inquiry thread, select “Add Reply” from the project’s View/Edit page.

The reply will populate directly below the initial inquiry with a timestamp of the reply.

Admin users also have the option of “Closing” the project inquiry thread. Select the “Change Inquiry Status” button adjacent to the “Add Reply” button to select the inquiry status.


Automating Communications for Project Inquires
To set up automated communication alerts for Project Inquiries, begin by creating communication templates using the template tags provided in the next section.
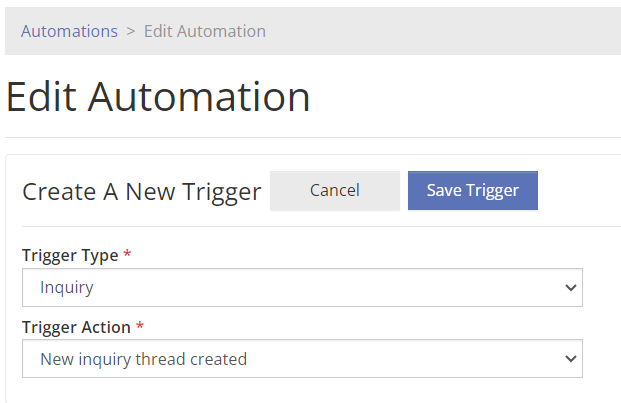
By selecting the Inquiry automation trigger you can enable actions based on a “New Inquiry Thread Created” or a “New Reply to an Inquiry Thread”:
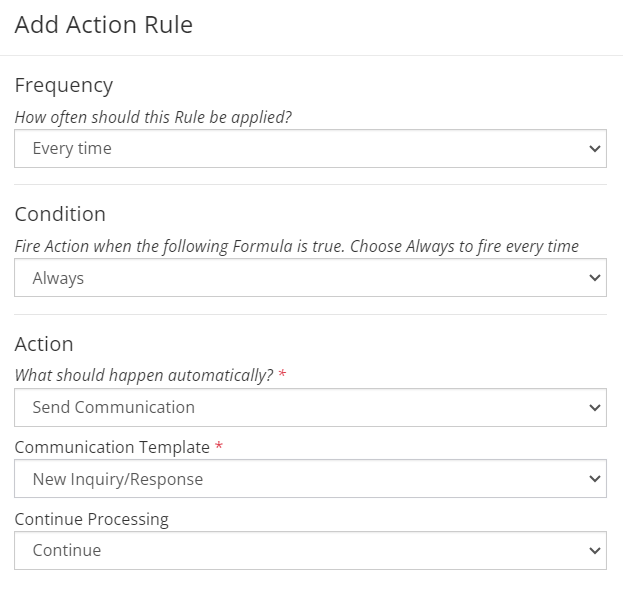
From there, automation action rules can be created to send out specific communication templates.
Inquiry Template Tags
The following template tags can be used in context of Communication templates being sent out with Automation >> Action rules:
| Inquiry Template tag | Function |
|---|---|
| {InquiryNoteContent} | Displays the content of the inquiry |
| {InquiryNotePublicId} | Displays the PublicID of the inquiry |
| {InquiryNoteAuthorEmail} | Displays the inquiry author’s email |
| {InquiryNoteAuthorName} | Displays the inquiry author’s name |
| {InquiryNoteTimestamp} | Displays the timestamp of the inquiry |
| {InquiryThreadName} | Displays the thread name of the inquiry |
| {InquiryThreadCategory} | Displays the thread category of the inquiry |
| {InquiryThreadPublicId} | Displays the public ID of the inquiry |
| {InquiryThreadExternalId} | This template tag allows an external systems integration to use a custom ID, if necessary |
| {IsNewThread} | This will either emit True or False |
Please note: These template tags will only be useful for Communications triggered as actions from an inquiry automation.
Inquiry Summary
The “Inquiry Summary” feature within “Tools” allows administrators to keep track of every open and closed customer inquiry within PowerClerk.

As default, the Inquiry Summary page shows only “Open” inquiries. Checking the “Include closed Inquiries” box will enable the admin user to view every inquiry within PowerClerk.

Administrators can dig deeper into each inquiry summary by selecting the arrow to the left of the Inquiry Title. This dropdown will show every inquiry within that specific project. From here the user has the ability to reply to the inquiry, go to the projects Admin or View/Edit screen, and change the status of an inquiry.

FAQs
Have additional questions? Contact us to nominate your FAQ and help others find answers to your own questions concerning this feature.
Create A Support Ticket
Not finding your answer here? Submit a question to our support team at the PowerClerk Ticket System and leverage the PowerClerk team’s expertise.