PowerClerk Support Center
- Program Design
-
- Automations
- Channels
- Communications
- Connections
- Content Library
- Custom API IDs
- Data Fields
- Deadlines
-
- Questions to ask yourself
- Locating the Deadlines feature
- What are Deadlines
- How to Create a Deadline
- Deadline Automation Action Rules
- Utilizing Project Admin Page for Deadlines
- Communication Templates for Deadlines
- Deadline Set/Satisfy Options
- Program-Wide Deadline Actions
- Reporting on Deadlines
- Deadlines in Project List Columns
- FAQs
- Document Templates
- eSignature Envelopes
-
- Questions to Ask
- Locating the eSignature Feature
- What are eSignature Envelopes?
- eSignature Checklist: The Prerequisites to create a new Envelope
- How to set up Advanced eSignature Envelopes Step-by-Step
- How to add an eSignature Envelope to a form
- eSignature Automation Trigger
- Viewing Completed eSignature Envelopes
- Resending eSignature Notifications
- Canceling eSignatures
- FAQs
- Forms
- Formulas and Calculated Fields
- Front Page
- Incentive Design
- Milestones
- Project List Columns
- Project Summary
- Project Views
- Roles
- Workflow
- Administration
- Tools Menu
- Integration Guides & API
- PowerClerk Video Guides
-
- New User Video Guide
- Setting up Business Days
- Dashboards
- FormSense
- Edit Forms - Tutorial #1
- Calculated Fields
- Build A Formula
- Milestones
- Edit Forms - Tutorial #2
- Project Summary
- Automation with Formulas in Action Rules
- Setting up Roll-up Reports
- Configuring Forms
- Roles and User Administration
- Formulas and Advanced Visibility Rules
- Visualize Workflows
- ArcGIS
- API
- SFTP Automatic Data Import
- Standard Web Adapter Setup
- PowerClerk Program Launch
- PowerClerk User Group Sessions (UGS)
- Learning Management System (LMS)
- Join us for Reflow!
- NEW: PowerClerk Certifications
Document Templates
Generate documents based on project data to simplify communications and contracts.
Questions to ask yourself about Document Templates:
What electronic or paper documents are required in the process?
What kind of documents should be downloadable? Will require eSignatures?
Which Data Fields should be populated within my document?
Are there requirements to keep a paper copy of certain Forms?Do my documents currently exist in a standard text editor format (like Word)?
Locating the Document Templates feature
Anyone in a Role with the Edit Document Templates privilege can add Document Templates by opening the PROGRAM DESIGN menu and clicking on Document Templates:

How to Define a New Template
To define a new Document Template, please click on the New Template Definition button and choose the type of Document Template (.docx, .xlsx, or .pdf), name your new template, and optionally enter a brief description for your new template. You also have the option to append the Project Number to a generated document template. This improves the quality of life for admins who are managing multiple projects and documents and need to have a unique identifier tied to their documents. If you choose to ‘append the Project Number’ to the generated Document Template, we suggest adding a “-“ after the Document Template Name to separate the name from the number.
Please Note: If you do not see the .xlsx template type, please have your Program Designer reach out to support via the PowerClerk ticket system to enable this feature for your program.
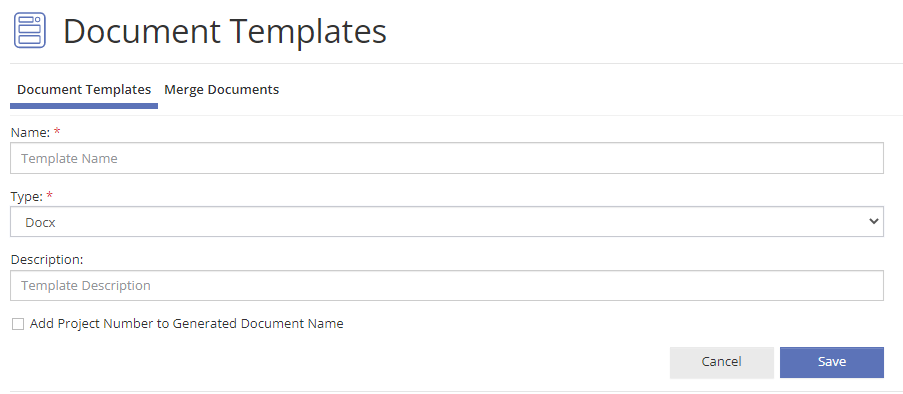
To upload the template, expand your new template definition (by clicking the green “+” icon) and select Upload New Template. This dialog lets you browse to your document template and upload it to PowerClerk:

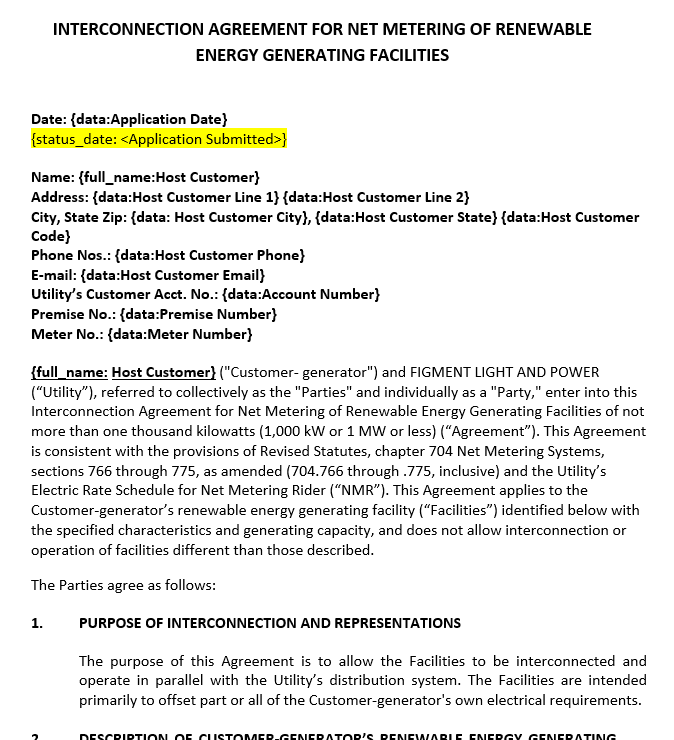
Please note: the Document Template feature allows you to define Data Field references within your template. This way you can populate project data within your template and pre-format your documents with required information. See below an example of a Word document, where the header section is populated with a range of Data Fields used within that program, inserted in with the proper Data Field curly brace tags. Within your Forms you can generate the finalized document and offer it for download to your installer or customer, keep as an internal copy and/or send for eSignature.
Configuring Word Documents as Document Templates using PowerClerk Data Field Tags
The Document Template feature allows you to define Data Field references within your Word Document template. This way you can populate project data within your template and pre-format your documents with required information. See below an example of a Word document, where the header section is populated with a range of Data Fields used within that program, inserted in with the proper Data Field curly brace tags. Within your Forms you can generate the finalized document and offer it for download to your installer or customer, and/or have an Automation generate the document to be sent out as an Attachment on a Communication, and/or keep as an internal copy, and/or send for eSignature.
Configuring Fillable PDFs as Document Templates using PowerClerk Data Field Tags
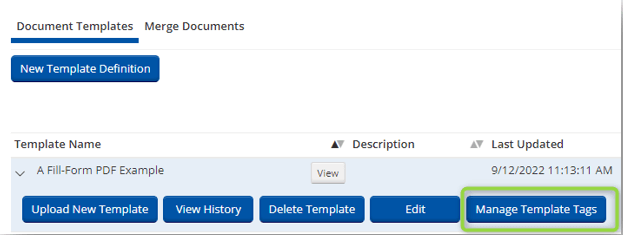
PowerClerk’s Document Template feature is compatible with fillable PDFs. You can assign PowerClerk data fields to populate the PDF’s fillable fields. To configure a document template using a Fillable PDF as the source document, upload the PDF as a Document Template. Then click the Manage Template Tags button as shown below:
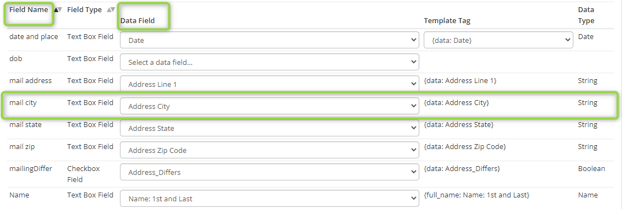
On the Manage Template Tags page, PowerClerk will display the PDF fillable fields as Field Names. Assign the PowerClerk Data Field that you wish to populate to the respective PDF field. The Data Field must match the Field Type from the PDF such as Text Box fields and Checkbox fields. Select Save once configured:
Please note: PDFs cannot be used for documents requiring E-Signature.
Configuring Excel Files as Document Templates using PowerClerk Data Field Tags
The Document Template feature allows you to define Data Field references within your .XLSX document template. This way you can populate project data within your template and pre-format your documents with required information. See below an example of a .XLSX document, where the sheet is populated with Data Fields used within that program, inserted with the proper Data Field curly brace tags.
Within your Forms you can generate the populated document and offer it for download to your installer or customer, and/or have an Automation with an action rule to ‘Generate Attachment’ to be sent out as an Attachment on a Communication.
Please Note: Document Templates generate on a per-project basis. If you would like to expose Program-wide data in Excel, see Reports.
XLSX document templates allow the user to generate an Excel document with data from a project populated using either the “pcdata” or “pctable” sheet tags. By populating these sheets with raw project data from PowerClerk, users can then use Excel functionality to generate final Excel versions of project documents (e.g. Itemized Bills, Attestation Forms, Work Orders, etc.).
Checklist for Creating your XLSX Document Template using “pcdata”:
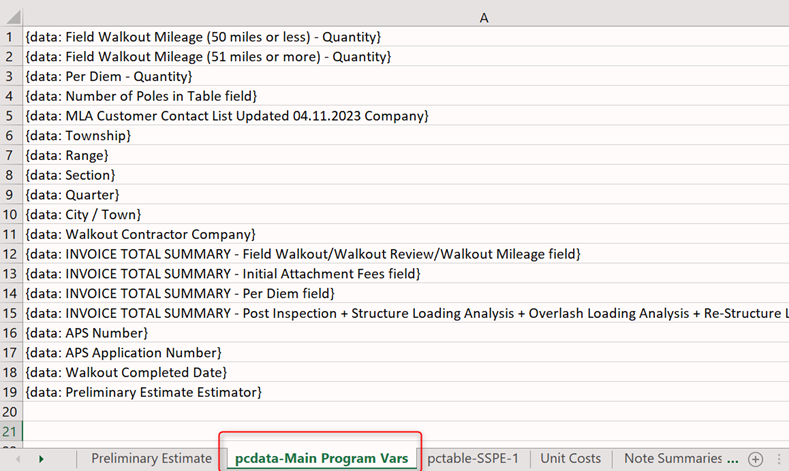
- Name the sheet pcdata–raw/other description
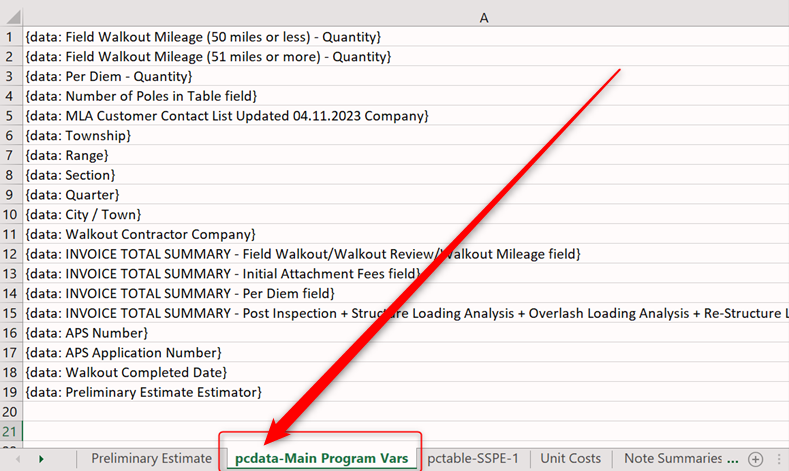
- In the example below, Figure 7 shows the raw/other description as “Main Program Vars”. This part is your choice, but the “pcdata-“ piece must be present in order for PowerClerk to recognize the tab (and populate the data from the tags).
- List the template tags as rows, starting at A1, A2, A3, etc.
- Create another Excel Sheet where the data can be formatted by referencing the raw data tab(s).
Checklist for Creating your XLSX Document Template using pctable for a Project Channel Table or Form Table Element:
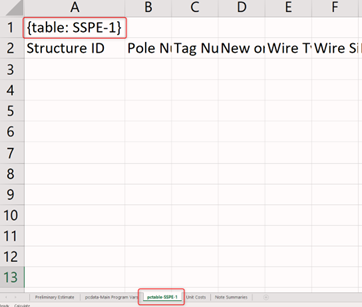
- Name the second sheet pctable-raw/optional description
- In the example below, Figure 8 shows the raw/other description as “SSPE-1”. This part must reflect the name of the channel (or name of the Table), and the “pctable-“ piece must be present in order for PowerClerk to recognize the tab (and populate the data from the table).
- Enter the following text in cell A1: {table: ProjectTableName}.
- Repeat with additional sheets to pull data from additional tables.
Formatting Data in XLSX Document Template
Additional sheets can be configured to automatically reference the data pulled into the template via the “pcdata” and “pctable” tabs. Find more information about how to format data in Excel on Microsoft’s site.
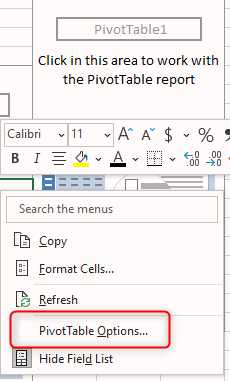
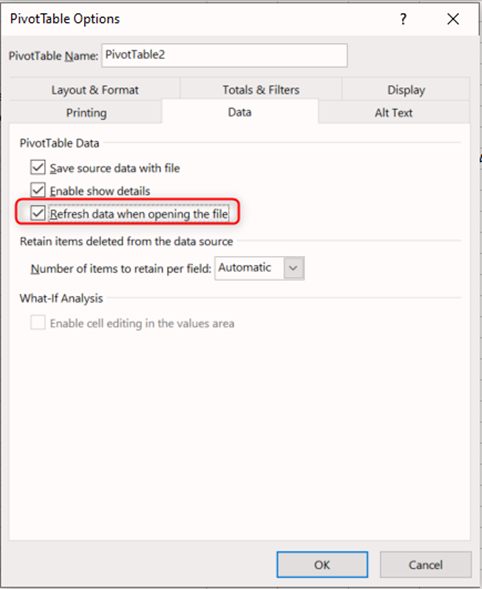
Please Note: If you plan on using Pivot Tables on the document template that reference data populated on the pcdata or pctable tabs, we suggest filling out your template with Dummy Data to ensure correct formatting, in addition to ensuring the Pivot Table in configured to “Refresh data when opening the file” (Right Click on Pivot Table, Pivot Table Option, Refresh data when opening the file).
Merging Documents
Submitted .docx and .pdf Attachments, including those uploaded from Generated Documents, can be combined into a Merged Document. Attachments uploaded to Attachment Fields on the same Form containing the Generate Document element can also be merged.
How to define a new Merged Template
Attachments bound to be merged into one Document Template need to be marked as “Allow Document Merge” under Program Design >> Data Fields >> tab Attachments, and expanding the respective Attachment and using the Edit button offers to set option “Allow Document Merge”:

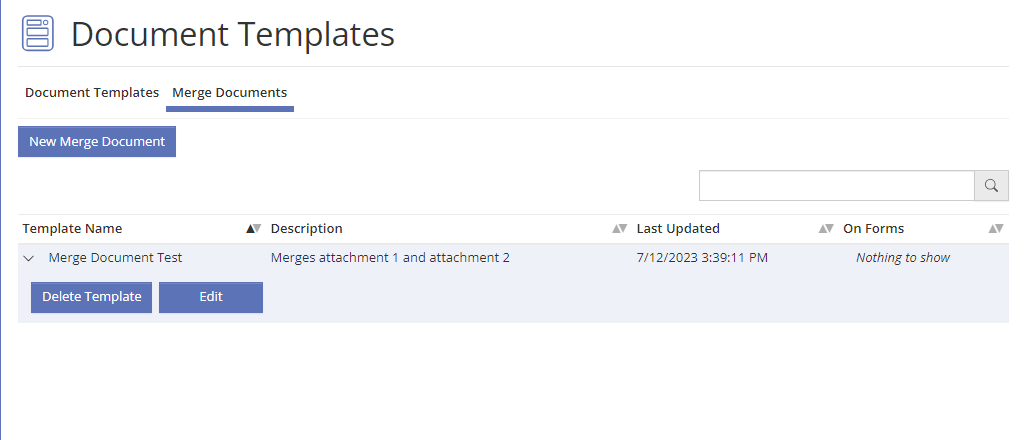
Once all attachments bound for a Merged Document have been marked as “Allow Document Merge” please navigate to Program Design >> Document Templates tab Merge Documents to start the configuration of the Merged Document and its contents:
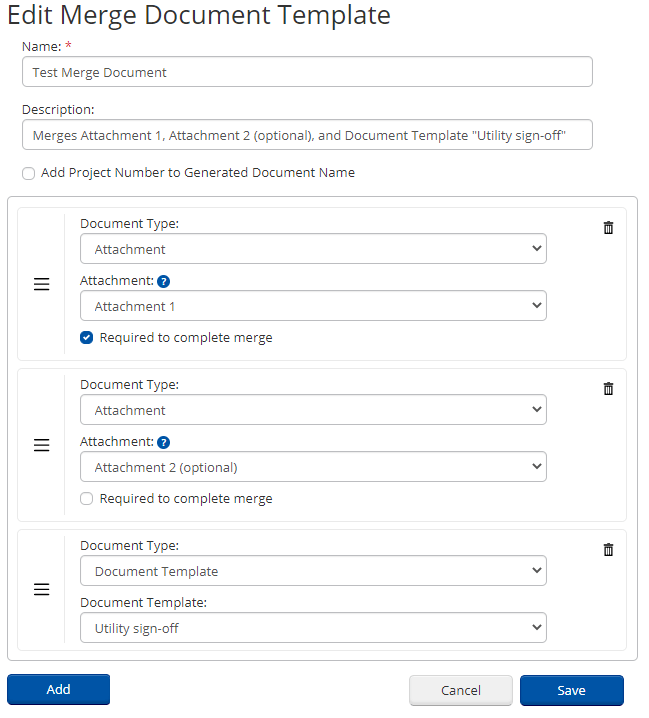
Configuring a Merged Document allows Program Designers to define which other Attachments and Document Templates are to be combined, and if these items are required for the merging process to succeed. Please note that Document Templates to be merged will always be required whereas Attachments can be marked as required and are otherwise optional components of the final Merged Document:
Creating Signatory Tags in Document Templates
Document Templates can be set up with data tags for an eSignature to be populated based on the contact details entered in a PowerClerk form.
Commonly three DocuSign tags are placed into a Document Template: {Administrator Sign}, {Applicant Sign} and {Applicant (or Administrator) Date}. Place these tags in the respective signature spaces on the document using a white font color to completely blend into the background and become invisible to those signing this document.
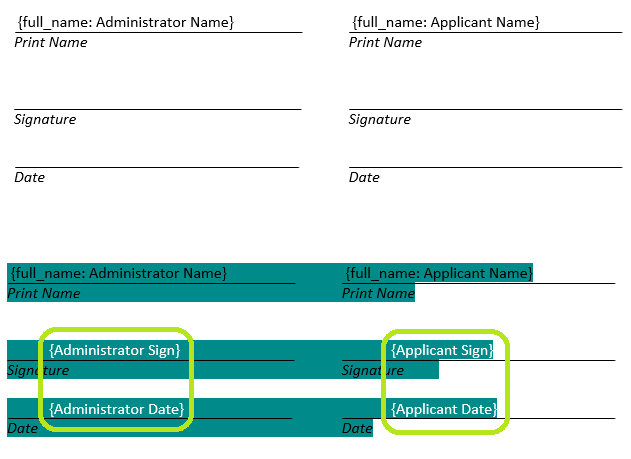
Please note: The label in above screenshot shown as “Applicant” *must match* the signatory DocuSign tag portion as shown in the following example of specific DocuSign template tags, which will allow you to control positioning of eSignature elements:
{signatorySign}: Place this tag within your Document Template to position the signatory’s signature.{signatoryInitial}: You can use this tag to designate where initials should be placed.{signatoryDate}: Use this tag to position the eSign date.
Commonly these three DocuSign tags are placed into a Document Template using a white font color to completely blend into the background and become invisible to the applicant signing this document. This also means that if you are trying to change a Document Template, you can identify potential DocuSign tags by highlighting the entire document to make them appear.
Please note: Avoid breaking these DocuSign template tags into multiple-lines as this may hinder proper placement of signatures or initials when the Document Template is parsed within DocuSign. Reducing the font size *will not* affect the actual size of the placed initials, so even though the DocuSign signatory template tags may appear very small when configuring the Document Template, the actual initials will be proper-sized and correctly placed in the respective area.
Besides the DocuSign signatory tags ({signatory Sign}, {signatory Initial}, {signatory Date}) you can also use the following specific DocuSign tags:
{signatoryText}: Adding DocuSign Text tags allow you to capture additional user input during the DocuSign, which you can further process within PowerClerk by mapping these tags with the Manage Template Tags page outlined in the next section. You can enumerate additional text tags by adding a number e.g.{signatoryText 1},{signatoryText 2},{signatoryText 3}, etc.{signatorySensitive}: By using DocuSign’s Sensitive tag the tag value will become obfuscated after the signer has entered the sensitive data.
Steps to Upload Document Template’s with Signatory Tags to PowerClerk
Anyone in a Role with the Edit Document Templates privilege can add Document Templates by opening the PROGRAM DESIGN menu and clicking on Document Templates:
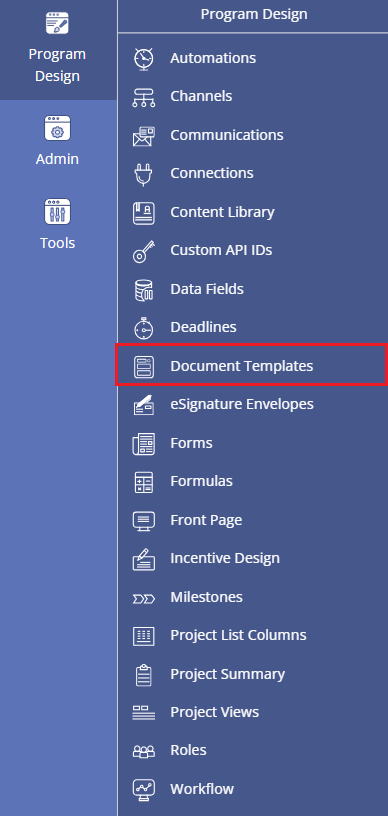
To upload your eSignature Document Template, you will first need to make a new template definition. Click on the New Template Definition button and name your new template, for instance: “Interconnection Template”.
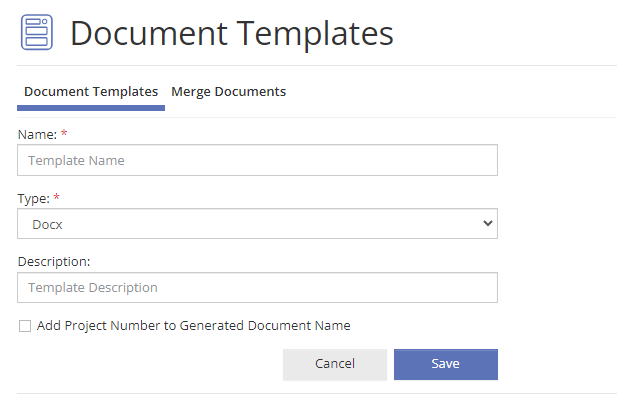
To upload the template, expand your new template definition (by clicking the green “+” icon) and select Upload New Template. This dialog lets you browse to your document template and upload it to PowerClerk:

Incorporating DocuSign via eSignature
If you are looking to add eSignature capabilities to your program, visit the eSignature Envelopes article to learn more about eSignature setup.
Mapping eSignature tags
Configure eSignature Document Templates via the Manage Template Tags page to pull data entered during the eSignature process into the chosen PowerClerk data fields:

When new Document Templates are uploaded to your program, PowerClerk will detect signatory tags.
The Manage Template Tags page provides you the ability to map signatory tags to PowerClerk data fields. Once the eSignature process is complete, all data entered by signers into signatory tags that are mapped to a PowerClerk data field will be copied to the configured fields.
Optionally, select a required format for data that the signer will be asked to enter during the signature process, e.g. to capture Social Security Numbers in Sensitive Data Fields within PowerClerk:

DocuSign Date, Text, and Sensitive tags are mappable while the Sign and Initial tags cannot be mapped to a PowerClerk Data Field.
PLEASE NOTE: The Manage Template Tags page will only show signatory tags after you re-upload a Template Document for an existing Template Definition or upload a template for a new Template Definition.
Automation triggers for eSignatures
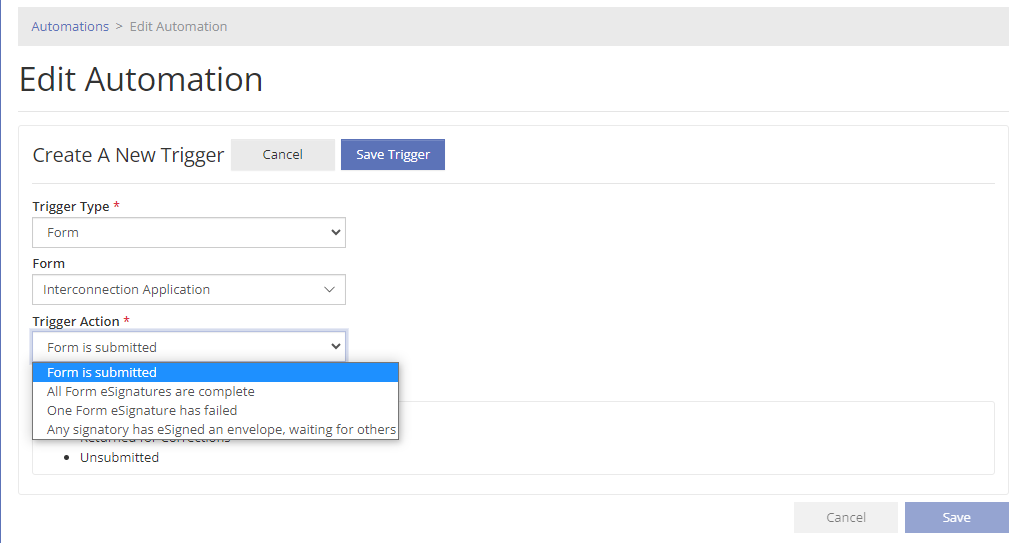
There are three dedicated eSignature triggers for Automations when selecting a Form as the triggering element:
- All Form eSignatures are complete – this will trigger once all parties have signed the document
- One Form eSignature has failed – this will trigger when any eSignature fails (e.g., email delivery issue)
- Any signatory has eSigned an envelope, waiting for others – this will trigger every time one of the signatory signs unless they are the last, in which case the scenario would be “All Form eSignatures are complete”
Smart Templates
With the introduction of Smart Templates, PowerClerk has made it easier for Program Designers to create and maintain Document Templates and Communication Templates. Once you upgrade your templates to Smart Templates, PowerClerk will track all the Data Fields, Data Field Groups, and Attachments that your templates reference via Template Tags. Smart Templates will behave the same as the current templates when used, so the change will be invisible to your users.
Upgrading to Smart Templates will simplify the Program Designer’s job in the following ways:
- Early Error Detection:
- PowerClerk will alert you to common errors in your templates as soon as you upload a new Document Template or save a Communication Template.
- Automatically Update Templates when Renaming Fields:
- If you change the name of a Data Field referenced by a Smart Template, the Smart Template will automatically update to reflect the new name.
- Improved Data Field Reference Tracking:
- Once all your templates are upgraded, the Data Field List Page will display new columns showing the Communication Templates and Document Templates referencing each Data Field, Data Field Group, or Attachment.
- These new columns will appear once all templates of the respective type have been upgraded.
- PowerClerk will block you from archiving fields that are referenced by a Smart Template.
Upgrading to Smart Templates
In order to take advantage of Smart Templates, you need to upgrade your existing Document Templates and Communication Templates. You will start the process by going to either the Document Templates page or Communications page under the Program Design menu. You can choose to have PowerClerk try to upgrade all your templates automatically by clicking the “Upgrade All Templates” button, or you can upgrade templates one-at-a-time by clicking any un-upgraded template in the table and clicking the new “Upgrade” button. You must upgrade your Communication Templates and your Document Templates separately.
You must upgrade all templates of a given type to see which templates of that type reference a given Data Field on the Data Field List Page. Once you begin upgrading templates, it is recommended to finish upgrading all templates as quickly as possible to avoid confusion that could arise when some templates are upgraded but others are not. For instance, if you rename a field, the upgraded templates that reference the field will automatically update to reflect the new field name, but the un-upgraded ones will not. If you have old templates that are no longer in use, you can choose to delete them rather than upgrade them.
Upgrading when a Test Environment Exists
If your program has an active Test Environment, it is recommended that you upgrade your templates to Smart Templates in the Test Environment. When you commit the Test Environment, the upgraded templates will be transferred to your production program. You do not need to upgrade every template in the Test Environment in order to commit it. If you expect to keep your Test Environment active for a long time, you can upgrade your templates in your production program, but you will need to repeat the same upgrades in the Test Environment before committing it.
Broken Template Tags
In most cases, your templates can be upgraded automatically with no manual intervention once you initiate the upgrade. However, during the upgrade process, PowerClerk may detect broken template tags. Any tags detected in this way are currently being ignored by PowerClerk when using the template, so this will alert you to existing errors in your templates. A tag can be identified as broken for any of the following reasons:
- Invalid Tags:
- The tag contains a typo and PowerClerk cannot read it.
- This may arise if there is a typo in the prefix of a template tag (ie. before the “:”), or if there is another typo or formatting error.
- This can also arise in Communication Templates if there is HTML formatting applied to a portion of the tag but not the entire thing.
- Tags whose Reference cannot be found:
- The tag attempts to reference a field or group that does not exist.
- This situation may arise from a typo in the field name.
- It may also arise if the field was renamed after the template was created.
- Tags whose Reference is archived:
- The tag attempts to reference a field that has been archived.
You will need to manually correct any errors in a template to finish upgrading it. Once all the errors have been corrected, PowerClerk will automatically upgrade the template to a Smart Template.
Examples of Broken Tags
- {data: Customer Naame First}:
- Assume a field called “Customer Name First” exists.
- This template tag is broken because it contains a simple typo in the name of the Data Field it is trying to reference.
- This can be resolved by fixing the typo in the field name
- {data: Payment Amt}:
- This tag does not contain an obvious typo, but it may still be invalid if there is no field named “Payment Amt.” This could arise if the field has been renamed or archived. For example, perhaps a designer later renamed the field “Payment Amount.”
- This can be resolved by ensuring the tag text matches the current field name or unarchiving the “Payment Amt” field if applicable.
- {Project Number}:
- This is a template tag for the built-in ProjectNumber field, but it contains a subtle typo. The correct tag is {ProjectNumber} (no space). You can view all supported template tags for built-in fields in the Built-In Fields Tab of the Data Field List Page.
- This can be resolved by fixing the typo (removing the space).
- {full–name: Customer}:
- Assume a contact Data Field Group called “Customer” exists.
- This tag is invalid because of a typo in the tag prefix. The correct prefix is “full_name” (underscore, not hyphen), so the correct tag is {full_name: Customer}.
- This can be resolved by correcting the typo in the tag prefix.
- {{data: <b>Applicant Email</b>}:
- Assume a field called “Applicant Email” exists.
- This may arise in Communication Templates due to HTML formatting interfering with PowerClerk’s ability to read a template. This is tricky to understand because it may appear correct when the template is inspected visually. The issue is that the <b> pieces are invisible when the template is viewed in the browser because they convey the information that the text “Applicant Email” appears in bold. In this case, the tag will appear as the following to the user: {data: Applicant Email}. However, when PowerClerk processes the template, the <b> text gets in the way of finding the correct “Applicant Email” field. This kind of error may look different depending on the specific text formatting in the template, but any case where you see text enclosed in angle brackets (“<”, “>”) showing up in the template errors but not visible in the template is probably an example of this.
- This can be resolved by clearing existing text formatting from the template tags in your Communication Template and ensuring that any formatting applies to the entire tag, including the outer brackets.
To remedy Template Tag formatting errors, there are several ways to alleviate these issues:
- With the whole tag selected, click the “Clear formatting” button as sometimes tag formatting is completely invisible to the viewer:
 Figure 19: Clear Formatting
 - Alternatively, delete the tag and re-type it from scratch. That will also remove any invisible formatting.
Video Guides
Would a video guide help to better explain Document Templates? Contact us and let us know.
A full list of all Video Guides can also be found here.
FAQs
Have additional questions? Contact us to nominate your FAQ and help others find answers to your own questions concerning this feature.
Create A Support Ticket
Not finding your answer here? Submit a question to our support team at the PowerClerk Ticket System and leverage the PowerClerk team’s expertise.