PowerClerk Support Center
- Program Design
-
- Automations
- Channels
- Communications
- Connections
- Content Library
- Custom API IDs
- Data Fields
- Deadlines
-
- Questions to ask yourself
- Locating the Deadlines feature
- What are Deadlines
- How to Create a Deadline
- Deadline Automation Action Rules
- Utilizing Project Admin Page for Deadlines
- Communication Templates for Deadlines
- Deadline Set/Satisfy Options
- Program-Wide Deadline Actions
- Reporting on Deadlines
- Deadlines in Project List Columns
- FAQs
- Document Templates
- eSignature Envelopes
-
- Questions to Ask
- Locating the eSignature Feature
- What are eSignature Envelopes?
- eSignature Checklist: The Prerequisites to create a new Envelope
- How to set up Advanced eSignature Envelopes Step-by-Step
- How to add an eSignature Envelope to a form
- eSignature Automation Trigger
- Viewing Completed eSignature Envelopes
- Resending eSignature Notifications
- Canceling eSignatures
- FAQs
- Forms
- Formulas and Calculated Fields
- Front Page
- Incentive Design
- Milestones
- Project List Columns
- Project Summary
- Project Views
- Roles
- Workflow
- Administration
- Tools Menu
- Integration Guides & API
- PowerClerk Video Guides
-
- New User Video Guide
- Setting up Business Days
- Dashboards
- FormSense
- Edit Forms - Tutorial #1
- Calculated Fields
- Build A Formula
- Milestones
- Edit Forms - Tutorial #2
- Project Summary
- Automation with Formulas in Action Rules
- Setting up Roll-up Reports
- Configuring Forms
- Roles and User Administration
- Formulas and Advanced Visibility Rules
- Visualize Workflows
- ArcGIS
- API
- SFTP Automatic Data Import
- Standard Web Adapter Setup
- PowerClerk Program Launch
- PowerClerk User Group Sessions (UGS)
- Learning Management System (LMS)
- Join us for Reflow!
- NEW: PowerClerk Certifications
Communications
Engage and inform your applicants with powerful Communication Templates.
Locating the Communications feature
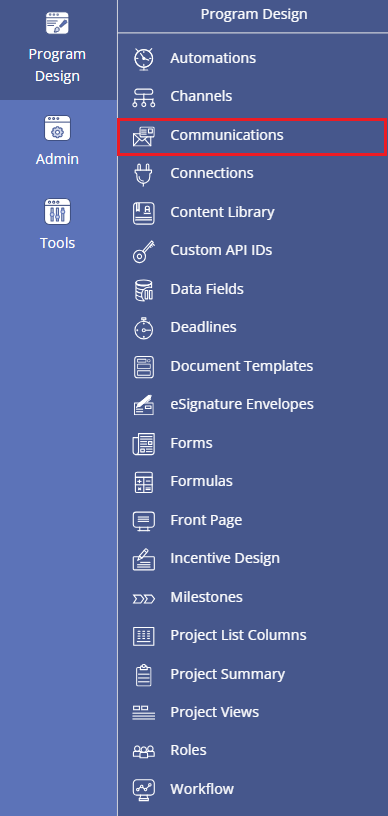
Anyone in a Role with the Edit Communications privilege can navigate to the Communications screen by opening the PROGRAM DESIGN menu and clicking on Communications:
How to create a Communications Template
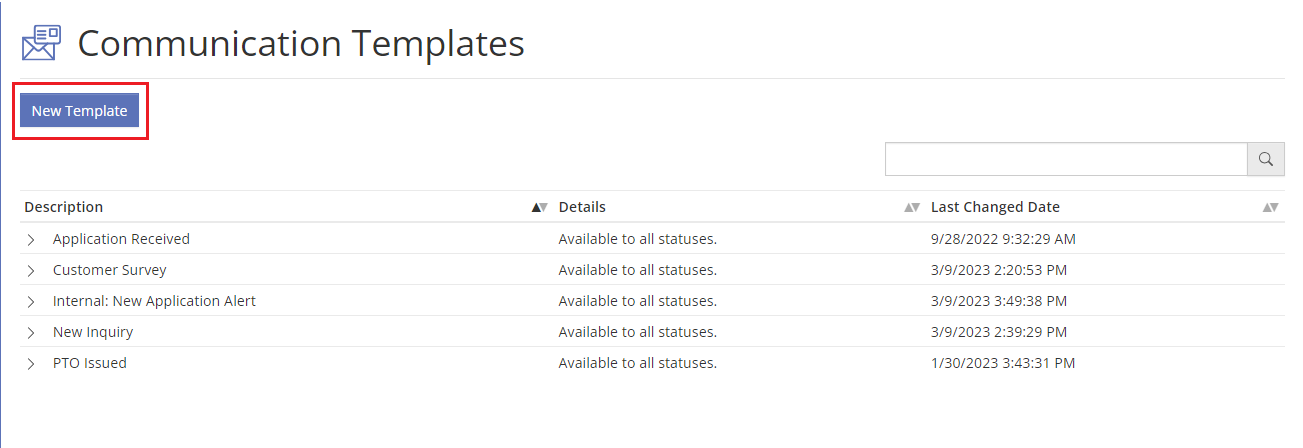
Create a new Communication Template by clicking the New Template button:
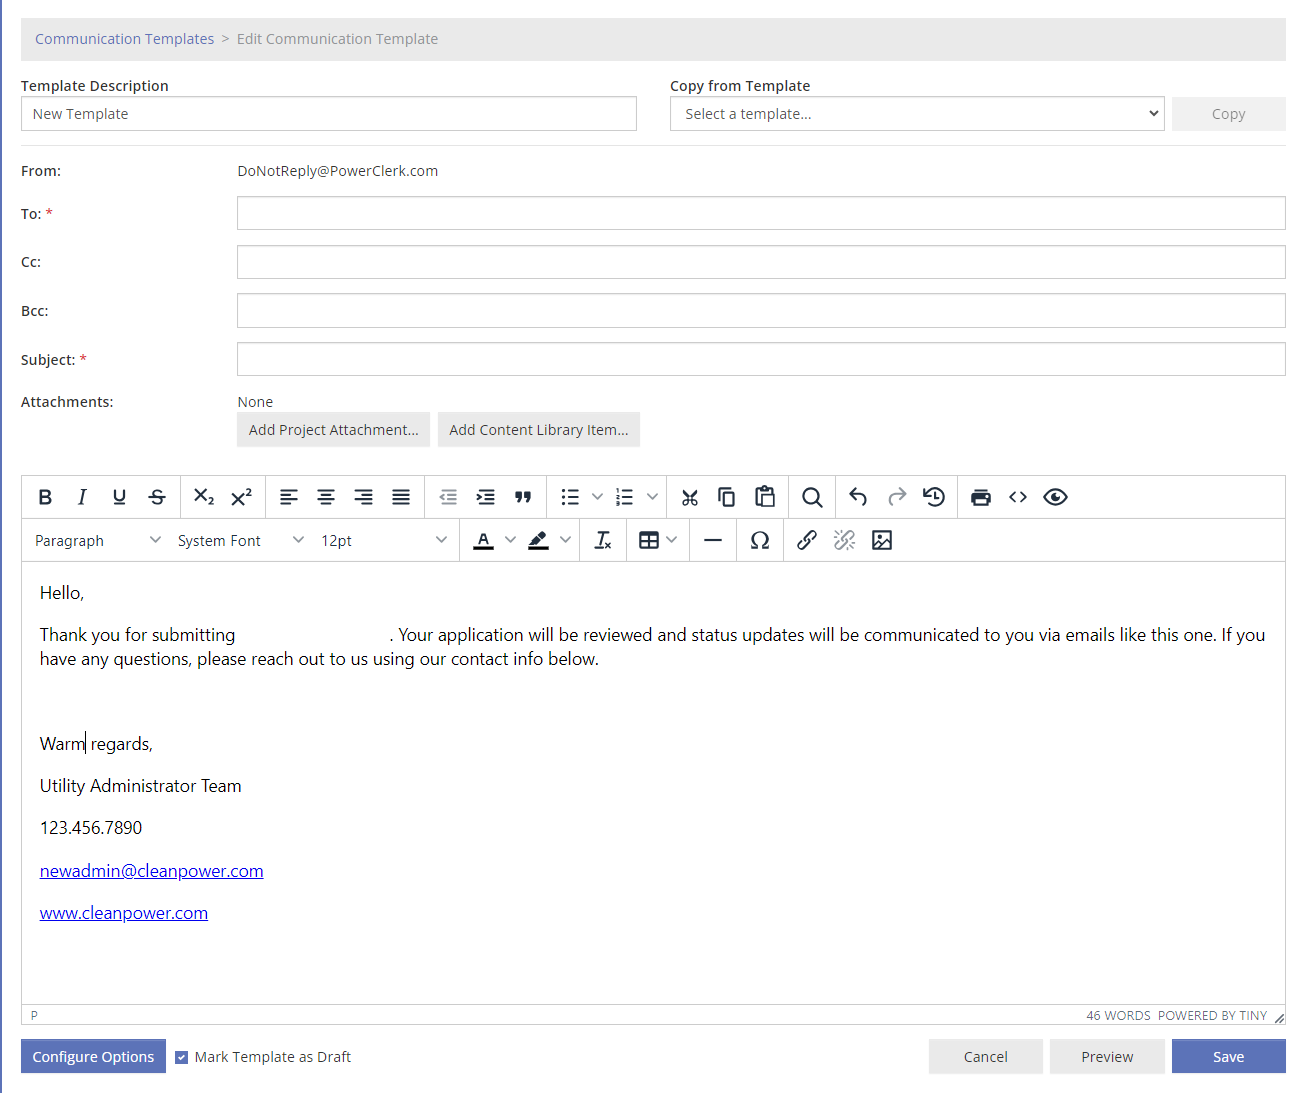
The Communication Editor is a fairly straightforward, rich HTML editor. It allows a user to enter and format text, insert hyperlinks, insert images (referenced by an image-URL), and more:
Finding Data Tags
For this Communication Template, we want to send a confirmation email to the applicant to verify that their project application has been submitted successfully. We want to include their Project Number using a Data Field Tag and send it to their email address, which will also be populated using the Data Field Tag for their email-address.
By navigating to PROGRAM DESIGN >> Data Fields you can search all available Data Field references for your program.
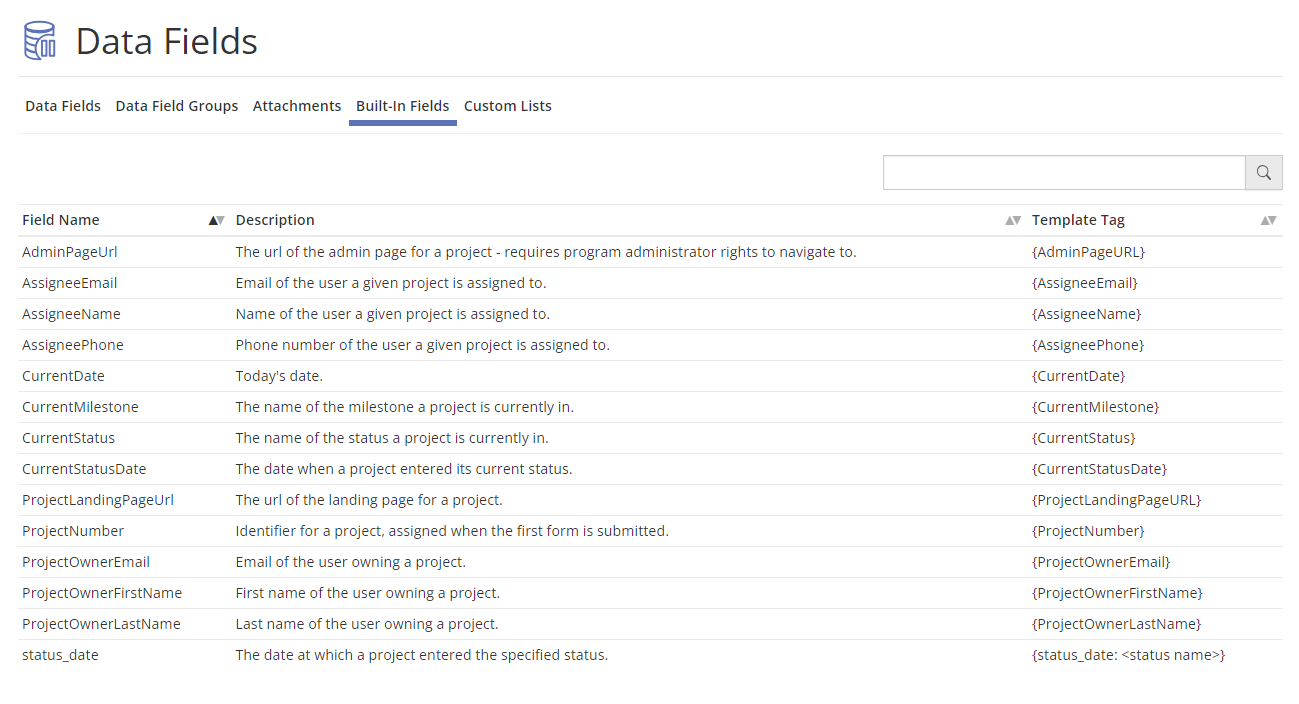
The Data Fields page lists all available Data Fields in your PowerClerk program. See below the Data Field reference for Applicant Email. The actual Data Field Tag is embedded as “{data: Applicant Email}” within the Communications Template. PowerClerk will automatically populate the actual email address value when this template is sent. Note that some Data Fields types, like User types, will require that the embedded tag references the email field (“{email: User Selector}“), not the full name or other attribute.
To reference the Project Number, which is one of PowerClerk’s Built-in Fields, embed “{ProjectNumber}” into the Communication Template. Your Communication Template should now look like this:
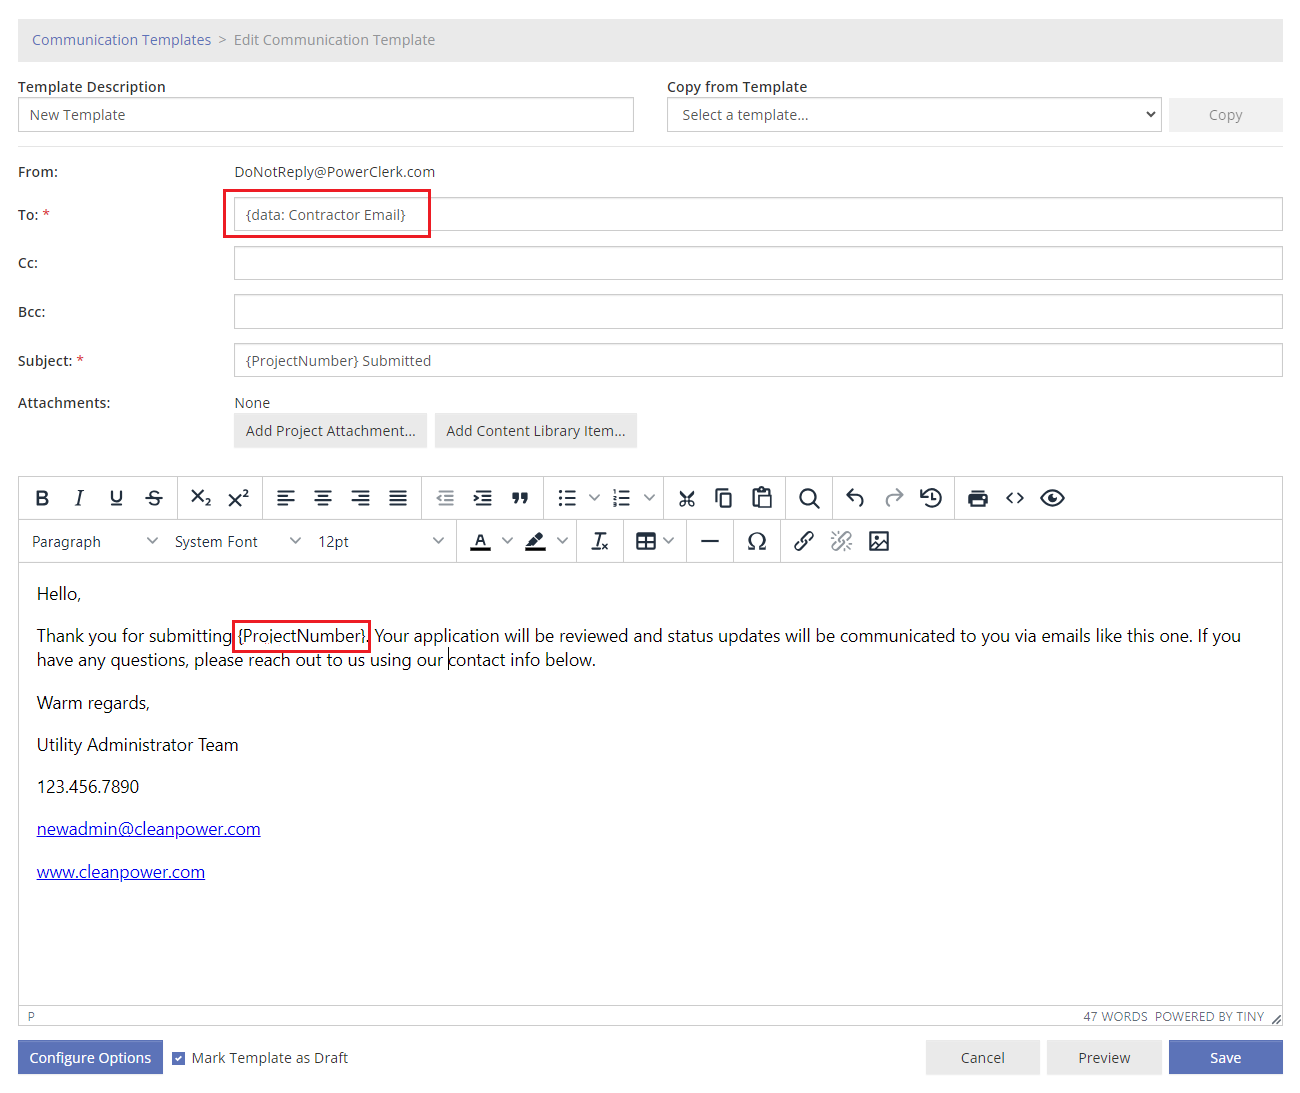
Please note: Upon sending this Communication Template, these two Data Field references will resolve to their actual values:
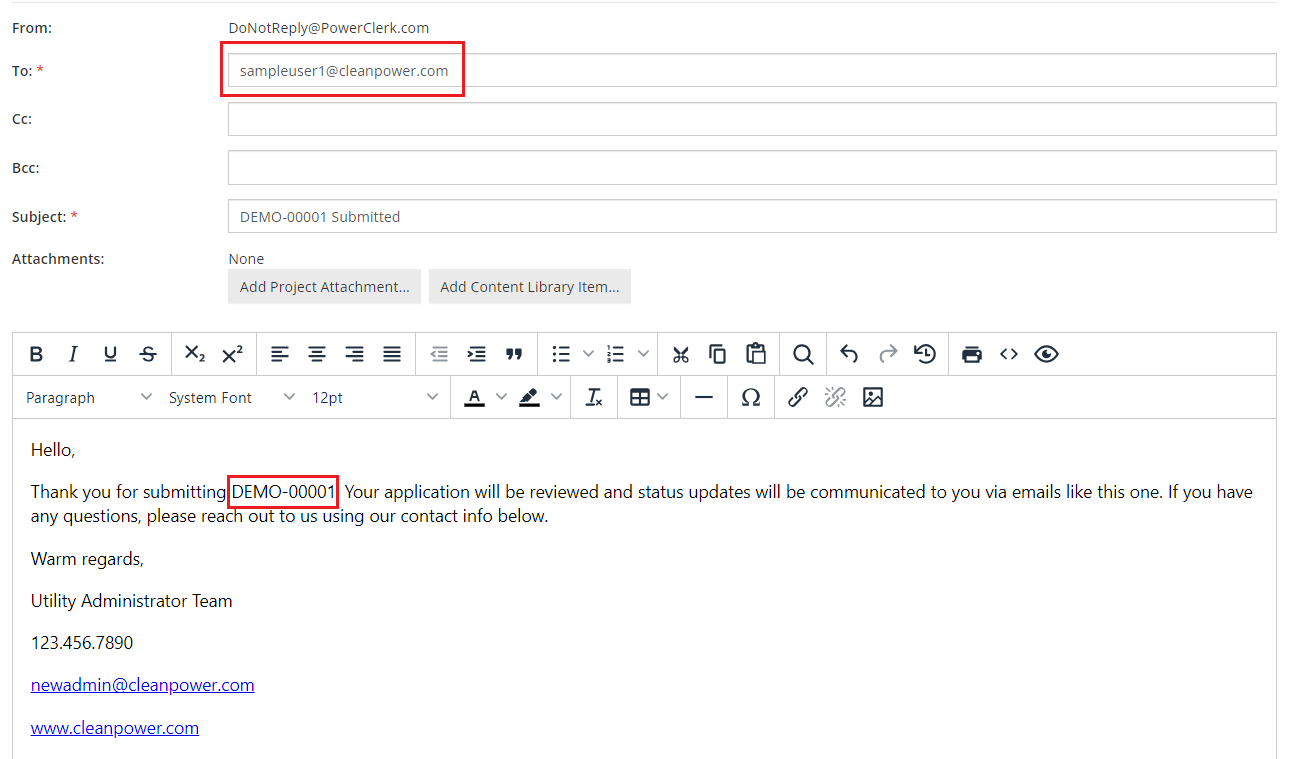
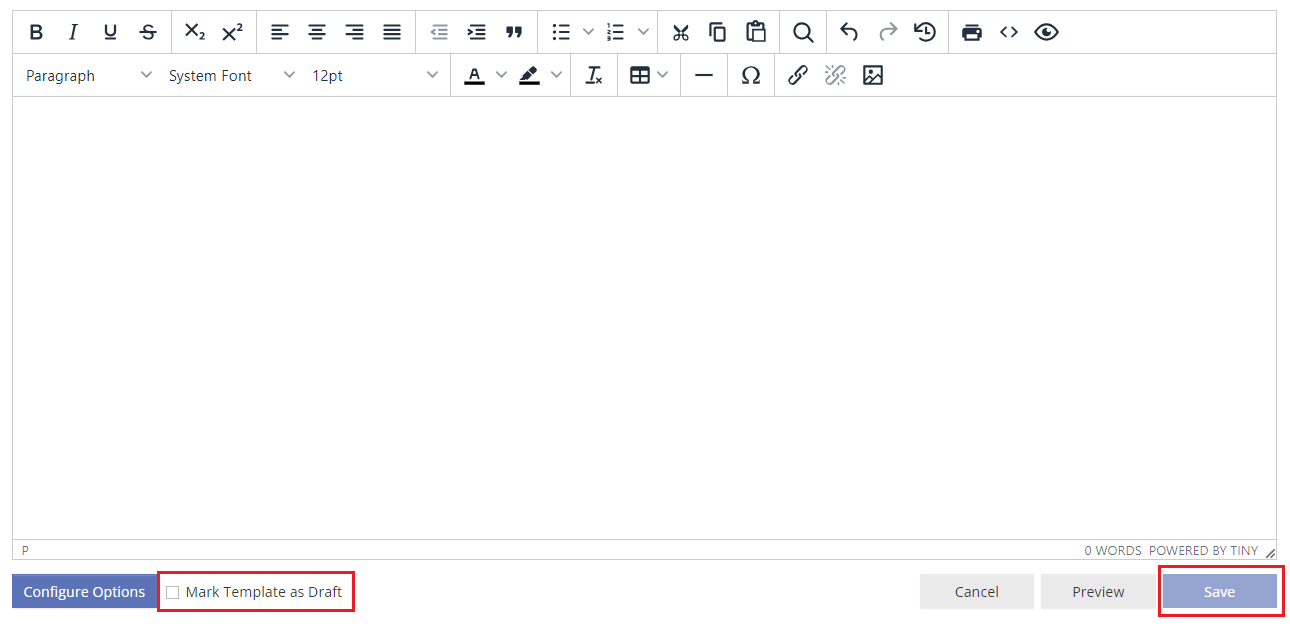
When you are done editing your Communication Template for use, uncheck at the bottom of the template Mark Template as Draft and click the Save button. Leaving Mark Template as Draft checked will still save your template for later editing but will not yet be available for use.
Mass Communications via Data Import
Please follow this link to learn more about sending mass communications to notify applicants of notable events through the Announcements feature.
Please review our policy on mass communications here prior to performing a data import.
Images in Communications
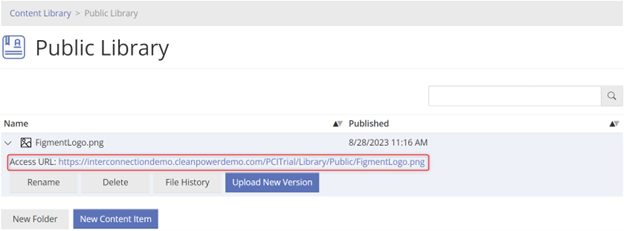
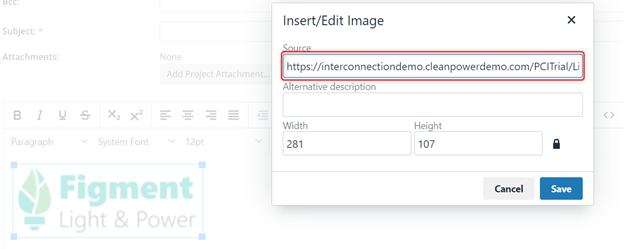
Any images that need to be embedded in the email body of a Communication Template must have an image URL to properly populate. To embed images in a Communication Template (e.g. Company Logo) select the Insert/Edit Image icon and insert the image URL. It is recommended that Communication Template Images be uploaded to the Public Folder of PowerClerk’s Content Library, where an Access URL will be automatically generated for use within Communication Templates.
Project Attachments and Content Library Items
Attachments can also be included in your communication templates. There are two options for incorporating attachments to Communications Templates: Project Attachments and Content Library Items.
Project Attachments:
- Project Attachments allow you to choose an Attachment Data Field embedded on a PowerClerk form.
- Project Attachments will be project specific. If an Attachment Data Field included on a Communication Template is populated on a form for a project, that attachment will then be included when the Communication is sent out.
- Content Library Items allow you to choose from uploads in the Public and Private Libraries.
- Content Library Items used as attachments will include the same item as an attachment for every project when the Communication is sent.
Please Note: The maximum cumulative attachment size for a given Communication is limited to approximately 7 MB. If the attachment(s) exceeds this limit, the Communication may fail to send.
Smart Templates
With the introduction of Smart Templates, PowerClerk has made it easier for Program Designers to create and maintain Document Templates and Communication Templates. Once you upgrade your templates to Smart Templates, PowerClerk will track all the Data Fields, Data Field Groups, and Attachments that your templates reference via Template Tags. Smart Templates will behave the same as the current templates when used, so the change will be invisible to your users.
Smart Templates simplify the Program Designer’s job in the following ways:
- Early Error Detection:
- PowerClerk will alert you to common errors in your templates as soon as you upload a new Document Template or save a Communication Template.
- Automatically Update Templates when Renaming Fields:
- If you change the name of a Data Field referenced by a Smart Template, the Smart Template will automatically update to reflect the new name.
- Improved Data Field Reference Tracking:
- Once all your templates are upgraded, the Data Field List Page will display new columns showing the Communication Templates and Document Templates referencing each Data Field, Data Field Group, or Attachment.
- These new columns will appear once all templates of the respective type have been upgraded.
- PowerClerk will block you from archiving fields that are referenced by a Smart Template.
Upgrading to Smart Templates
In order to take advantage of Smart Templates, you need to upgrade your existing Document Templates and Communication Templates. You will start the process by going to either the Document Templates page or Communications page under the Program Design menu. You can choose to have PowerClerk try to upgrade all your templates automatically by clicking the “Upgrade All Templates” button, or you can upgrade templates one-at-a-time by clicking any un-upgraded template in the table and clicking the new “Upgrade” button. You must upgrade your Communication Templates and your Document Templates separately.
You must upgrade all templates of a given type to see which templates of that type reference a given Data Field on the Data Field List Page. Once you begin upgrading templates, it is recommended to finish upgrading all templates as quickly as possible to avoid confusion that could arise when some templates are upgraded but others are not. For instance, if you rename a field, the upgraded templates that reference the field will automatically update to reflect the new field name, but the un-upgraded ones will not. If you have old templates that are no longer in use, you can choose to delete them rather than upgrade them.
Upgrading when a Test Environment Exists
If your program has an active Test Environment, it is recommended that you upgrade your templates to Smart Templates in the Test Environment. When you commit the Test Environment, the upgraded templates will be transferred to your production program. You do not need to upgrade every template in the Test Environment in order to commit it. If you expect to keep your Test Environment active for a long time, you can upgrade your templates in your production program, but you will need to repeat the same upgrades in the Test Environment before committing it.
Broken Template Tags
In most cases, your templates can be upgraded automatically with no manual intervention once you initiate the upgrade. However, during the upgrade process, PowerClerk may detect broken template tags. Any tags detected in this way are currently being ignored by PowerClerk when using the template, so this will alert you to existing errors in your templates. A tag can be identified as broken for any of the following reasons:
- Invalid Tags:
- The tag contains a typo and PowerClerk cannot read it.
- This may arise if there is a typo in the prefix of a template tag (ie. before the “:”), or if there is another typo or formatting error.
- This can also arise in Communication Templates if there is HTML formatting applied to a portion of the tag but not the entire thing.
- Tags whose Reference cannot be found:
- The tag attempts to reference a field or group that does not exist.
- This situation may arise from a typo in the field name.
- It may also arise if the field was renamed after the template was created.
- Tags whose Reference is archived:
- The tag attempts to reference a field that has been archived.
You will need to manually correct any errors in a template to finish upgrading it. Once all the errors have been corrected, PowerClerk will automatically upgrade the template to a Smart Template.
Examples of Broken Tags
- {data: Customer Naame First}:
- Assume a field called “Customer Name First” exists.
- This template tag is broken because it contains a simple typo in the name of the Data Field it is trying to reference.
- This can be resolved by fixing the typo in the field name
- {data: Payment Amt}:
- This tag does not contain an obvious typo, but it may still be invalid if there is no field named “Payment Amt.” This could arise if the field has been renamed or archived. For example, perhaps a designer later renamed the field “Payment Amount.”
- This can be resolved by ensuring the tag text matches the current field name or unarchiving the “Payment Amt” field if applicable.
- {Project Number}:
- This is a template tag for the built-in ProjectNumber field, but it contains a subtle typo. The correct tag is {ProjectNumber} (no space). You can view all supported template tags for built-in fields in the Built-In Fields Tab of the Data Field List Page.
- This can be resolved by fixing the typo (removing the space).
- {full–name: Customer}:
- Assume a contact Data Field Group called “Customer” exists.
- This tag is invalid because of a typo in the tag prefix. The correct prefix is “full_name” (underscore, not hyphen), so the correct tag is {full_name: Customer}.
- This can be resolved by correcting the typo in the tag prefix.
- {{data: <b>Applicant Email</b>}:
- Assume a field called “Applicant Email” exists.
- This may arise in Communication Templates due to HTML formatting interfering with PowerClerk’s ability to read a template. This is tricky to understand because it may appear correct when the template is inspected visually. The issue is that the <b> pieces are invisible when the template is viewed in the browser because they convey the information that the text “Applicant Email” appears in bold. In this case, the tag will appear as the following to the user: {data: Applicant Email}. However, when PowerClerk processes the template, the <b> text gets in the way of finding the correct “Applicant Email” field. This kind of error may look different depending on the specific text formatting in the template, but any case where you see text enclosed in angle brackets (“<”, “>”) showing up in the template errors but not visible in the template is probably an example of this.
- This can be resolved by clearing existing text formatting from the template tags in your Communication Template and ensuring that any formatting applies to the entire tag, including the outer brackets.
To remedy Template Tag formatting errors, there are several ways to alleviate these issues:
- With the whole tag selected, click the “Clear formatting” button as sometimes tag formatting is completely invisible to the viewer:
 Figure 8: Clear Formatting
 - Alternatively, delete the tag and re-type it from scratch. That will also remove any invisible formatting.
PowerClerk Mass Communication Policy
Purpose
This policy aims to provide clear guidelines for mass communications within PowerClerk services. It defines the difference between spam/marketing emails and transactional emails, ensuring compliance with CAN-SPAM Act (United States) and CASL (Canada) regulations, and email service provider requirements.
Communications are no longer permitted to be triggered via the legacy Bulk Communications request. PowerClerk now has an Announcements feature; announcements are a type of email communication to be sent to many recipients in a mass communication event falling outside of the normal project workflow.
Learn more about the new Announcements feature by clicking here.
Definitions
Transactional Emails: These are messages directly related to a transaction or an existing business relationship. Transactional messages contain content that:
- Facilitates, completes, or confirms a commercial transaction that the recipient already has agreed to;
- Gives warranty, recall, safety, or security information about a product or service the recipient bought;
- Notifies the recipient about a change in the terms or features of a membership, subscription, account, loan or other ongoing commercial relationship; notifies the recipient of a change in their standing with respect to that ongoing commercial relationship; or provides regular, periodic account balance information to the recipient;
- Delivers goods or services as part of a transaction that the recipient already has agreed to.
Spam/Marketing Emails: These are promotional messages sent to recipients with the primary purpose of advertising or promoting a commercial product or service. They are not transaction-related.
Guidelines
PowerClerk is a workflow automation software solution that helps utilities manage their energy programs. It offers a wide range of features and support for handling utility transactions efficiently. Sending spam/marketing emails through PowerClerk is not permitted. Some transactional emails, (i.e. those sent via our announcements feature), may be interpreted as marketing emails by email service providers. To protect our customers’ as well as our own sending reputations, PowerClerk will apply format and functional controls to these emails that ensure functional compliance with email services. The content of all messages should remain transactional in nature.
1. Spam Marketing Emails
Sending Spam/Marketing emails, as defined in this document, through PowerClerk is strictly disallowed. The following list provides further examples and characteristics of Spam/Marketing Emails. This is not an exhaustive list of examples nor characteristics.
Examples of spam/marketing emails:
- Promotional Emails Focused on:
- Promoting program enrollment and/or rebate opportunities
- Promoting utility products or marketplaces via email
- Promoting utility services and/or events.
2. Transactional Emails
PowerClerk permits the sending of Transactional Emails, as defined in this document.
The following list provides further examples and characteristics of Transactional Emails. This is not an exhaustive list of examples or characteristics:
- Examples of Transactional Emails:
- Application confirmation and follow-up requests
- Service confirmations or delays
- Password reset notifications
- Account statements and billing transaction notifications
3. Mass Communication Emails
Clean Power Research permits the sending of announcements via PowerClerk, so long as they meet the definition of Transactional Emails, as defined in this document.
Although Transactional Emails are exempt from email service provider requirements for mass marketing emails, emails sent via PowerClerk’s announcements feature could increase the risk of these emails being treated as mass marketing emails. To reduce the risk of these emails being treated as spam PowerClerk will add additional unsubscribe links to these emails, including a “one click” unsubscribe.
Please, note that Clean Power Research reserves the right to remove access to PowerClerk’s announcement mail feature to any customer using it to send spam/marketing emails or as necessary to protect PowerClerk’s ability to reliably deliver email and maintain a positive sender reputation.
4. Prerequisites for Using Announcements
In order for customers to send emails using the Announcements feature, the following requirements must be met:
For self-service access to this feature, utilities must use their own sending domain. For assistance with this, please reach out to support@powerclerk.com.
To trigger an Announcement, the user account processing the data import must have Multi Factor Authentication (MFA) enabled or authenticated via Single Sign On (SSO).
Video Guides
Would a video guide help to better explain Communications? Contact us and let us know.
A full list of all Video Guides can also be found here.
FAQs
- {data: Test Date} for short date format
- {data: Test Date, unknown } for short date format and the default value 'unknown' if there is no date set
- {data: Test Date,, DayOnly } for just the number of the day
- {data: Test Date,, DayOrdinalSuffix } for just the ordinal suffix for the day, e.g. st is the day is 1, 21 or 31, nd for 2 and 22, etc.
- {data: Test Date,, DayOnly2Digits } for just the number of the day prefixed with 0 if less than 10
- {data: Test Date,, DayOfWeekName } for just the name of the day of the week
- {data: Test Date,, MonthNumberOnly } for just the number of the month
- {data: Test Date,, MonthNumberOnly2Digits } for just the number of the month prefixed with 0 if less than 10
- {data: Test Date,, MonthNameOnly } for just the name of the month
- {data: Test Date,, YearOnly} for just the year
Have additional questions? Contact us to nominate your FAQ and help others find answers to your own questions concerning this feature.
Create A Support Ticket
Not finding your answer here? Submit a question to our support team at the PowerClerk Ticket System and leverage the PowerClerk team’s expertise.