PowerClerk Support Center
- Program Design
-
- Automations
- Channels
- Communications
- Connections
- Content Library
- Custom API IDs
- Data Fields
- Deadlines
-
- Questions to ask yourself
- Locating the Deadlines feature
- What are Deadlines
- How to Create a Deadline
- Deadline Automation Action Rules
- Utilizing Project Admin Page for Deadlines
- Communication Templates for Deadlines
- Deadline Set/Satisfy Options
- Program-Wide Deadline Actions
- Reporting on Deadlines
- Deadlines in Project List Columns
- FAQs
- Document Templates
- eSignature Envelopes
-
- Questions to Ask
- Locating the eSignature Feature
- What are eSignature Envelopes?
- eSignature Checklist: The Prerequisites to create a new Envelope
- How to set up Advanced eSignature Envelopes Step-by-Step
- How to add an eSignature Envelope to a form
- eSignature Automation Trigger
- Viewing Completed eSignature Envelopes
- Resending eSignature Notifications
- Canceling eSignatures
- FAQs
- Forms
- Formulas and Calculated Fields
- Front Page
- Incentive Design
- Milestones
- Project List Columns
- Project Summary
- Project Views
- Roles
- Workflow
- Administration
- Tools Menu
- Integration Guides & API
- PowerClerk Video Guides
-
- New User Video Guide
- Setting up Business Days
- Dashboards
- FormSense
- Edit Forms - Tutorial #1
- Calculated Fields
- Build A Formula
- Milestones
- Edit Forms - Tutorial #2
- Project Summary
- Automation with Formulas in Action Rules
- Setting up Roll-up Reports
- Configuring Forms
- Roles and User Administration
- Formulas and Advanced Visibility Rules
- Visualize Workflows
- ArcGIS
- API
- SFTP Automatic Data Import
- Standard Web Adapter Setup
- PowerClerk Program Launch
- PowerClerk User Group Sessions (UGS)
- Learning Management System (LMS)
- Join us for Reflow!
- NEW: PowerClerk Certifications
Reports
Locating the Reports feature
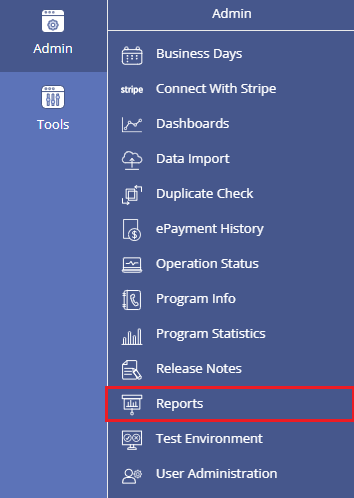
Anyone in a Role with the View Shared Reports privilege can edit Reports by opening the ADMIN menu and clicking on Reports:
How to setup Detail Reports
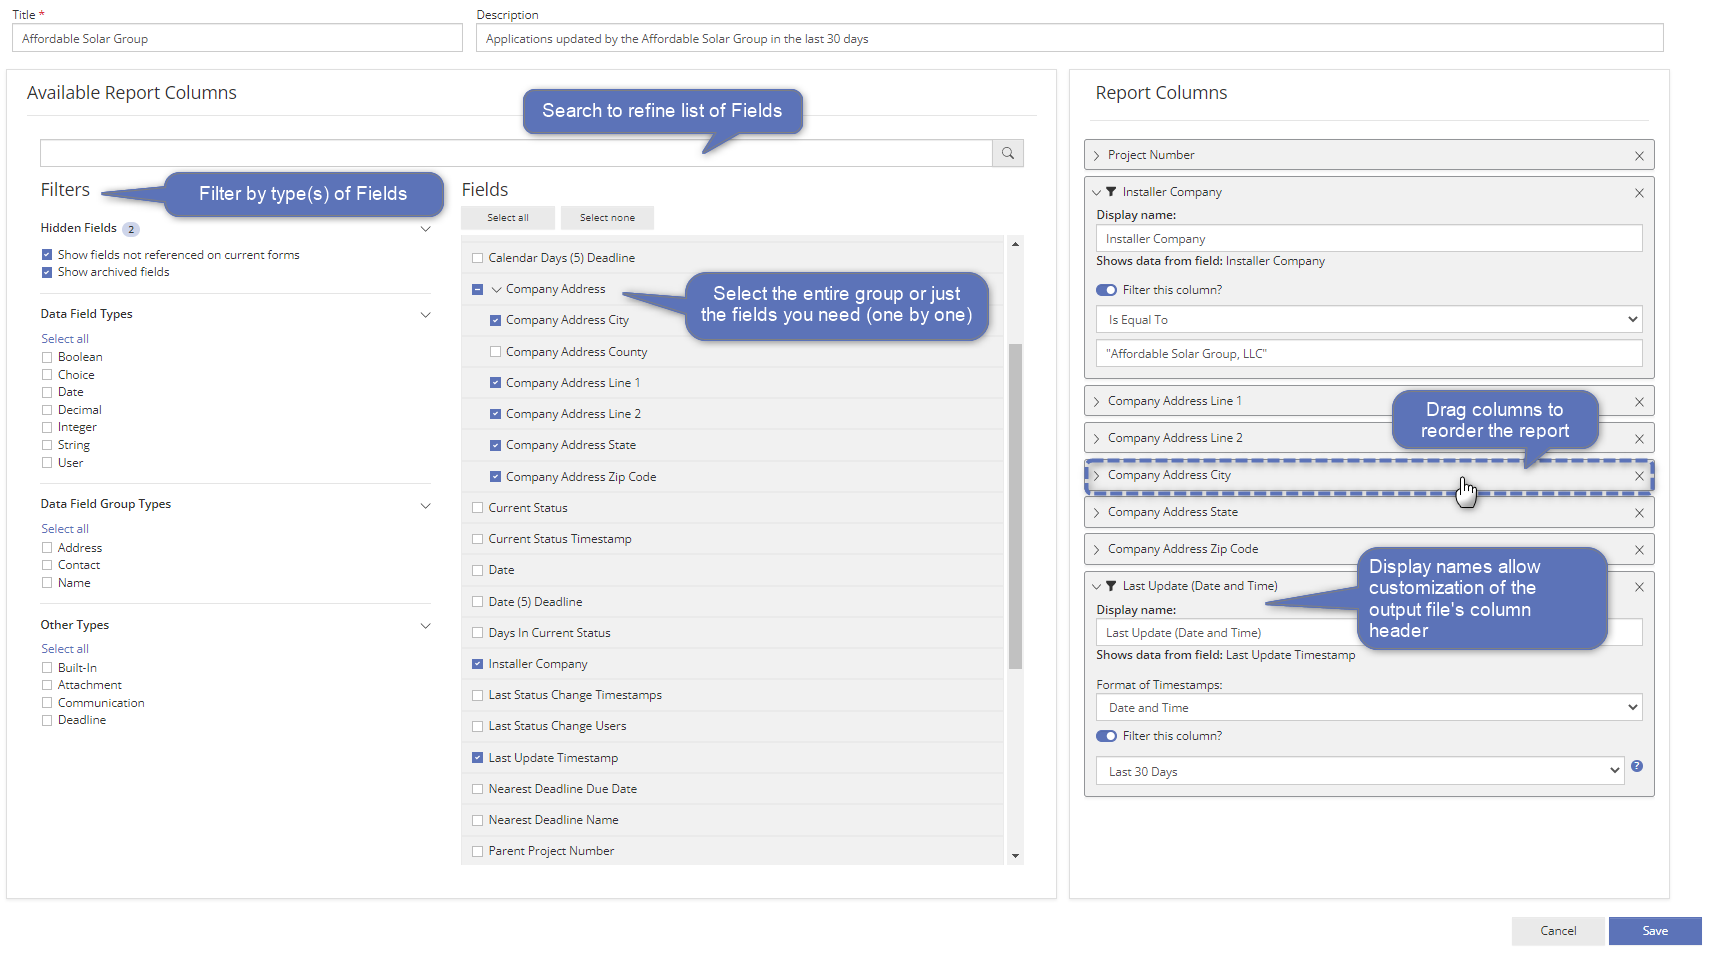
PowerClerk offers detailed reporting for administrators via a self-service report editor. Using the report editor, the administrator can define the program data which should be contained in a report. Reports are uniquely named by the administrator and fields are added onto a report design surface, like the Form editor.
When new Data Fields are created in the Form editor, a field name is assigned to that field by the administrator.
Field names are used to create reports in the Report setup user interface. Data Fields are added to the “Report Columns” section by either checking the box next to a specific data field or dragging-and-dropping a specific data field row onto the right hand panel. When compound fields such as Addresses are selected (or dragged-and-dropped onto the report), each element of the field appears individually on the report. Alternatively, the user may place individual elements on the report, such as Installer Company, as shown in the figure above.
The report editor includes a Search function and Filters (to aid administrators in locating fields to add to the report).
Filters available include:
- Hidden Fields: to remove/add archived fields and/or fields not currently referenced on a form.
- Data Field Types: to filter by type of data field.
Form Elements are related to specific types; for example, Boolean (T/F) fields are associated with check boxes, Choice fields are associated with Drop-down List and Multiple-Choice form field types, etc. Each unique Data Field within Form Elements comprised of more than one field (i.e., a Data Field Group) has its own type as well (e.g., First Name and Last Name, which comprise the Form Element Name, are each a String field). - Data Field Group Types: grouped data fields, created collectively when their Form Element is added to a Form.
Examples include the Contact and Address Form Elements as well as Special elements like the PV System and Energy Storage System. - Other Types: reportable Fields not directly related to a Form Element.
These include Built-In fields like Project Owner or Current Status as well as Fields that report on the meta data affiliated with Attachment Fields, Communications and Deadlines:- Attachment data: eSignature Status, File Name, Upload Timestamp, and Status (i.e., Approved or Rejected) for a given Attachment Field
- Communication data: First Send Timestamp, Message Status and Template Modified for all instances of a given Communication Template
- Deadline: due date for pending instances of a given Deadline
Note: if you do not see the data fields you expect, more than likely the configured filters are hiding those Data Fields, or you need to check one of the two options:
- “Show fields not referenced on current forms”
- “Show archived fields”
Roll-Up Reports
Roll-Up Reports provides administrators the ability to define reports which aggregate, average, and count values in program Data Fields. Using the familiar Report editor user interface, the administrator can define Roll-Up Reports including, but not limited to the following:
- Count of projects by City, State, Zip Code, or County
- Count of projects by Current Status
- Count of projects by Company
- Count of projects by Account Number (could be used to check for duplicates)
- Sum of PV System Nameplate Capacity by City, State, Zip Code, or County
- Average PV System Nameplate Capacity by City, State, Zip Code, County, etc.
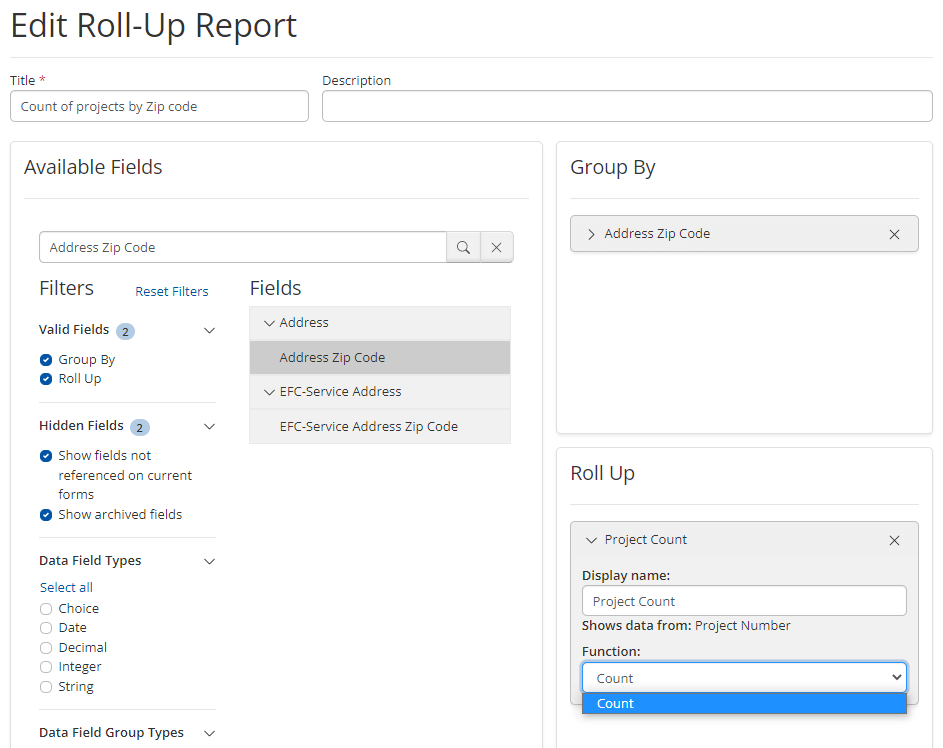
Similar to detail Reports, Roll-Up Reports will download in .csv format and are easily then converted into other common file types including .xlsx and .pdf.
Multi-Instance Reports
Multi-Instance Reports allow administrators to report across key project audits, like communication, status and attachment histories:
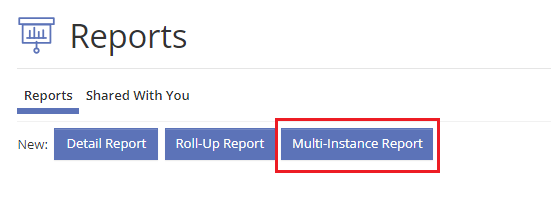
The following multi-instance fields in PowerClerk can be reported upon to collate this data outside of PowerClerk to increase your reporting capabilities and provide new avenues for Workflow analyses and program-wide optimizations:
- Attachment History: Report current and historical attachment metadata such as attachment name, uploader and approval status.
- Communication History: Report Communication Template names sent per project.
- Project Notes: Report Project Notes entered by administrative staff.
- Status History: Report data related to project status changes and by whom the change was initiated (see example shown below in Figure 5).
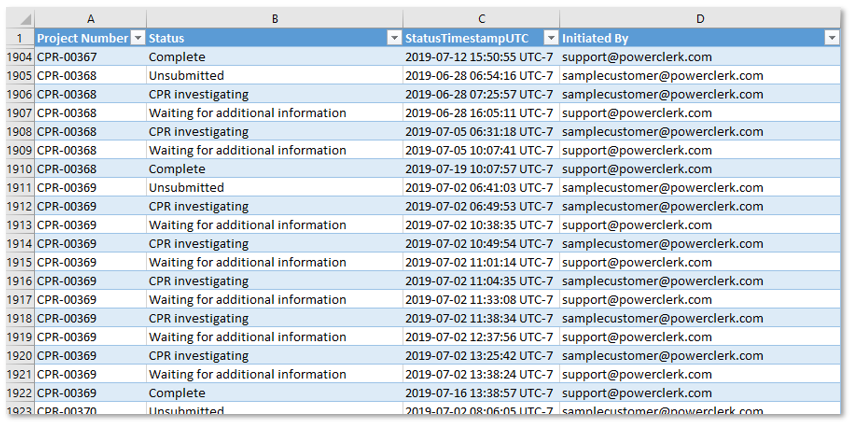
Please note: Multi-instance Reports also can be scheduled, shared, or integrated within Excel the same way regular reports can be handled.
Sharing Reports
When creating a Report in PowerClerk you can decide to share your Report with other users in Roles with the “View Shared Reports” privilege with the Share Report button and unshare the Report as well. To ease maintaining a shared Report in a group, additional PowerClerk user accounts can be granted save/edit access to a shared Report with button Grant Report Access:
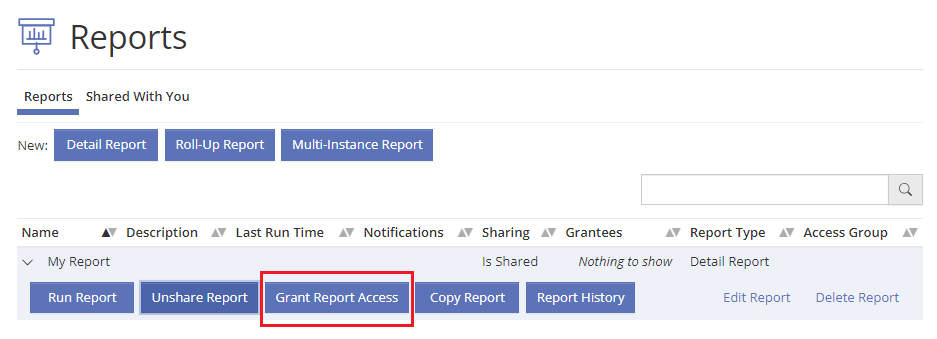
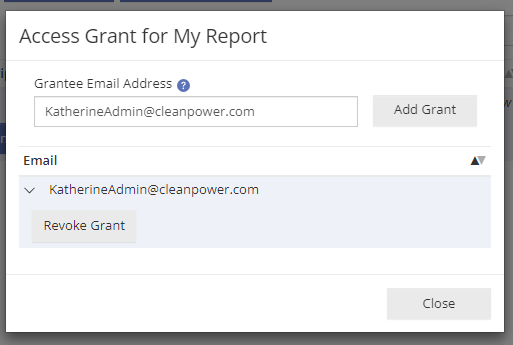
Using this button will allow to enter the email address of another PowerClerk user account to grant edit/save access to the Report:
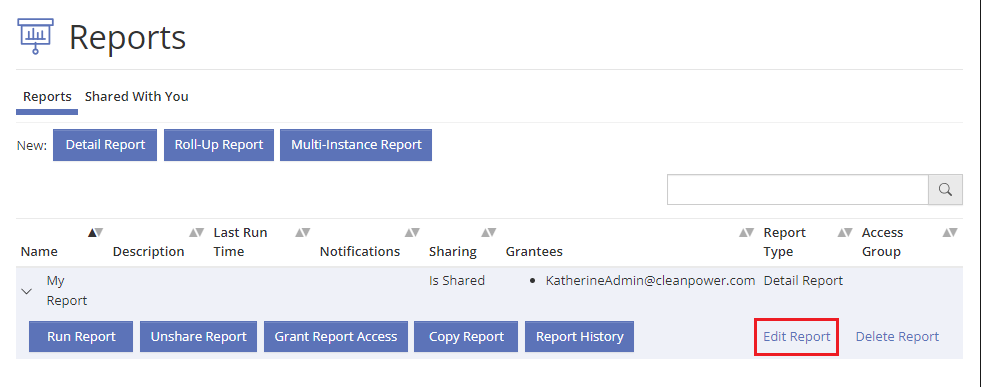
The Grantee of such Report access will see on their Shared With You tab the editable Reports available to them in column “Editable” as shown below:
Report History
Previously run reports will appear in the Report History for 30 days. Each historical report will display the date and time of its creation along with a link to download the report in Excel. If the report is shared and has run at least once in the past 30 days, the top of this page will include a ‘Download Link’ for use in integrations- see details below.
Integrate scheduled Reports with Microsoft Excel and Power BI
A report that is generated by a Scheduled Automation Trigger and associated “Run Report” Action Rule can be refreshed directly in an Excel workbook without having to log on to PowerClerk by referencing the report’s “Download Link” provided in the Report History:

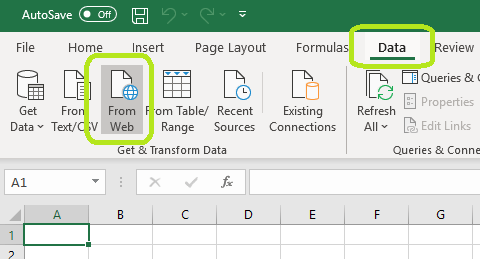
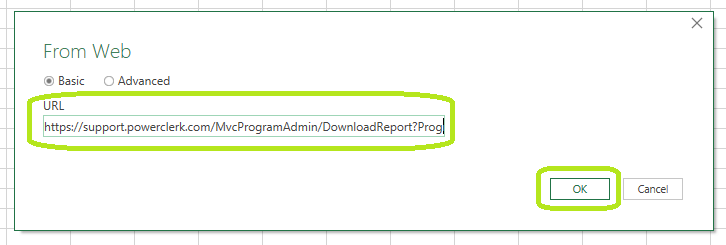
To connect directly to the latest iteration of the report within Excel click on the menu item Data >> From Web and paste the download link in the subsequent dialog as shown in Figure 10 and 10b:
When Excel prompts you for a User name and Password enter your PowerClerk credentials. These will be stored on your Windows system:
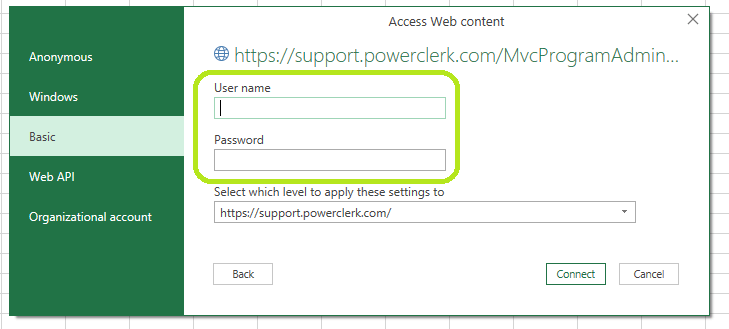
Please note: The connected Excel report may be shared, however, in order to refresh the report’s PowerClerk connection, the recipient must also have access to the shared PowerClerk report and provide their PowerClerk credentials within Excel to authenticate.
Synchronization of scheduled Reports within Excel
Once you have established the direct connection to the PowerClerk report via the “Download Link” option described above, you can refresh your Excel workbook by navigating to menu item “Data” and clicking on “Refresh All”. Please note that only the latest iteration of the PowerClerk report’s data is being retrieved. A refresh in Excel *does not* re-run the PowerClerk report, which is why this functionality is particularly useful for scheduled Reports where PowerClerk automatically ran the report.
Cross-Program Reports
Cross Program Reporting allows you to run reports across multiple PowerClerk programs that you have in your agency. In order to set up programs for cross-program reporting, please contact Clean Power Research to setup and enable this feature for your programs and state the programs you would like to run a report on. In addition, the roles intended to run this kind of report need to have the admin privilege “Edit Cross-Program Report Mapping” enabled:
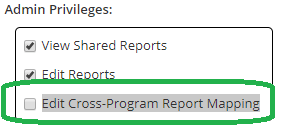
The next step in this process is to configure Cross-Program Report mapping. Any role with the “Edit Cross-Program Report Mapping” admin permission can access the Cross-Program Report mapping dialog. This relates the data fields from one program to the other programs as shown in Figure 15 below:

Click the Save button once you are finished mapping the data fields. You should now be able to run your Cross-Program Report.
Please Note: To run a Cross-Program Report that includes multiple programs, the user must have access to the other programs’ data. This can be achieved by either having an Admin Role in all included programs or by having a Role with broad access and being granted access to the Report.
FAQs

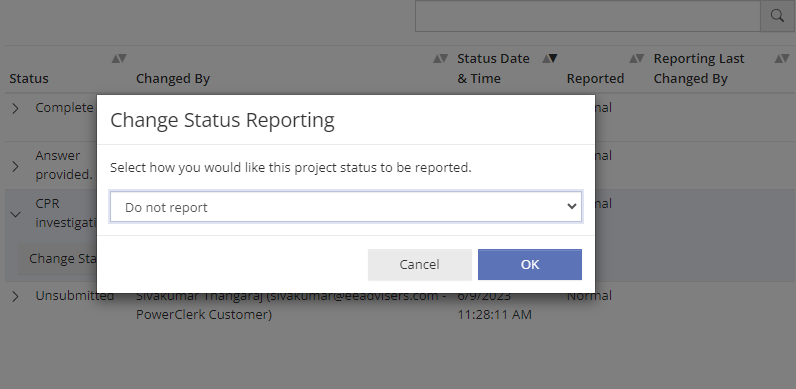
Expand the status row for the status you wish to suppress reporting for this single project by clicking button Change Status Reporting and select “Do not report” in the subsequent dialogue and acknowledge your selection:
Have additional questions? Contact us to nominate your FAQ and help others find answers to your own questions concerning this feature.
Create A Support Ticket
Not finding your answer here? Submit a question to our support team at the PowerClerk Ticket System and leverage the PowerClerk team’s expertise.

