PowerClerk Support Center

Project Pages
Project Admin Page
Locating the Project Admin Page
How to Use the Project Admin page
Project View/Edit Page
Locating the Project View/Edit Page
How to use the Project View/Edit Page
Program Design
Automations
Questions to Ask
Locating the Automations feature
How to create an Automation
Automation Triggers
Automation Action Rules
Validation Rules
Scheduled Triggers
Troubleshooting Automations
FAQs
Channels
Questions to ask yourself
Locating the Channels feature
What are Channels?
Types of Channels
Channel Type: Mark as Child
Channel Type: Make Successor
Channel Type: Create Related Project
Channel Type: Submit Related Project
Channel Type: Project Lookup
How to create a Channel
Channel Signals and Automations
Using Channels in Test Environments
FAQs
Communications
Questions to ask yourself
Locating the Communications feature
Creating Communication templates
Finding Data Tags
Images in Communications
Sending Mass Communications
Project Attachments and Content Library Items
Smart Templates
Upgrading to Smart Templates
Upgrading when a Test Environment Exists
Broken Template Tags
Examples of Broken Template Tags
PowerClerk Mass Communication Policy
FAQs
Connections
Questions to ask yourself
Locating the Connections feature
What are Connections
How to Create a Standard Web Adapter
Define the Standard Web Adapter
Connecting, Testing, and Enabling the Web Adapter
Creating a Standard Web Adapter Configuration
Utilizing Connections on PowerClerk
Maintaining and Editing the Web Adapter
Web Adapter Payload Type Format
Supported Message Versions
Error Handling
Custom List Lookup
Create a Custom List Lookup
Utilizing Custom List Lookup
FAQs
Content Library
Questions to ask yourself
Locating the Content Library feature
Uploading content to the Content Library
Use with Communication Templates
Use for Front Page content
FAQs
Custom API IDs
Questions to Ask
Locating the Custom API IDs feature
How to edit a Custom API ID
FAQs
Data Fields
Questions to ask yourself
Locating the Data Fields feature
How to work with Data Fields
Custom Lists and Data Field Groups
Table form element
PV System + batteries element
FAQs
Deadlines
Questions to ask yourself
Locating the Deadlines feature
What are Deadlines
How to Create a Deadline
Deadline Automation Action Rules
Utilizing Project Admin Page for Deadlines
Communication Templates for Deadlines
Deadline Set/Satisfy Options
Program-Wide Deadline Actions
Reporting on Deadlines
Deadlines in Project List Columns
FAQs
Document Templates
Questions to ask yourself
Locating the Document Templates feature
How to define a new Template
How to define a new Merged Document
eSignatures
DocuSign template tags
Mapping eSignature tags
Smart Templates
FAQs
eSignature Envelopes
Questions to Ask
Locating the eSignature Feature
What are eSignature Envelopes?
eSignature Checklist: The Prerequisites to create a new Envelope
How to set up Advanced eSignature Envelopes Step-by-Step
How to add an eSignature Envelope to a form
eSignature Automation Trigger
Viewing Completed eSignature Envelopes
Resending eSignature Notifications
Canceling eSignatures
FAQs
Forms
Questions to ask yourself
Locating the Forms feature
How to create and edit Forms
Adding data fields
Configuring Forms
VersaForms
Sensitive Data Fields
FAQs
Formulas and Calculated Fields
Questions to ask yourself
Locating the Formulas feature
How to work with Formulas and Calculated Fields
Formula Data Dictionary
Dynamic Formula References
Rules of Formula References
Advanced Visibility Rules
Video Guides: Formulas
FAQs
Front Page
Questions to ask yourself
Locating the Front Page feature
How to edit the Front Page
FAQs
Incentive Design
Questions to ask yourself
Locating the Incentive Design feature
How to create and edit Incentive Designs
Incentive Options for One-Time Incentive Type
Incentive Design Options
FAQs
Milestones
Questions to ask yourself
Locating the Milestones feature
How to define a Milestone
FAQs
Project List Columns
Questions to ask yourself
Locating the Project List Columns feature
How to use Project List Columns
FAQs
Project Summary
Questions to ask yourself
Locating the Project Summary feature
How to edit the Project Summary
FAQs
Project Views
Questions to ask yourself
Locating the Project Views feature
How to edit Project Views
FAQs
Roles
Questions to ask yourself
Locating the Roles feature
How to create and edit a Role
Access Groups
Access Groups and Automations
Access Groups and Data Imports
Access Groups and Reports
FAQs
Workflow
Questions to ask yourself
Locating the Workflow feature
How to create and edit the Workflow
Transitions
Workflow Example Overview
FAQs
Administration
Announcements
Locating the Announcements feature
Creating an Announcement
Triggering an Announcement
Managing Announcements Topic List
Managing Announcement Topic Enrollment Via User Account
Prerequisites for Using Announcements
Business Days
Questions to ask yourself
Locating the Business Days feature
Setting up Business Days
FAQs
Dashboards
Questions to ask yourself
Locating the Dashboards feature
How to create widgets in your Dashboard
Other Dashboard Actions
Data Import
Questions to ask yourself
Locating the Data Import feature
Steps to Complete a Data Import
Data Import Configurations
Column Header Types
Automatic Data Imports via SFTP
FAQs
Duplicate Check
Questions to ask yourself
Locating the Duplicate Check feature
How to use Duplicate Checks
FAQs
Import Projects
Questions to ask yourself
Locating the Import Projects feature
How to Import From V2
FAQs
Operation Status
Questions to ask yourself
Locating the Operation Status feature
How to use the Operation Status feature
FAQs
Program Info
Project Inquiry
Locating the Project Inquiry feature
How to edit the Project Inquiry Settings
Automating Communications for Project Inquires
Inquiry Summary
Questions to ask yourself
Locating the Program Info feature
How to edit the Program Info menu
Notification Banners
Usage Info
FAQs
Program Statistics
Questions to ask yourself
Locating the Program Statistics feature
How to use Program Statistics
FAQs
Reports
Questions to ask yourself
Locating the Reports feature
How to setup Reports
Multi-instance reports
Sharing Reports
Integrate scheduled Reports
Cross-Program Reports
FAQs
User Administration
Questions to ask yourself
Locating the User Administration feature
How to work with User Administration
FAQs
Test Environment
FAQs
Questions to ask yourself
Locating the Test Environment feature
How to setup a Test Environment
Tools Menu
My Account
Questions to Ask
Locating the My Account feature
How to use the My Account feature
Setting up Multi-Factor Authentication
Missing, lost, or stolen mobile devices: resetting Multi-Factor Authentication
Disabling Multi-Factor Authentication
Recovery Guidelines for MFA Administrators
FAQs
FormSense
Questions to Ask
Locating the FormSense feature
How to use the FormSense feature
FAQs
Grant Access
Questions to Ask
Project Grants vs Broad Grants (i.e. "Grant Access")
Locating the Project Grant feature
Locating the Grant Access feature
How to use the Grant Access feature
FAQs
Integration Guides & API
ePayments
Questions to ask yourself
Locating the ePayments History feature
How to add ePayments
FAQ
PowerClerk API
Questions to Ask
What is the PowerClerk API?
What can the PowerClerk API do?
Integrating with the PowerClerk API
API Documentation for Developers
Single Sign On (SSO)
Questions to Ask
PowerClerk SSO Configuration
Azure AD Configuration (SAML)
Azure AD Configuration (OIDC)
Okta IDP Configuration (SAML)
SP Configuration
SSO for multiple programs
IDP Configuration Troubleshooting
FAQs
Integration Guide 001: How to configure a Web Adapter – ArcGIS Implementation
Integration Guide 002: How to configure Electric Power Research Institute’s (EPRI) DRIVE Connect software with PowerClerk
PowerClerk Video Guides
Setting up Roll-up Reports
New User Video Guide
Configuring Forms
Roles and User Administration
Setting up Business Days
Formulas and Advanced Visibility Rules
Visualize Workflows
Dashboards
ArcGIS
FormSense
API
Edit Forms - Tutorial #1
SFTP Automatic Data Import
Calculated Fields
Standard Web Adapter Setup
Build A Formula
Milestones
Edit Forms - Tutorial #2
Project Summary
Automation with Formulas in Action Rules
PowerClerk Program Launch
PowerClerk User Group Sessions (UGS)
Learning Management System (LMS)
Join us for Reflow!
NEW: PowerClerk Certifications

Test Environment

Save time and ensure quality delivery by using the Test Environment to develop and evaluate program changes without impacting your live program.

Test Environment feature


Questions to ask yourself about your Test Environment:

Who in your organization should have access to the Test Environment? Who needs to create Test Environments?
Which aspects of your current program need to be improved?
How do we commit Test Environment changes to our live or production program?
What are the different PowerClerk Enviornments?

Locating the Test Environment feature

Anyone in a Role with the Create Test Environment privilege can access this feature by opening the ADMIN menu and clicking on Test Environment:
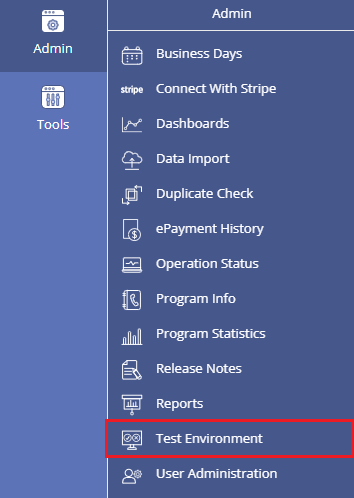
 

Locating the Test Environment feature

Figure 1: ADMIN >> Test Environment


How to setup a Test Environment

The Test Environment feature of PowerClerk allows you to create a copy of your current program to evaluate and implement changes to your live program without interruption.


The dialog shown in Figure 2 below offers you the option to include Roles from your existing program to allow them access to your new Test Environment. PowerClerk Communications can be routed to your email address in a Test Environment instead of the users outlined in the templates. This can be helpful for testing. Enter at least one email address to route PowerClerk Communications. Multiple email addresses can be entered if separated by a semi colon. Please note this will not include emails sent via integrations, such as DocuSign emails.
 

To begin click the Create Test Environment button:
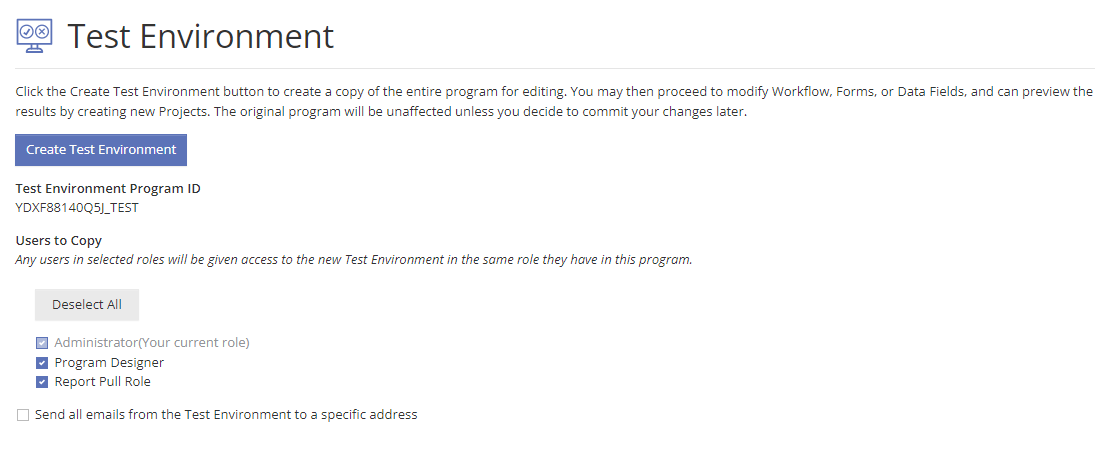
 

Create Test Environment

Figure 2: Create Test Environment


Once your new Test Environment has been created you will notice a yellow-grey banner indicating that you are working within a Test Environment. The overview of Program Changes lists any differences between your current main program and your Test Environment. The overview will notify you if there are any duplicates with the main program and the test environment that will block the test environment from being committed. The easiest way to address these blockers is by deleting the duplicated in the non-test environment program.
 
Upon completion of your changes and thorough functionality testing, please visit PowerClerk’s Ticket System program and submit your commit request by selecting the option “I would like my Test Environment to be committed”. Alternatively, you may select to discard your current Test Environment to start over with a completely new Test Environment.
 
Please Note: We recommend you do not make configuration changes in your live program while a Test Environment is active as the TE will overwrite current program configuration. You can continue to work on individual projects and customers can still submit applications.
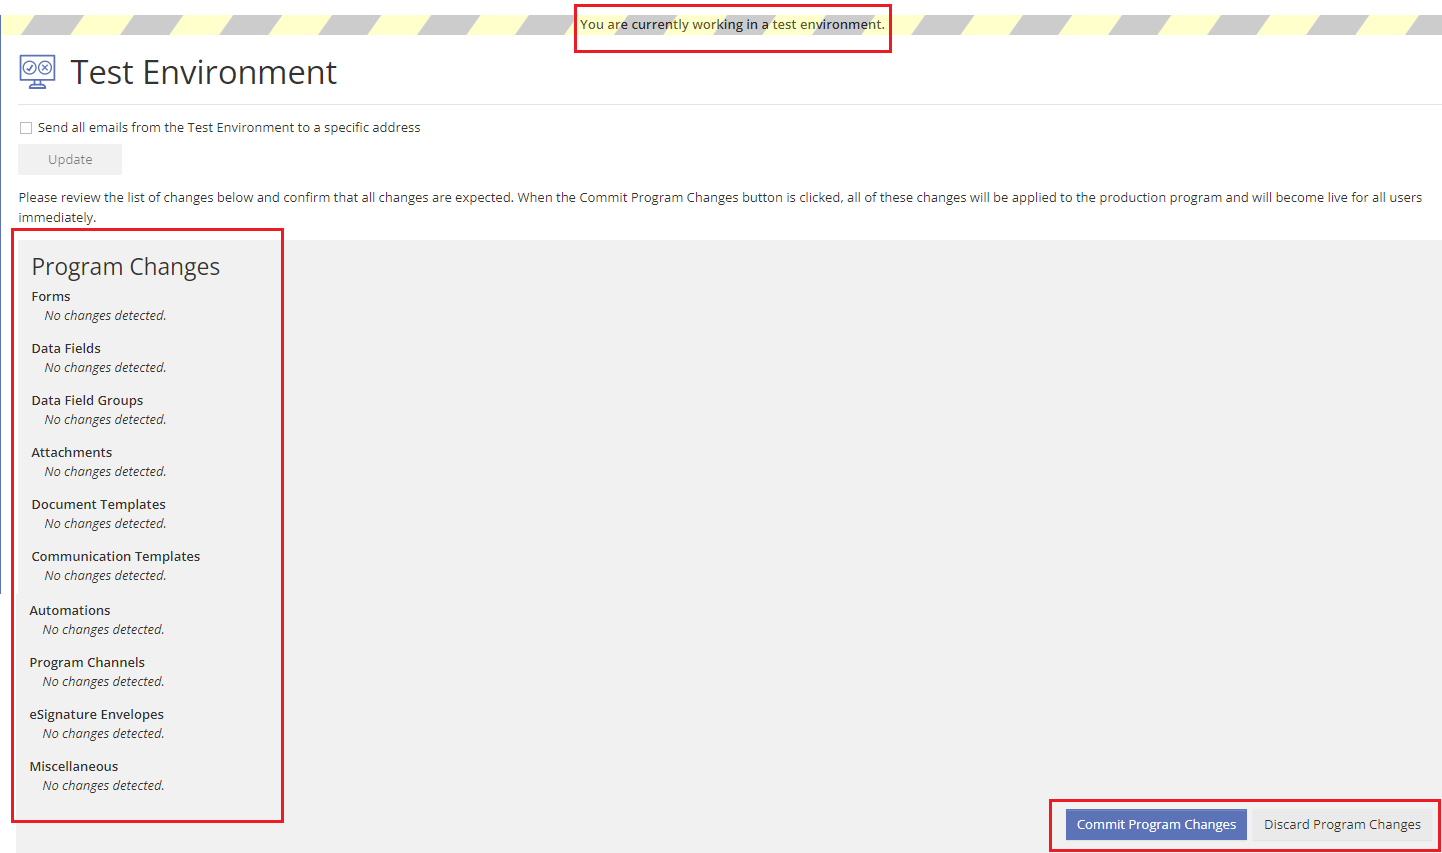
 

Test Environment dialog

Figure 3: Test Environment dialog


Please note: Upon fulfillment of your commit request, all your edits within your Test Environment will be committed to your actual main program and this procedure is not reversible.

You can create only one Test Environment at a time and have to either discard or request the commit of your changes before creating a new Test Environment.


PowerClerk Environments

PowerClerk has two main environments. A Sandbox Environment that will be noted with PCITrial in the URL and the Production Environment that will NOT have PCITrial in the URL.
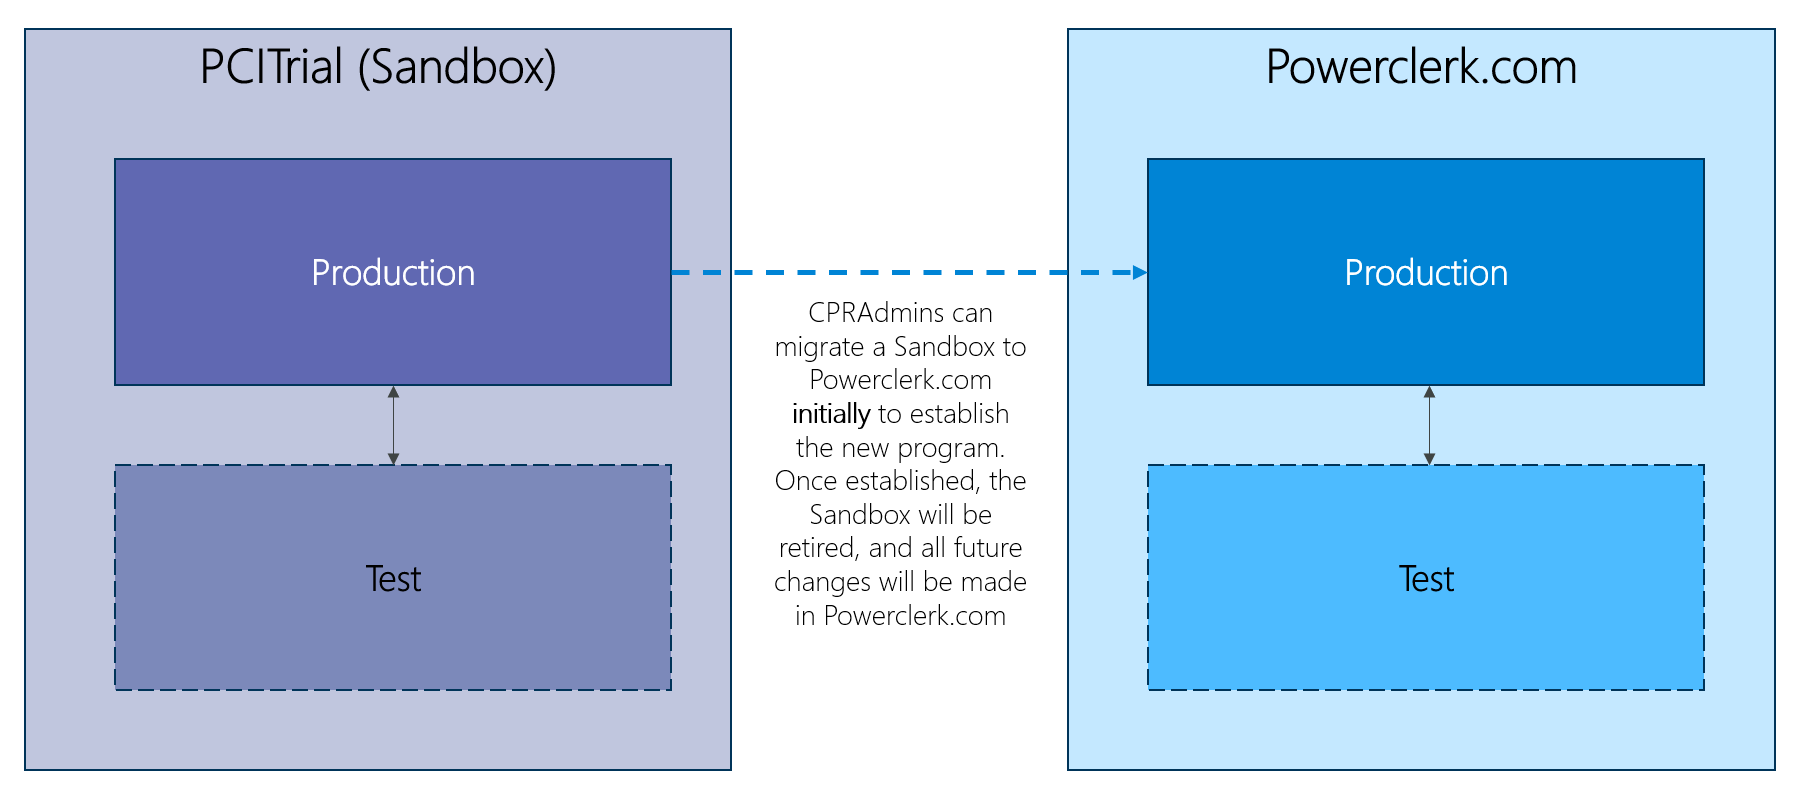
 

PowerClerk Enviornments

Figure 4: PowerClerk Enviornments


A Sandbox environment will typically be utilized to build programs or sometimes test out potential features you would like enabled in your production program before you pay for it. Once a Sandbox program has finished testing and is configured, it will be pushed to a Production environment. When utilizing the sandbox environment do not place PII/customer data in this environment. Please note: CPRAdmins can migrate a Sandbox to Powerclerk.com initially to establish the new program. Once established, the Sandbox will be retired, and all future changes will be made in Powerclerk.com. Additionally, we are unable to merge Sandbox instances with established programs in Powerclerk.com.
 

A Production environment is for live programs that are being utilized and contain customer data/PII data.
 

Both environments have their own instance of a Test Environment. We recommend closing test environments frequently to assure that when they are committed the program remains up to date.

FAQs

Q: What is the process for the PowerClerk team to commit a Test Environment?
A: While in the Test Environment, please review the Test Environment report by navigating to Admin >> Test Environment and investigate any entries that state "Duplicate Detected". These duplicates represent commit conflicts between your live Production Environment and Production Test Environment that prevent the PowerClerk Support Team from committing your Test Environment. Most commonly, these duplicates appear by altering your Production Environment while your Test Environment was already established, and then re-creating the Production changes in your Test Environment with the exact same naming convention(s). You can fix most "Duplicate Detected" conflicts by renaming the respective PowerClerk element either in your production environment or Test Environment. Once you have thoroughly tested all program changes of your current Test Environment and are ready to request the commitment of these changes to your Production Environment, please submit your commit request by clicking the button called New Support Request in PowerClerk's Ticket System program and then selecting the option "I would like my Test Environment to be committed" and completing the form before submitting your support ticket. PowerClerk's Support Team guarantees to process your commit request within 5 business days, and most commit requests are processed within hours of ticket submittal. If you need to target a specific date for committing your program changes, please reach out to the PowerClerk Support Team ahead of time to ensure we can work with your time constraints. Once your Test Environment has been committed, you will receive a commit confirmation email form the PowerClerk Support Team. Alternatively, the PowerClerk Support Team may contact you to remedy any commit conflicts that need to be addressed prior to committing your current Test Environment.
Q: When committing a Test Environment, will we keep all users that had already been registered in Production?
A: Yes, committing a Test Environment to Production will not overwrite your existing users in Production. Similarly, if you have Projects set up in the Test Environment, those Projects will not overwrite your existing projects in Production when committing the Test Environment to Production.
Q: Does the Program ID stay the same when you create a Test Environment?
A: No, the Program ID will not stay the same. It will change to be the: Program ID +"_TEST" every time a test environment is created. For example, if your current Program ID is ABCEDF, the test environment's Program ID will be ABCDEF_TEST.

Have additional questions? Contact us to nominate your FAQ and help others find answers to your own questions concerning this feature.

Create A Support Ticket

Not finding your answer here?  Submit a question to our support team at the PowerClerk Ticket System and leverage the PowerClerk team’s expertise.