Deadlines

Locating the Deadlines feature
Anyone in a Role with the Edit Deadlines privilege can navigate to the Deadlines screen by opening the PROGRAM DESIGN menu and clicking on Deadlines.

What are Deadlines?
Deadlines can be utilized to help keep projects on time, ensure that different stakeholders are submitting data by certain dates, and help monitor program performance. Deadlines can be used for several reasons, including:
- External Deadlines to ensure applicants submit their documentation within the mandated timeframe and remind them of outstanding tasks. An example of this is setting a deadline to ensure application corrections are submitted on time.
- Internal Deadlines to ensure application processing keeps a reasonable pace or remains within the rules and regulations of the program. An example of this is a deadline for the Administrator to review the applications within a certain number of days.
- Project Milestone Deadlines to capture the total number of days a project moved through each designated milestone.
How to create Deadlines
To create a deadline, navigate to the Deadlines page and select “New Deadline”. A deadline consists of: deadline length in number of days (calendar, or business), reminder emails, and actions for the deadline to take if it expires. You can also create Automation Action Rules to manage your deadlines (set, satisfy, pause/resume).

On the Edit Deadline page, you will set the deadline’s properties, communications, and expiration action. The details of each are listed below.

Countdown: Choose to countdown in Calendar Days or Business Days. Business Days can be modified on the Business Days Calendar feature under the ADMIN menu.
Deadline is set: Choose to start the deadline countdown based on the moment the deadline is set with an automation or based on a data field in a PowerClerk form.
If you choose ‘when the deadline is set’, the deadline due date will be calculated from the moment the deadline was set. If you choose a date field, the deadline due date will be calculated from the value of that selected date field. If the selected date field doesn’t have a value when the deadline is started, no deadline will be set.
Time: Choose what time of day the deadline should expire. The deadline can either expire at the time of day the deadline was set or at 11:59pm on the expiration date.
Satisfied by status change to: Choose how to satisfy the deadline by status change. Note there are multiple ways to satisfy a deadline, within and outside the deadline’s configuration. See the section below for more details.
The options are:
- None for This Configuration: Deadline will keep counting down until an Administrator specifically marks this Deadline as Satisfied from the Project Admin page or if an Automation is created.
- Any Status Change: Deadline will be satisfied if the project changes status to any status.
- Specific Status: Deadline will be satisfied if the project changes status to this specific status.
The option chosen will work in conjunction with any Automation Action Rules. Manually satisfying a deadline overrides automatic configurations.
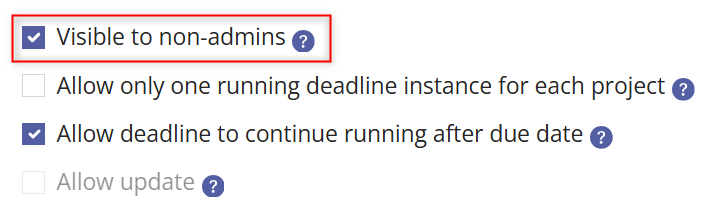
Visible to non-admins: If selected, the deadline will appear on the project’s View/Edit page and may appear within the “Deadline Date (Next Due or Overdue)” built-in project list column for non-admins. A deadline will always be visible on the Project’s Admin page.
Allow only one instance for each project: If selected, this configuration will not allow duplicate deadlines to run simultaneously. Select this configuration if you do not want to create additional instances (e.g. an Automation tries to set a new deadline but the same deadline is already pending). This option is required for deadlines that are calculated based on the value of a selected data field.
Allow deadline to continue running after due date: If selected, the deadline to continue running as “Pending – Not satisfied” as the deadline expires. The deadline will continue to run until satisfied and you can report on how long the deadline has been active.
Allow Update: This option is only available for deadlines that are calculated based on the value of a selected data field. If selected and another instance of this deadline is created (either manually or by an automation) and the previous instance is not satisfied, the due date will be recalculated using the new value of the selected date field that was originally used to calculate the due date.
Reminders: Choose if you would like to send out reminders to the relevant group or individual that the deadline due date is approaching.
Remind with template: Specify which Communication Template shall be sent as the Deadline reminder. Within the Communication Template you can configure which recipients receive the reminder as well as the messaging of what actions need to be taken in order to satisfy the deadline. More information on how to set up the Communication Template is below.
Reminder schedule: Choose how often and when to send the reminders following the default schedule or a customized schedule. The default schedule will send reminder notifications 60, 30, 7, and 1 day prior to the deadline’s expiration. This schedule will discontinue once the deadline has been satisfied. Alternatively, a custom schedule may be specified by providing the reminder intervals separated by commas (e.g. “200, 60, 20, 5, 1”).
After Due Date: Choose what actions PowerClerk should automatically take on a project if the deadline expires without being satisfied.
Change to Status: If a status is chosen, PowerClerk will automatically change the project’s status to the selected one if the deadline expires. Any Automations associated with the project status change will run.
Notify with Template: If a Communication Template is chosen, PowerClerk will automatically send the communication to the configured user(s) to notify them that the project’s deadline has expired. Here you can outline actions that need to be taken on the project or next steps. See below for more information on Communication Templates with Deadlines.
Deadline Automation Action Rules
A Deadline can be: Set, Satisfied, Paused, and Resumed via Automation Action Rules. As a best practice, we suggest utilizing Automation Triggers associated with Statuses for deadline action rules.
If a deadline is paused and then subsequently resumed, PowerClerk will resume the deadline from the moment the deadline was paused. For example, if a deadline was set to be due in 10 business days total, and an automation paused the deadline after 3 business days, then the deadline will resume with only 7 business days left.
An example of a deadline that can be set up with Action Rules is for Administrators to complete a preliminary review of every application that enters the review status within a certain number of days.
Through an Automation Action Rule, a Program Designer can “Set” a deadline for Application Review when an application is submitted and enters the “Application Initial Review” status.
If the Administrator finds that corrections are required on the application, another Automation Action Rule can be set to “Pause” the Application Review deadline and “Set” a Customer Edits Required deadline when the project enters the “Application Suspended Corrections Required” status.
Once the customer submits their corrections, an Automation Action rule can “satisfy” the Customer Edits Required deadline and another rule can “resume” the Application Review deadline when the project moves back to the “Application Initial Review” status. The Application Review deadline will resume from the moment it was paused and continue the countdown.
Steps 1 – 3 below illustrate this example:
Step 1: When the project status enters “Application Review”, “Set Deadline [Application Review]”:


Step 2: If customer corrections are required on the application, two deadline action rules are configured: “Pause Deadline [Application Review]”, and “Set Deadline [Customer Edits Required]”:

Step 3: When the customer corrections are finished and the project re-enters the Application Review status, two action rules are configured: “Satisfy Deadline [Customer Edits Required]”, and “Resume Deadline [Application Review]”. Please note: In these examples a formula condition was used to express the scenario of customer corrections being required:

Utilizing Project Admin Page for Deadlines
The Project Admin Page will show any deadlines that are currently pending (active), paused, expired, or satisfied. Admin can take the following actions on a project’s individual deadline:
- Set a new deadline.
- Change current deadline’s due date.
- Manually mark a deadline as satisfied.
- Review all active and satisfied deadlines.

Communication Templates for Deadlines
Communications Templates can be created to remind the appropriate user(s) of an upcoming deadline and provide directions on how to complete the tasks to satisfy the deadline. Communication Templates can also be used to tell appropriate user(s) of a deadline’s expiration.
There are four distinct template tags that can be used within Communication Templates to convey information about specific Deadlines.
“Deadline Active” Template Tag:
This template tag calculates the sum of elapsed times any of the respective Deadline’s instances have been running for a project. This value is shown in days (calendar or business days) rounded up to full days. Any times when the respective Deadline instances may have been paused will be subtracted. This tag can be utilized in any Communication Template and in Document Templates.

To illustrate the Deadline Active Template Tag, the communication template below is configured to send a utility customer an email informing them how long the utility took to process their application:

Deadline Specific Tags:
These template tags can only be used for communications configured within the deadline. They will only appear and have a proper value when sent out in the deadline itself as a reminder or part of a deadline expiration.
- Tag {DeadlineDueDate}: Shows the respective Deadline’s due date in context of a reminder email or expiration email sent out for the respective Deadline.
- Tag {DaysToDeadline}: Shows the respective Deadline’s remaining days for the Deadline to expire in context of a reminder email or expiration email sent out for the respective Deadline.
- Tag {DeadlineName}: Shows the respective Deadline’s name in context of a reminder email or expiration email sent out for the respective Deadline.

Deadline Set/Satisfy Options
Deadlines can be set via:
- Automation Action Rule
- Manually via Project’s Admin Page
- Data Import*
Deadlines can be satisfied via:
- Status Change configured in Deadline’s configuration
- Automation Action Rule
- Manually via Project’s Admin Page
- Data Import*
*For more information, please visit the Data Import Support Center Article.
Program-Wide Deadline Actions
Sometimes it may be necessary to adjust an active deadline running in multiple projects. There are three actions that can be taken for a deadline on a program-wide basis.

Delay: Delay a Deadline’s expiration date for a specified number of days. This option allows you to accommodate for storm days or other events and collectively extend all instances of the deadline. When selecting this option, you can specify if this delay should affect all projects with the deadline active, or only certain projects that are nearing their deadline’s expiration date.
Reset: Reset all projects with an active instance of this deadline back to its original due date. This action will override any manual intervention or previous changes made to individual projects.
Recalculate: Available only to deadlines configured to business days. Recalculating deadlines will set new due dates based on your current Business Calendar settings. For example, if you add upcoming holidays or closed office to your program’s calendar, you can adjust the deadline’s expiration dates to accommodate this change.
Reporting on Deadlines
Deadlines can be reported on in the Detail Report and the Multi-Instance Report types. More information on Reports will be found on the Reports Support Center Article.
Detail Report: Report on the project’s Nearest Deadline Due Date and Nearest Deadline Name.
Multi-Instance Report: Report on Deadline History. This will include:
- Deadline Name: Name of deadline
- Creation Timestamp: The date the deadline was originally created (set) on a project deadline.
- Due Date: Deadline due date that includes any extension such as Delay Deadline or Admin Change Due Date.
- Original Due Date: Original due date, prior to a Delay Deadline or Admin Change Due Date being triggered.
- Deadline Status: Pending (active), Paused, Satisfied, Expired
- End Date: The date the Deadline was marked as “Satisfied”
- Calendar Days/Business Days Running: The difference between the creation date and the time the deadline was stopped by the Automation, minus the time it was paused.
- Calendar Days/Business Days Left on Paused Deadline: The calculation of days remaining. .
- Calendar Days/Business Days Paused: Number of days the deadline has been paused.
Please note: The “Days Running, Days Left, and Days Paused” is calculated by the difference between the Creation Timestamp, and the time the deadline was paused, minus the total time paused.

Deadlines in Project List Columns
With the ability to add column headers Nearest Deadline Name and Nearest Deadline Due Date in your Project List Columns, you can easily add an overview of which Deadline will expire next for each project in your program:

Video Guides
Would a video guide help to better explain Deadlines? Contact us and let us know.
A full list of all Video Guides can also be found here.
FAQs
Have additional questions? Contact us to nominate your FAQ and help others find answers to your own questions concerning this feature.
Create A Support Ticket
Not finding your answer here? Submit a question to our support team at the PowerClerk Ticket System and leverage the PowerClerk team’s expertise.