PowerClerk Support Center
- Project Pages
- Program Design
-
- Automations
- Channels
- Communications
- Connections
- Content Library
- Custom API IDs
- Data Fields
- Deadlines
-
- Questions to ask yourself
- Locating the Deadlines feature
- What are Deadlines
- How to Create a Deadline
- Deadline Automation Action Rules
- Utilizing Project Admin Page for Deadlines
- Communication Templates for Deadlines
- Deadline Set/Satisfy Options
- Program-Wide Deadline Actions
- Reporting on Deadlines
- Deadlines in Project List Columns
- FAQs
- Document Templates
- eSignature Envelopes
-
- Questions to Ask
- Locating the eSignature Feature
- What are eSignature Envelopes?
- eSignature Checklist: The Prerequisites to create a new Envelope
- How to set up Advanced eSignature Envelopes Step-by-Step
- How to add an eSignature Envelope to a form
- eSignature Automation Trigger
- Viewing Completed eSignature Envelopes
- Resending eSignature Notifications
- Canceling eSignatures
- FAQs
- Forms
- Formulas and Calculated Fields
- Front Page
- Incentive Design
- Milestones
- Project List Columns
- Project Summary
- Project Views
- Roles
- Workflow
- Administration
- Tools Menu
- Integration Guides & API
- PowerClerk Video Guides
-
- Setting up Roll-up Reports
- New User Video Guide
- Configuring Forms
- Roles and User Administration
- Setting up Business Days
- Formulas and Advanced Visibility Rules
- Visualize Workflows
- Dashboards
- ArcGIS
- FormSense
- API
- Edit Forms - Tutorial #1
- SFTP Automatic Data Import
- Calculated Fields
- Web Connector Setup
- Build A Formula
- Milestones
- Edit Forms - Tutorial #2
- Project Summary
- Automation with Formulas in Action Rules
- PowerClerk Program Launch
- PowerClerk User Group Sessions (UGS)
- Learning Management System (LMS)
- Join us for Reflow!
- NEW: PowerClerk Certifications
Applicant and Administrator Experience
Applicant Experience
Account Creation
Applicants can self-register for accounts in PowerClerk as shown in Figure 1; however, email verification is required prior to being able to login.
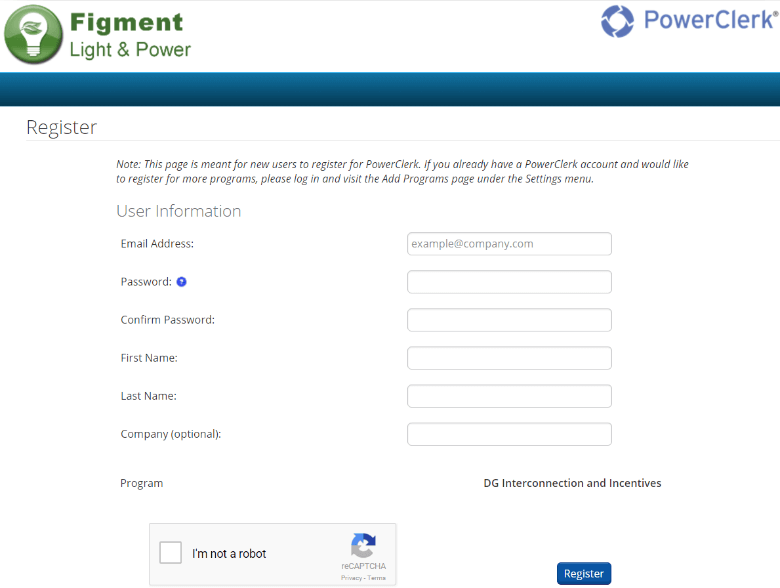
Enabling applicants to self-register saves the administrative team time over an admin-managed applicant registration process.
Applicants must enter all required information to request an account. When a PowerClerk account is requested, a time-sensitive verification email with a security code is automatically sent to the user to confirm the user’s email address and complete registration.
Submitting Applications
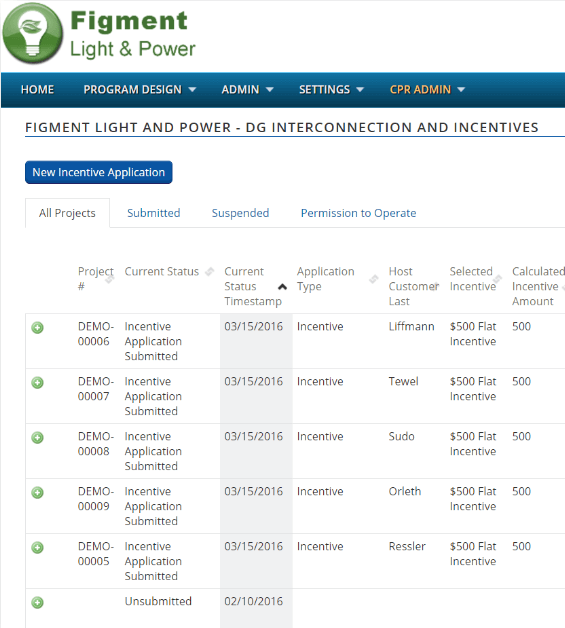
Once the applicant has set up their PowerClerk account, they may log in to submit new applications or check the status of existing applications. Any applicant user account that requests access to the program can submit applications if self-registration has been enabled by the administrator.
See the list of applications visible to a user in Figure 2. Note that additional columns can be displayed on this page (e.g., Account Number, Host Customer Name, etc.,) as specified by the administrator to provide additional context to each application. The search box will search any of the column contents in the application list:
The applicant begins filling out a new application by clicking the blue”New [Form Name]” button. The application form is then displayed as a series of task steps to be completed. These task steps will require the applicant to populate fields as designed in the form editor (by the administrator—see the “Forms” section), which can include contact information, technical information about a generating system, supporting documentation, and more. A representative application form is shown in Figure 3:
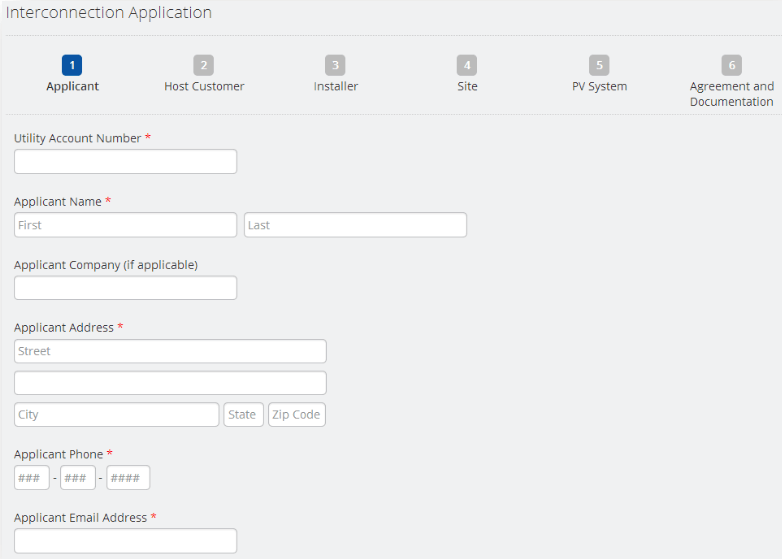
The data entered into the application form is automatically saved each time the user changes pages in the form or exits the form. Unsubmitted (incomplete) applications are saved and the applicant may return at any point in the future—assuming administrators have not suspended the program or user in the meantime—to finish filling out an Unsubmitted application.
PV System Components
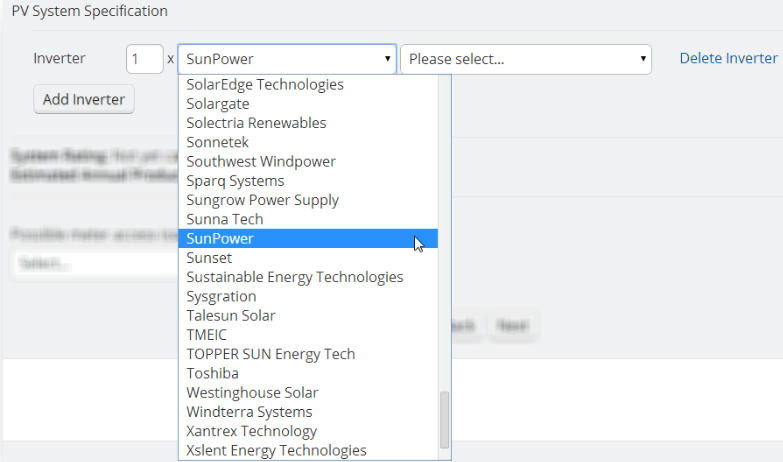
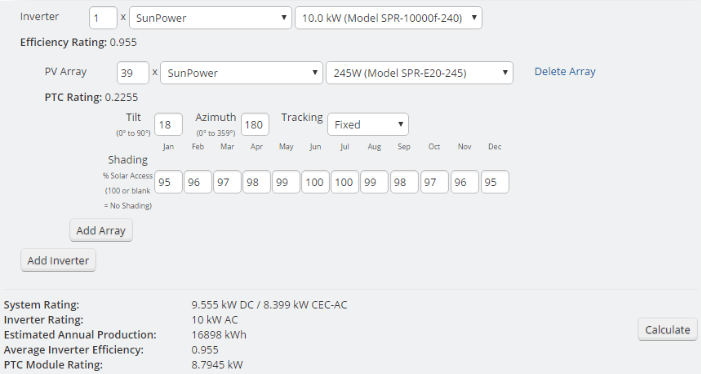
PowerClerk provides drop-down lists of equipment manufacturer and model from which the applicant can select the relevant components for their application. Use of drop-downs reduces applicant data entry mistakes and makes it possible for PowerClerk to reference equipment ratings and specifications to calculate system ratings and estimated annual production. Rather than having the applicant enter an equipment rating and manually perform the total system rating calculation PowerClerk will perform the calculation automatically. See Figure 4 and Figure 5 for an example from a PV incentive application. In this example, the estimated annual production (kWh), DC rating and CEC-AC rating are calculated using specifications from the CEC equipment list as well as the system location, orientation, and shading.
CEC Equipment List –PV Equipment
PowerClerk utilizes the California Energy Commission (CEC) solar equipment lists, which can be accessed here: http://www.gosolarcalifornia.org/equipment/. Only CEC-listed equipment as it appears on the public CEC website is included in PowerClerk.
Equipment ratings (inverter efficiency and module PTC rating) are drawn from the CEC list and cannot be overridden. Custom, unlisted, freeform or generic equipment cannot be entered into PowerClerk’s purpose-built PV System control. Clean Power Research automatically scans the CEC equipment website and any changes to the CEC site are automatically reflected in PowerClerk, usually in less than a business day.
Supporting Documentation
Many incentive applications require supporting documentation such as one-or three-line diagrams and more to be included in the application package. PowerClerk enables the applicant to upload electronic attachments directly into the application form from their web browser. Electronic document attachments can be in .pdf, .docx, .xlsx, or .csv format and can be up to 5MB per attachment.
The list of supporting documents is entirely specified by the administrator. Electronic attachments can be marked as required with a red asterisk, and may also appear dynamically depending on entries in other data fields with Conditional Visibility.
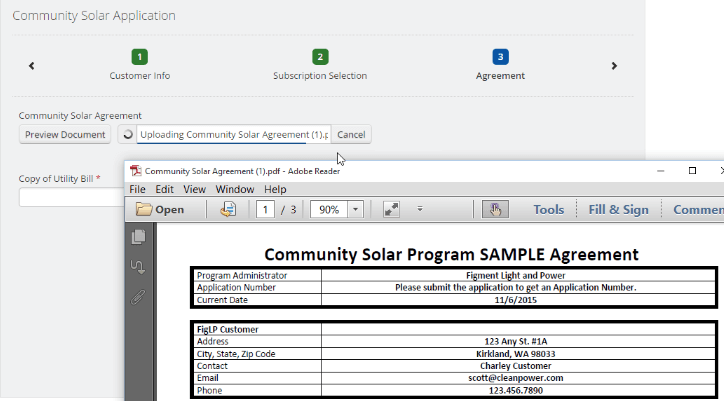
Documents such as agreements can be generated by PowerClerk. These documents can be populated with information from the application, as configured by the administrator. An example agreement document has been generated and uploaded as shown below in Figure 6:
Applicant Post-Submission Experience
Once an application is submitted it receives a unique project number and is no longer editable by the applicant. The applicant may use the View button to review the application data and electronic attachment, but may no longer make edits unless the administrator returns the application into an applicant-editable state. In the case of a two-step program, a 2nd step application form will require review and editing by the applicant once the application enters a particular status. Both the workflow and the configuration of forms to statuses are configurable by the administrator, as described in the “Workflow” and “Forms” sections. The applicant is able to see a complete summary of their in-progress and submitted applications in the main application list, including the current status of each application.
Administrator Experience
Roles
In order to discuss the administrator experience in PowerClerk, we first need to define Roles. Roles control who can see and do what actions at what time. A hierarchy of roles, each with uniquely defined permissions, can be specified by the administrator. A typical set of roles for a PowerClerk program is defined below:
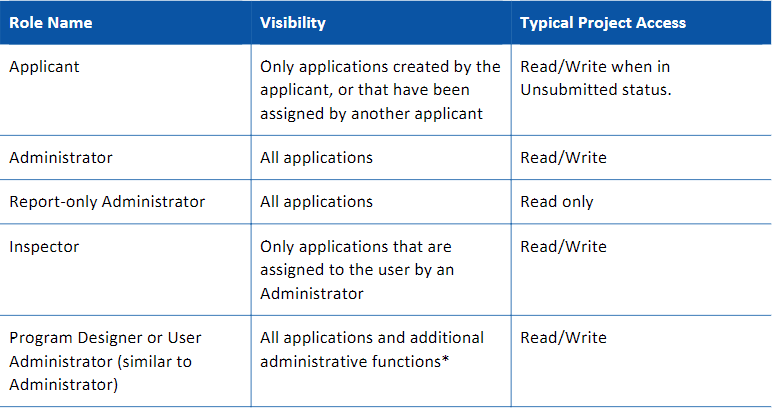
*Additional administrative functions can include user administration, document template import and activation, communication template creation and activation, deadline creation, front page editing, and more.
Roles in PowerClerk are configurable by the administrator.
Unless otherwise specified, all functionality will be described from the User Administrator’s perspective.
Administrative Application Processing
Upon login, the administrator is directed to the Home page in PowerClerk which displays the list of applications. The Home page displays all applications for the program, and a number of searchable/sortable columns that are configurable, but can include application status and most recent status date. The administrator can View any application to see a read-only summary, or use the Admin button to open the admin view of the application. The administrator may also Delete application from the Home page, if it is in the Unsubmitted status. See Figure 8:

To review a particular application, the administrator clicks Admin which opens the Admin page. The Admin page is a single-page overview of the entire application, and allows the administrator to:
- Review the application, including any electronic attachments and signed documents
- Change the application status
- View status history
- View/edit Project Notes
- Send Communications
- Set Deadlines
- Review eSignature status
- Set Assignee
- Review Project Data History
See Figure 9 and Figure 10 for changing status; and Figure 11 for detail on the Admin page:
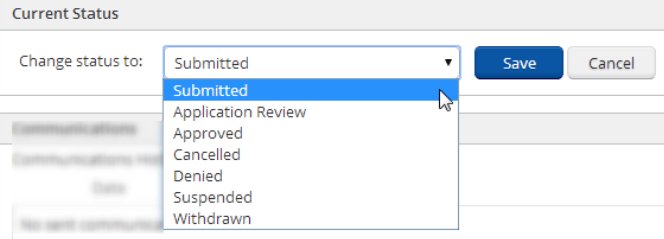
The administrator can change the status for an application from “Submitted” to “Application Review” to indicate to the applicant that review is underway. Note in Figure 10 that the date and time of the most recent status change is indicated next to the status. See the “Workflow” section for additional detail on configuring the flow between statuses:

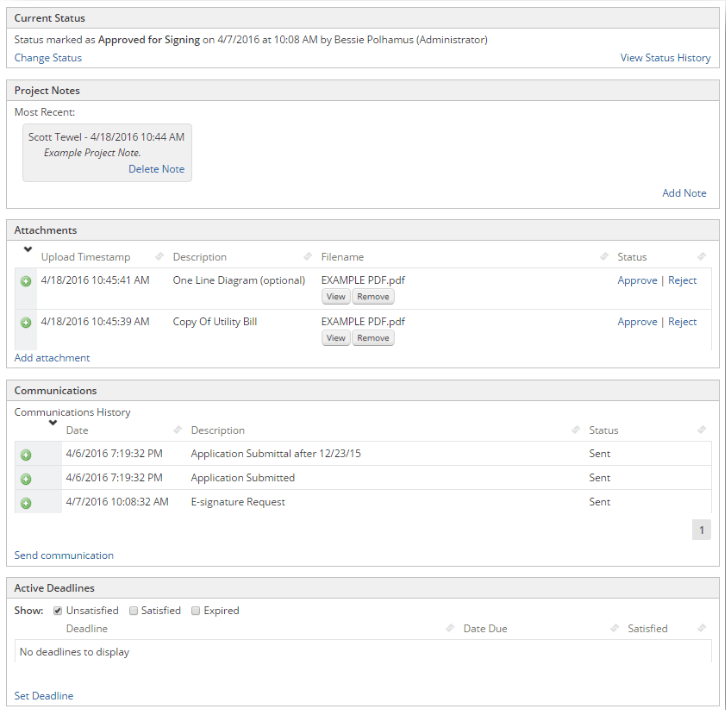
From the Admin page, the administrator can also send communications to various stakeholders, including the applicant. Communications are typically (and most productively) generated based on pre-saved templates. The Communications panel on the Admin page facilitates on-demand communications between administrator and applicant, and provides an easily digestible summary of communications history. The Communications panel tracks communications sent manually by the administrator as well as those sent automatically by Actions. See the “Communications” section for additional configuration detail and the “Actions” section on automatic sending of communications.
Deadlines can be created, activated and deactivated from the Admin page as well. Similar to the Communications panel, the Deadlines panel is placed near the top of the Admin page to provide the administrator easy access to activate and satisfy deadlines, and monitor active and expired deadlines. Deadlines keep the administrator, the applicant, and other stakeholders in line with project timelines as specified by the administrator. See the “Deadlines” section for additional detail.
The administrator can review each electronic attachment in the web browser by clicking on it, and can choose to Approve or Reject each attachment, enabling them to track outstanding items which could be prohibiting an application from advancing to the next status. Also, the administrator can upload documents into a particular application from the Admin page. In the case of a Rejected document, the applicant could email an updated version of the document to rectify any issues and the administrator could then upload it into PowerClerk.
If the application meets all program requirements, the administrator can advance the application to the next status in the workflow. Once the application process is complete, the administrator will place the application in a status such as “Complete,” “Approved,” or similar.
In the case of an application with errors or an attachment that has been rejected, the administrator has a range of possible actions available to notify the applicant that additional action is needed to correct the deficiency. The administrator can send communications to the applicant, or the administrator can change the application status to “Suspended” or similar to indicate that additional action is needed. See the “Actions” section for additional detail on how deadlines and communications can be automatically activated or sent, respectively, based on a status change.
Program Design
In PowerClerk, the administrator has a number of tools at their disposal to create and modify a program’s Workflow, Forms, Communications, Templates, Deadlines, Actions, Reports, and more as shown in Figure 12. These tools have been designed to provide flexibility and control to the administrator, enabling them to develop unique, program-specific workflows based on each program’s specific requirements. In many competing offerings, changing a program’s workflow or the contents of a form requires a code change, but both and more can be done self-service by the administrator in PowerClerk:
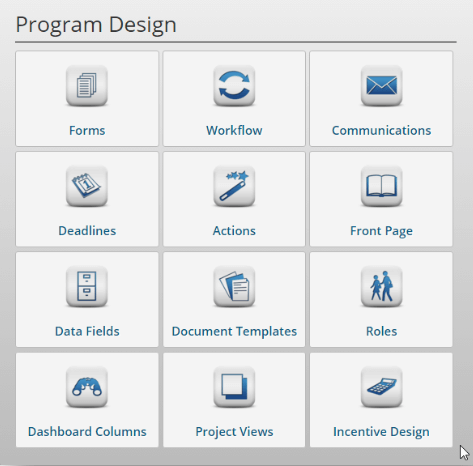
The following links will document in detail all Program Design functionalities within PowerClerk.
Build-A-Program
Advanced Program Design
Program Reporting
Administration
- Business Days
- Duplicate Check
- Data Import
- Import from V2
- Operation Status
- Program Info
- Program Statistics
- Reports
- Test Environment
- User Administration