PowerClerk Support Center
- Project Pages
- Program Design Menu
-
- Automations
- Channels
- Communications
- Connections
- Content Library
- Custom API IDs
- Data Fields
- Deadlines
-
- Questions to ask yourself
- Locating the Deadlines feature
- What are Deadlines
- How to Create a Deadline
- Deadline Automation Action Rules
- Utilizing Project Admin Page for Deadlines
- Communication Templates for Deadlines
- Deadline Set/Satisfy Options
- Program-Wide Deadline Actions
- Reporting on Deadlines
- Deadlines in Project List Columns
- FAQs
- Document Templates
- eSignature Envelopes
-
- Questions to Ask
- Locating the eSignature Feature
- What are eSignature Envelopes?
- eSignature Checklist: The Prerequisites to create a new Envelope
- How to set up Advanced eSignature Envelopes Step-by-Step
- How to add an eSignature Envelope to a form
- eSignature Automation Trigger
- Viewing Completed eSignature Envelopes
- Resending eSignature Notifications
- Canceling eSignatures
- FAQs
- Forms
-
- Questions to ask yourself
- Locating the Forms feature
- How to create and edit Forms
- Adding data fields
- Form Versions and Draft Forms
- Configuring Forms
- Form Field Elements
- Field Properties
- Conditional Visibility
- Sensitive Data Fields
- Location Form Element
- Address Autocomplete
- Exporting a Form to Excel
- VersaForms
- FAQs
- Formulas and Calculated Fields
- Front Page
- Incentive Design
- Milestones
- Project List Columns
- Project Summary
- Project Views
- Roles
- Themes
- Workflow
- Admin Menu
- Tools Menu
-
- My Account
-
- Questions to Ask
- Locating the My Account feature
- How to use the My Account feature
- Lockouts and Password Resets
- Setting up Multi-Factor Authentication
- Missing, lost, or stolen mobile devices: resetting Multi-Factor Authentication
- Disabling Multi-Factor Authentication
- Recovery Guidelines for MFA Administrators
- FAQs
- FormSense
- Grant Access
- Integration Guides & API
- PowerClerk Video Guides
-
- Setting up Roll-up Reports
- New User Video Guide
- Configuring Forms
- Roles and User Administration
- Setting up Business Days
- Formulas and Advanced Visibility Rules
- Visualize Workflows
- Dashboards
- FormSense
- Milestones
- ArcGIS
- Project Summary
- Automation with Formulas in Action Rules
- API
- Edit Forms - Tutorial #1
- SFTP Automatic Data Import
- Calculated Fields
- Web Connector Setup
- Edit Forms - Tutorial #2
- Build A Formula
- Help Articles
- PowerClerk Program Launch
- PowerClerk User Group Sessions (UGS)
- Learning Management System (LMS)
- Join us for Reflow!
- NEW: PowerClerk Certifications
eSignature Envelopes
Use eSignature envelopes to generate eSignatures and include them in a Form.
You are reading the eSignature Envelope Support Article:
- If you do not have eSignatures on your program, please refer to the guide below to setup eSignature Envelopes.
- If you have eSignature functionality on your program that was created before March 2023, you have Classic eSignatures on your program. Information on maintaining this eSignature type will be found on the Classic eSignature support article.
- Want to migrate to eSignature Envelopes? Contact our support team at the PowerClerk Ticket System to discuss migration options.
Locating the eSignature Feature
Anyone in a Role with the Edit eSignature Envelopes privilege can create an eSignature envelope by opening the PROGRAM DESIGN menu and clicking on eSignature Envelopes:

What are eSignature Envelopes?
eSignature Envelopes can also (optionally) include Attachments that were uploaded to a project and/or designated items stored within the program’s Content Library. When a signature request is triggered, by clicking “request signature” on a Form, the eSignature Envelope is created and sent to DocuSign. This action will subsequently email the designated signatories specified by the eSignature Envelope. The DocuSign email will direct them to DocuSign where they complete the signing process. Signatories do not have to be PowerClerk users.
eSignature Envelopes utilize data fields, attachments, and a document template that can be mapped and configured during envelope creation. Once the envelope has been designed, a PowerClerk program designer can open the Form where they wish to use the envelope, add the eSignature Envelope Form Element, and select the desired envelope.
eSignature Checklist for Creating a New Envelope:
Please Note: We will utilize a “backoffice” form throughout this example. A backoffice form is used to hold data fields to perform behind-the-scenes automations to set data fields or generate documents. This form does not need to be configured to be seen in any roles or statuses.
- Document Template:
- Required: Ensure you have created a Document Template with at least one Signatory Template Tag.
- Attachment Fields:
- Required: Define an Attachment Data Field to store the completed Envelope contents on a backoffice or internal-facing form.
- Optional: You may also define an Attachment in a backoffice form to store the certificate of completion from DocuSign.
- Data Fields:
- Required: For each signatory that will change depending on the Project, ensure there is a Contact Field or Name Field plus Email Field defined somewhere in the Program.
- Optional: Create data fields such as “Date Signed” on the backoffice form for each additional piece of information that is gathered in the Document Template via Template Tags. DocuSign can then house the date when each signatory completed the envelope (or other entered information) in these data fields.
How to set up Advanced eSignature Envelopes Step by Step
This tutorial explains how to configure an eSignature Envelope to be signed by an Applicant and Administrator of a program.
Step 1: Creating the Envelope
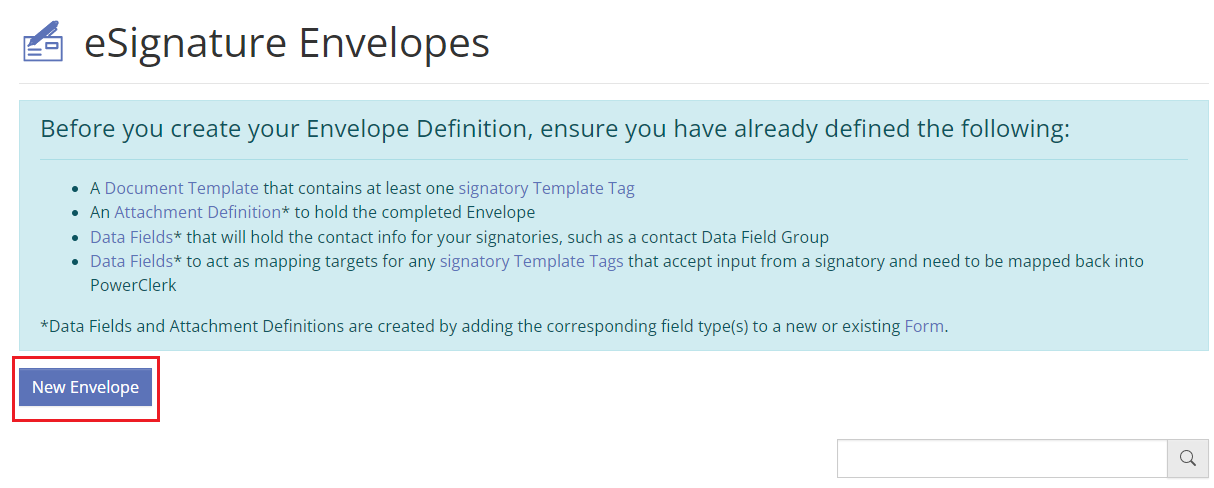
Anyone in a Role with the Edit eSignature Envelopes permission may create and edit an Envelope by going to Program Design >> eSignature Envelope. To define a new eSignature Envelope, click New Envelope. More information on the pre-requisite items can be found above.
Step 2: Completing the Overview
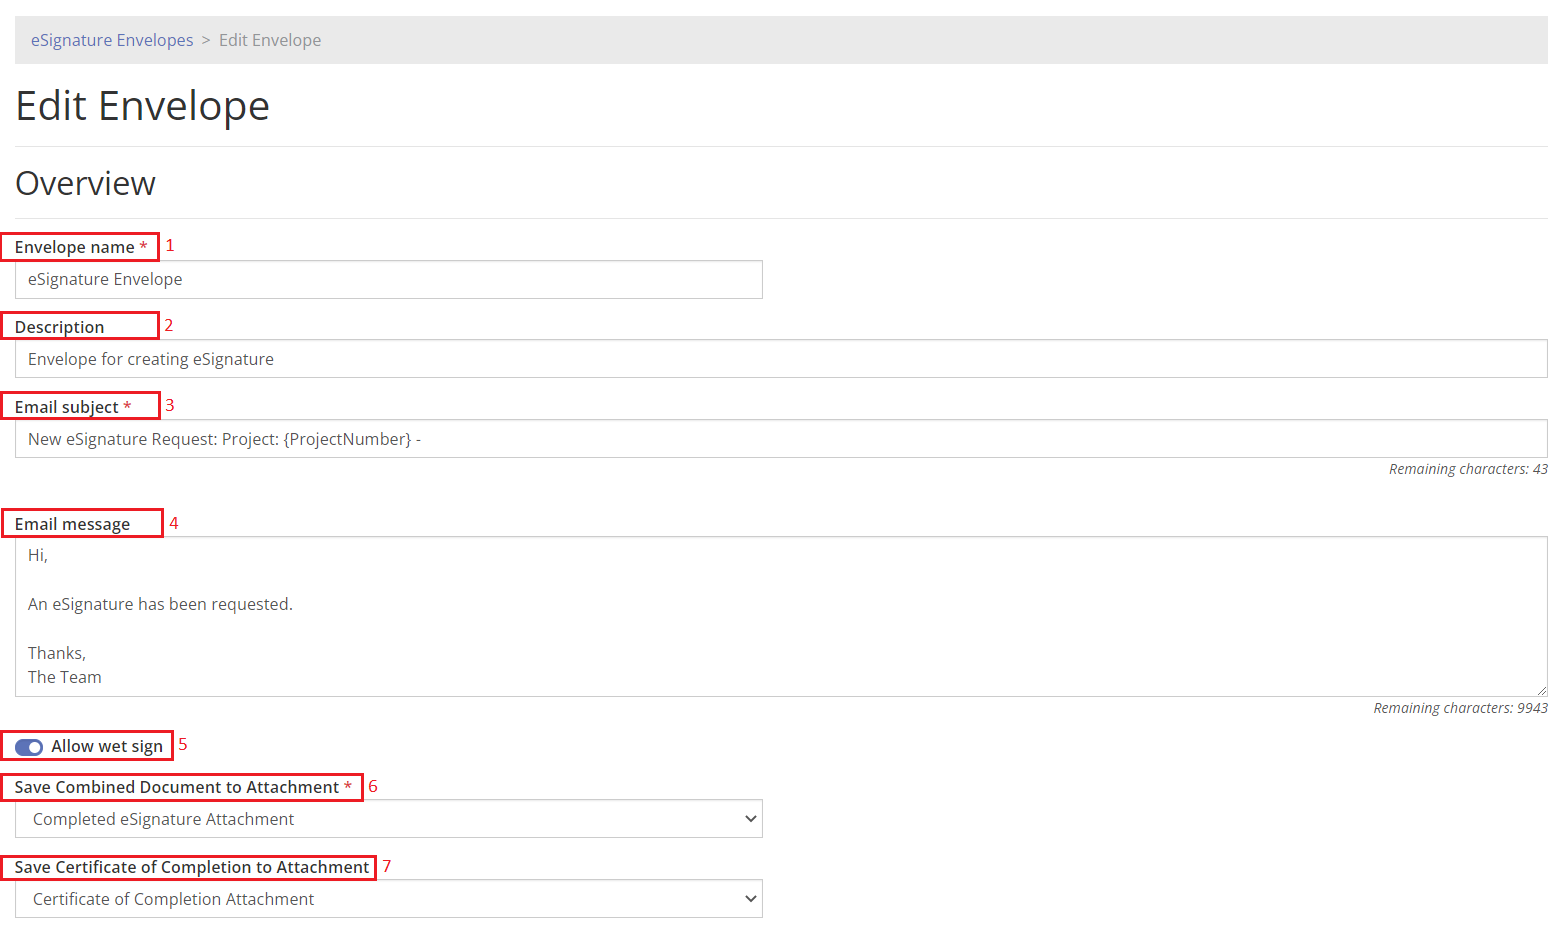
Completing the eSignature Envelope requires filling in the following information in the Overview demonstrated in Figure 3:
(1) Envelope Name: What the name of the entire Envelope will be.
(2) Description: To describe the contents of the Envelope.
(3) Email Subject: Will be what signatories receive in the email subject line. The Email Subject supports the {ProjectNumber} tag.
(4) Email Message: The body of the mail that will be sent with the DocuSign link.
(5) Allow wet sign: PowerClerk users can enable wet signs if they choose to. Wet sign is the process of downloading and being able to sign a physical paper document, form or contract with pen or pencil and then uploading the document back to PowerClerk.
(6) Save Combined Document to Attachment: PowerClerk requires users to select the attachment where the completed Envelope will be stored.
(7) Save Certificate of Completion to Attachment: If users created an attachment to save the certificate of completion from DocuSign that may be mapped here.
Please Note: HTML is not supported in Email Message. Support for Template Tags will be added in the future.
Step 3: Adding Items
PowerClerk requires users to add at least one document to be signed per envelope. Additional document templates, other attachments, or media from the content library can also be added for inclusion in the Envelope, as long as all documents to be signed have the same signatories. For example, if Document 1 must be signed by the homeowner and utility rep and Document 2 should be signed by the same homeowner and utility rep, and Document 3 requires no signatures, then these documents can be combined into one envelope.
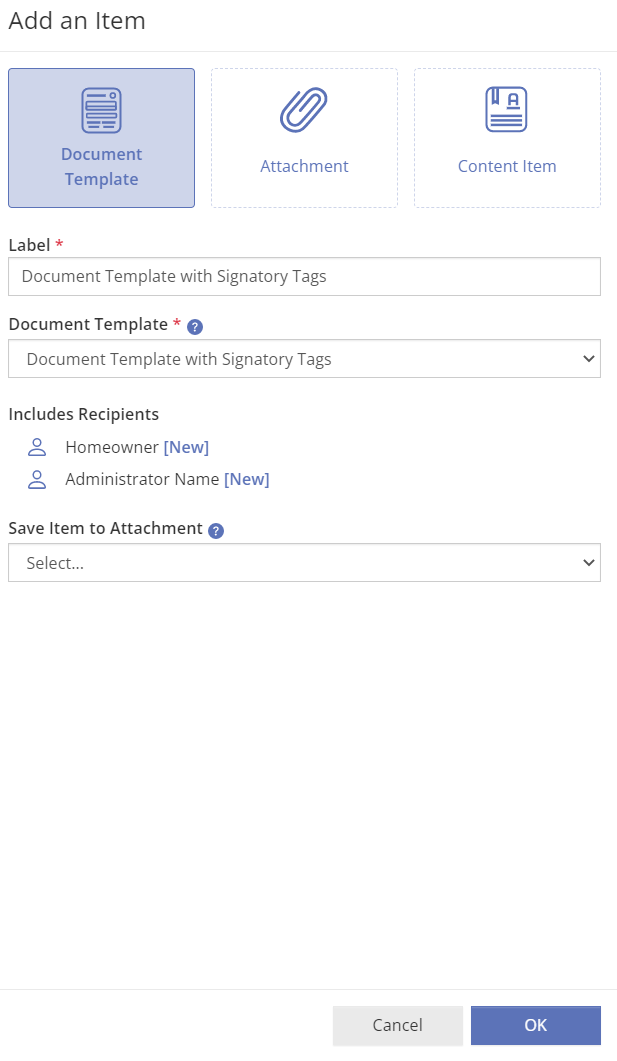
The figure below shows how to add a Document Template with signatory tags. First, click “Add Item” when the “Add an Item” menu appears ensure the Document Template is highlighted, then fill out the label. This will be what the Applicant sees as the title of this item. Select the Document Template with the signatory tag. To save the Document Template (alone) to an attachment, specify the location here. Keep in mind the combined contents of the envelope will be uploaded to the attachment specified earlier. Click “Ok” when done.
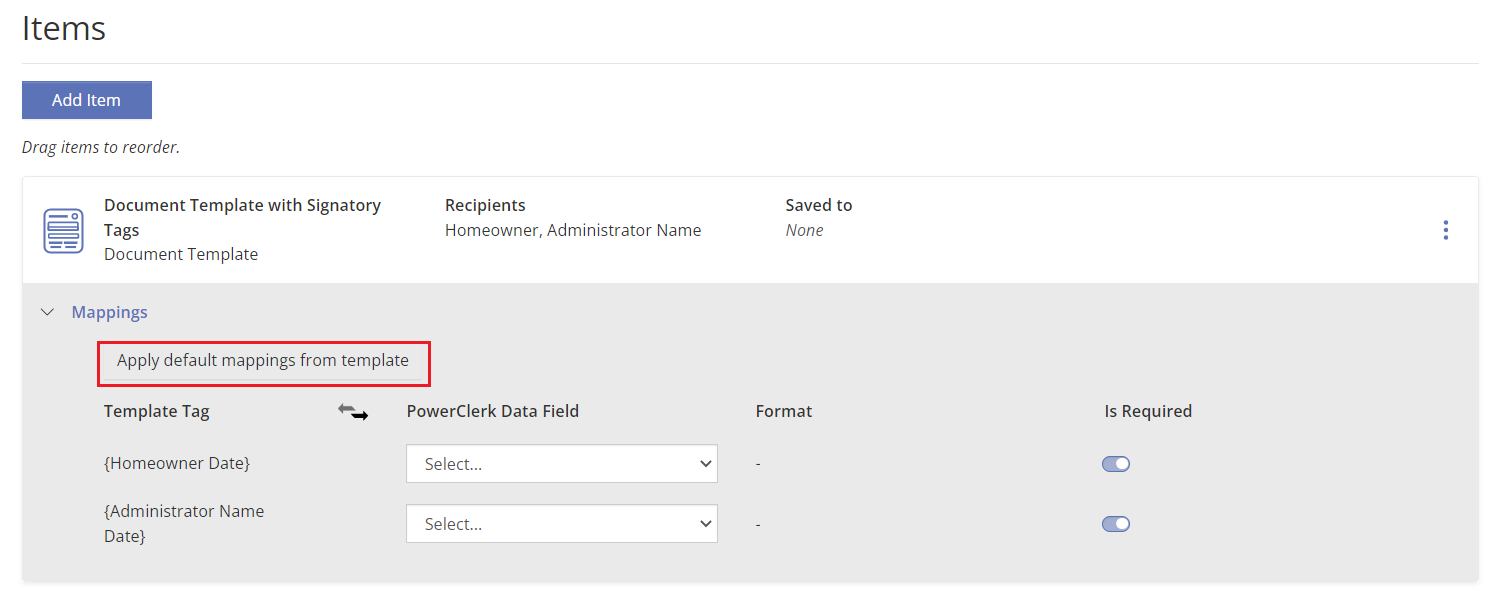
After a Document Template Item has been added, PowerClerk gives users the ability to map their tags to PowerClerk Data Fields. In this example we will be routing date template tags to date data fields that have been defined in a backoffice form.
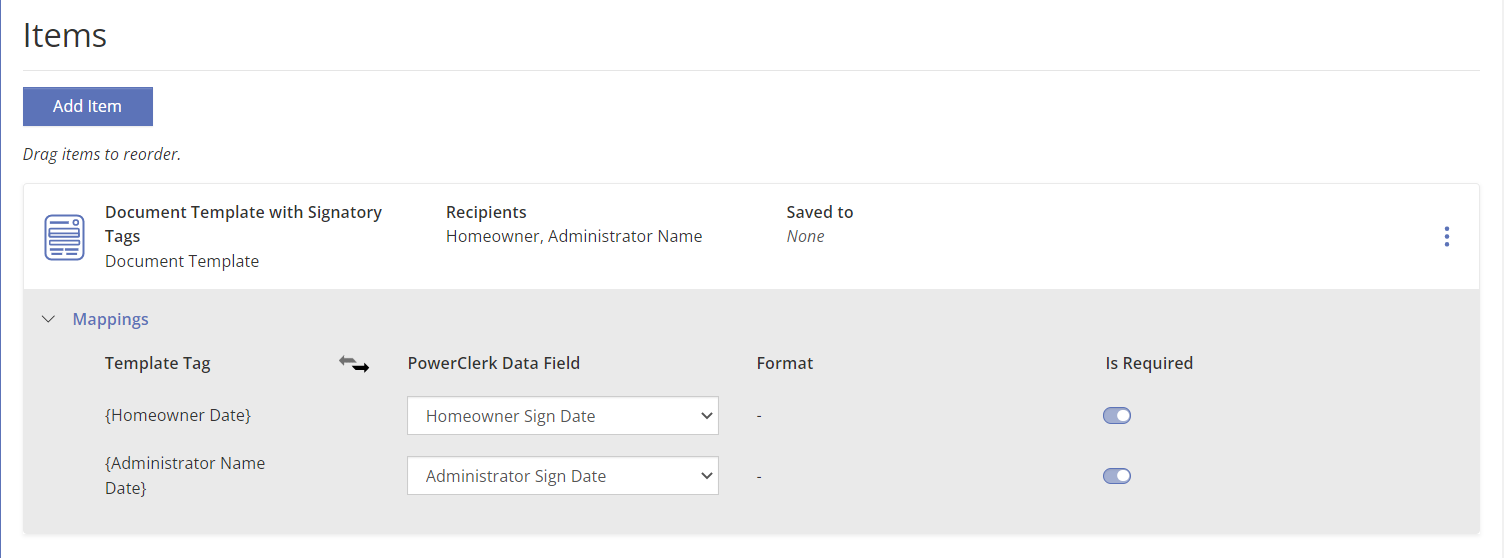
Please Note: If your program has an existing document template with already mapped template tags to PowerClerk data fields, when you add the Document Template, the button “Apply default mappings from template” will appear. Click this button to have PowerClerk apply those mappings to the Envelope. Date template tags do not need to be mapped as they are a DocuSign tag, but in order to have them saved on PowerClerk there must be a PowerClerk data field mapped to it.
Step 4: Signatory Setup and Routing Recipients
(1) eSignature Envelopes allow users to enable routing for the recipients of the envelope. When routing is enabled, there can be an order established on who will receive the DocuSign link first. Drag and drop the recipient boxes into the desired order. For the envelope shown in the figure below, the Administrator will receive the DocuSign link first, and when they have completed signing, it will then be sent to the Homeowner. If routing is not enabled, the eSignature request will be sent to all recipients simultaneously.
(2) PowerClerk eSignature Envelopes allow three ways to populate a signatory’s contact information. The first two involve PowerClerk Data Fields as the source of contact information. These Data Fields must be defined prior to creating the Envelope. If new contact information is collected for each project, use a Contact Field or a combination of a Name Data Field and an Email Data Field. Alternatively, a User Field can be placed on a Form, for example to select a reviewer from all users with the Reviewer role in that program. Selecting User Field here on the eSignature envelope will pull in the contact information of whichever user was selected in that field for the relevant project. The last option is to select a “Fixed Recipient” signatory to populate this envelope with the same individual’s name and email address for every project.
(3) Here you will also be able to send a Private Message to each recipient of the DocuSign communication. This message will not have the ability to use data field tags and will only be sent to that recipient.
Please Note: If multiple recipients share the same routing order and contact information when the eSignature envelope is requested, but have different private messages, these messages will be merged. The merged message will be limited to 1000 characters.

Step 5: Save
Once the recipients have been mapped and are ready, click Save to save the envelope.
How to add an eSignature Envelope to a Form:
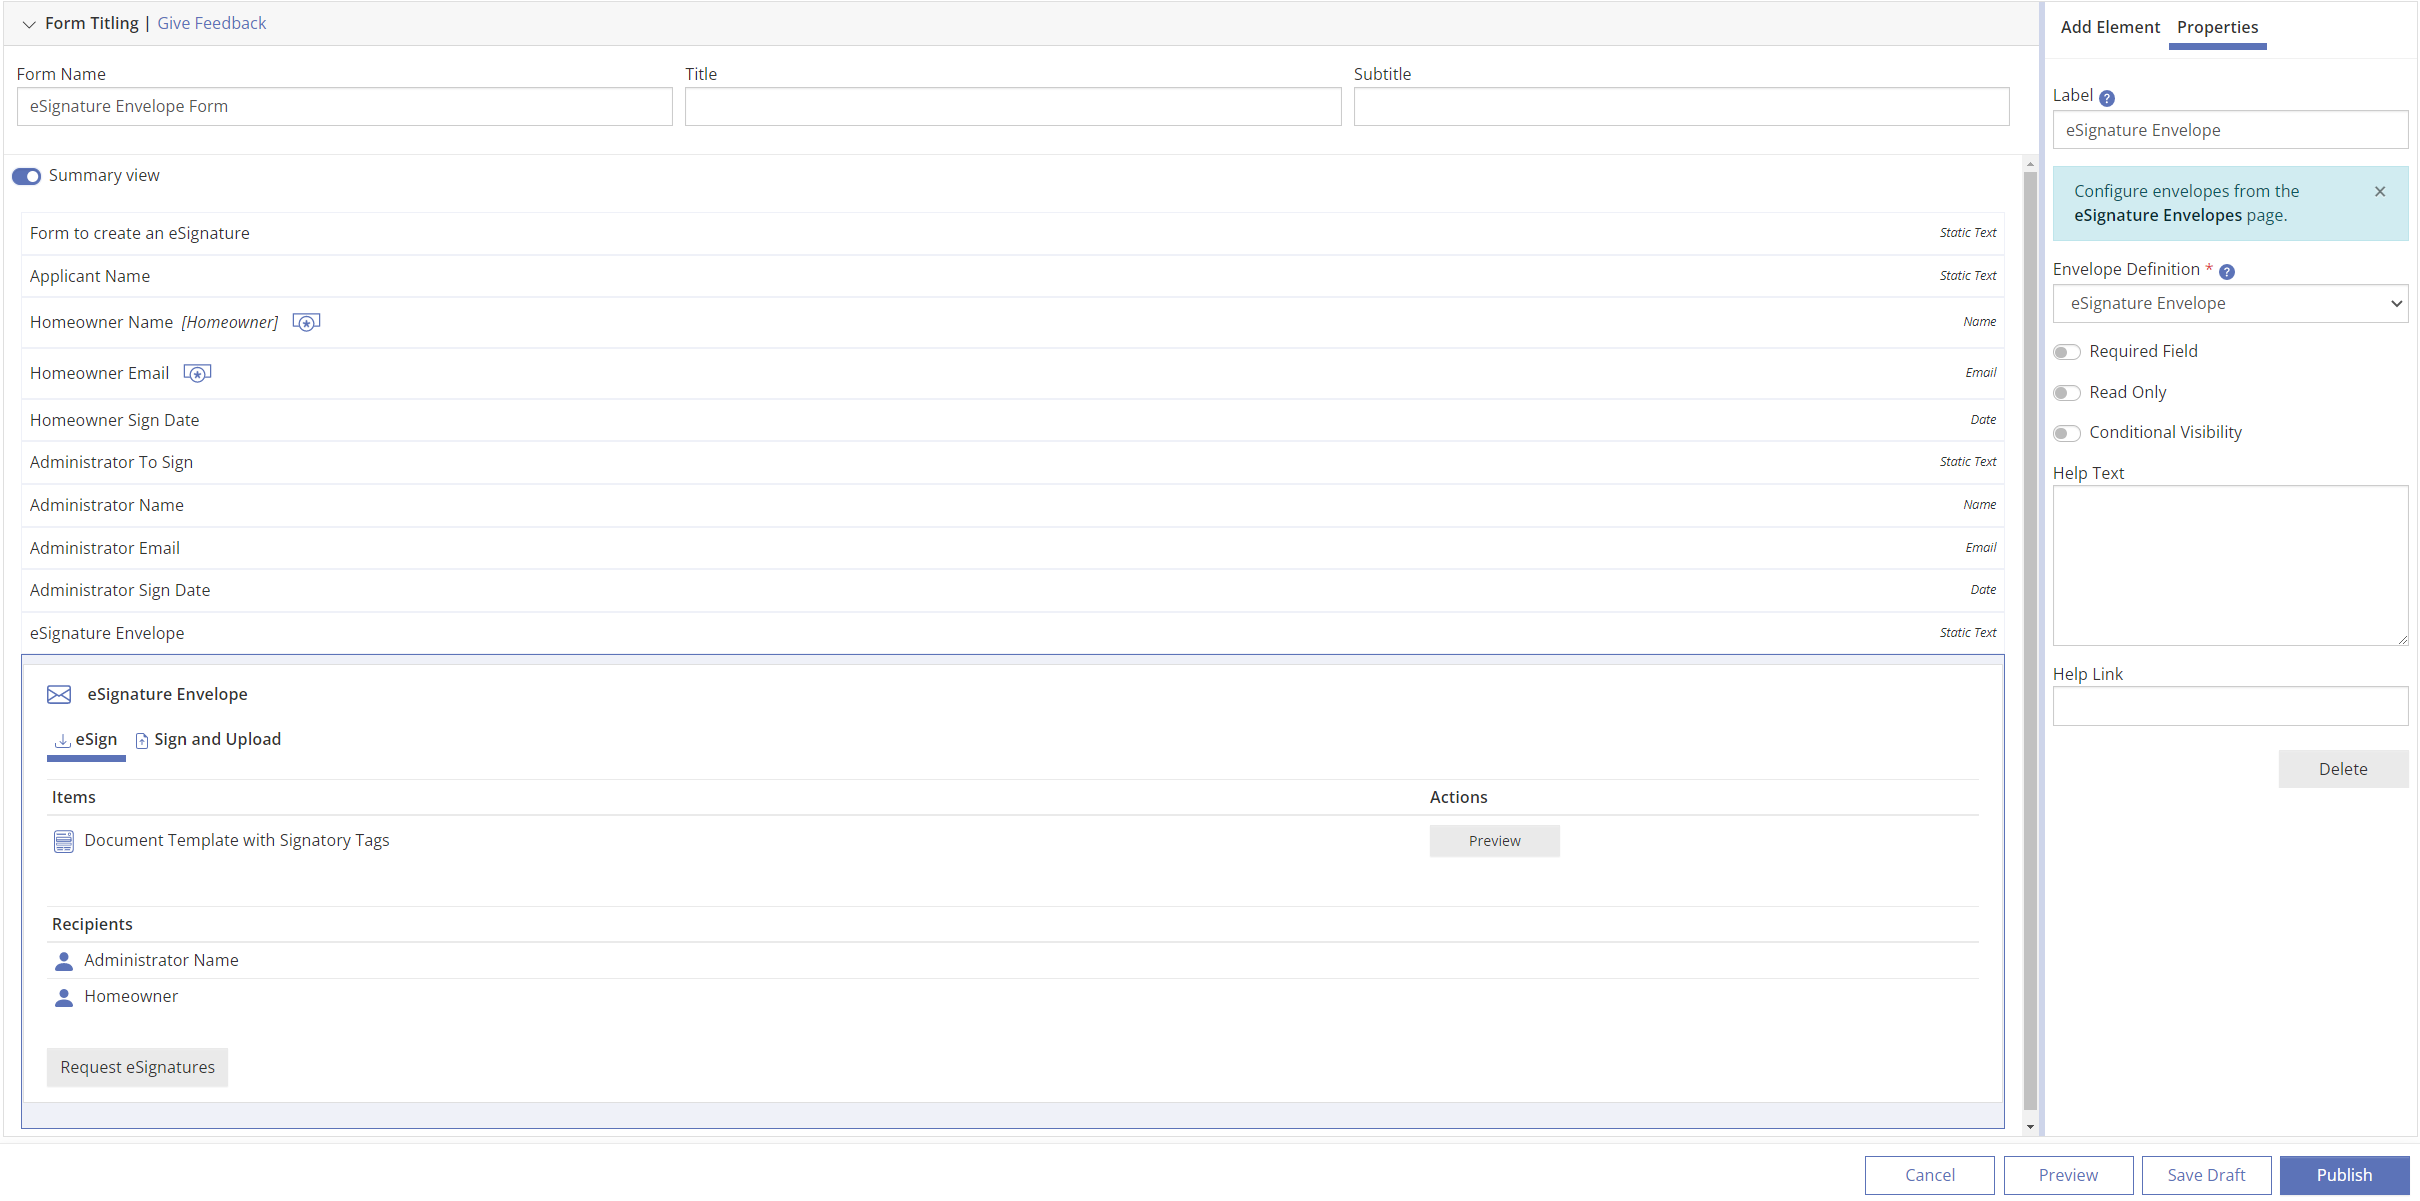
After an eSignature Envelope has been created, on the Forms page the eSignature envelope will now appear as an element. Drag and drop it into the form and select the Envelope Definition you wish to include. eSignatures are usually requested on an internal-facing form after an application has been reviewed and approved.
eSignature Automation Envelopes and Automations
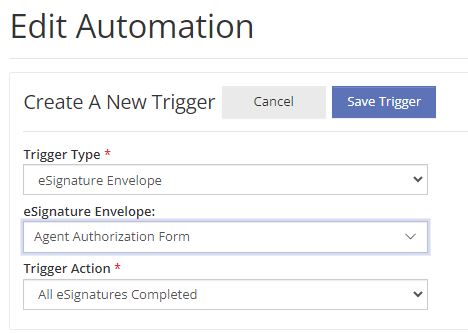
Automations allow you to automatically trigger PowerClerk to perform different actions. One trigger type is eSignature Envelope. Configure this trigger type to a specific eSignature Envelope definition and select the action. Then add the desired Action Rules. For example, you can configure an Automation Trigger to perform various actions the moment a specified envelope has all signatures complete. For more information on different Automation Triggers visit the Automations Support Center article.
eSignature Envelopes include an Automation Action Rule that when triggered, will automatically send the eSignature Request. Please Note: if the project contains an active eSignature and the action rule is retriggered, it will not create an additional envelope. For more information on different Automation Action Rules visit the Automations Support Center article.
eSignature Formula Expression
Formulas allow users to create logical conditions such as to selectively run Automation action rules, create Validation rules for Automations, create conditional visibility rules, and much more. A Formula Expression that can be utilized for eSignature Envelopes is the Logical Expression (Is Envelope Completed Reference).
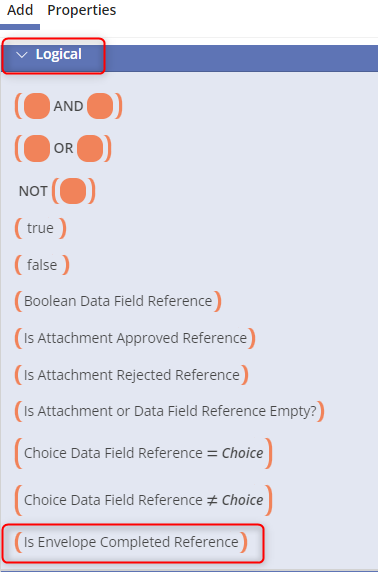
This formula expression can be configured by selecting an eSignature Envelope configuration to assess completeness. The formula expression is a logical formula expression that returns a Boolean value: ‘true’ indicates that the eSignature process is complete, while ‘false’ signifies that it is incomplete (i.e., there are missing eSignatures). To learn more about creating and utilizing Formulas and Formula expressions, visit the Formulas Support Center article.
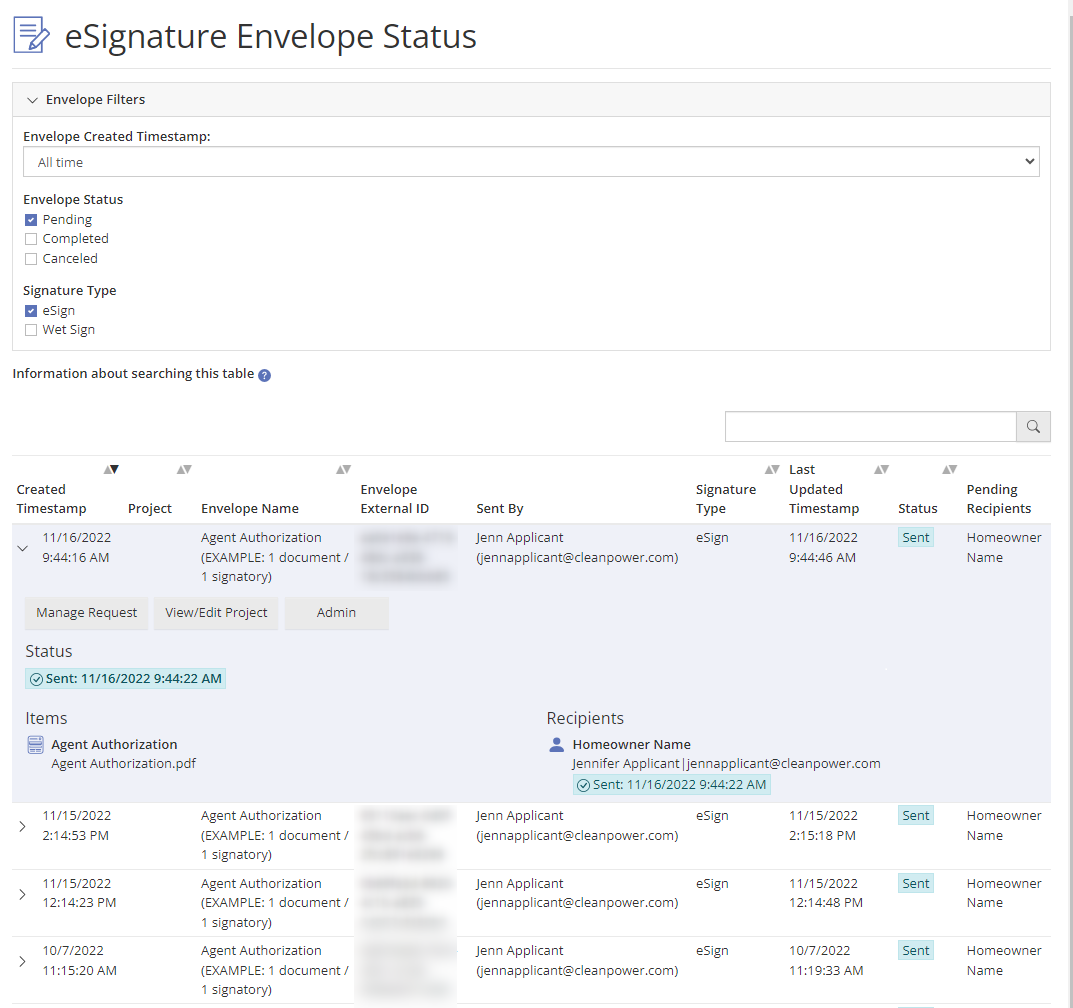
eSignature Envelope Status Page
The eSignature Envelopes Status Page can be located by going to Admin >> eSignature Envelope Status . This page allows admin users to view and manage all eSignature Envelopes that have been initialized on PowerClerk. This page can be filtered by the Envelope Status or the Signature Type.
Administrators can manage eSignatures from this status page or from a few other locations. Visit the section below on “Managing eSignature Requests” to learn more about resending notifications, updating the eSignature signatory information or cancelling an envelope.
Viewing Completed eSignature Envelopes on Project Landing Pages
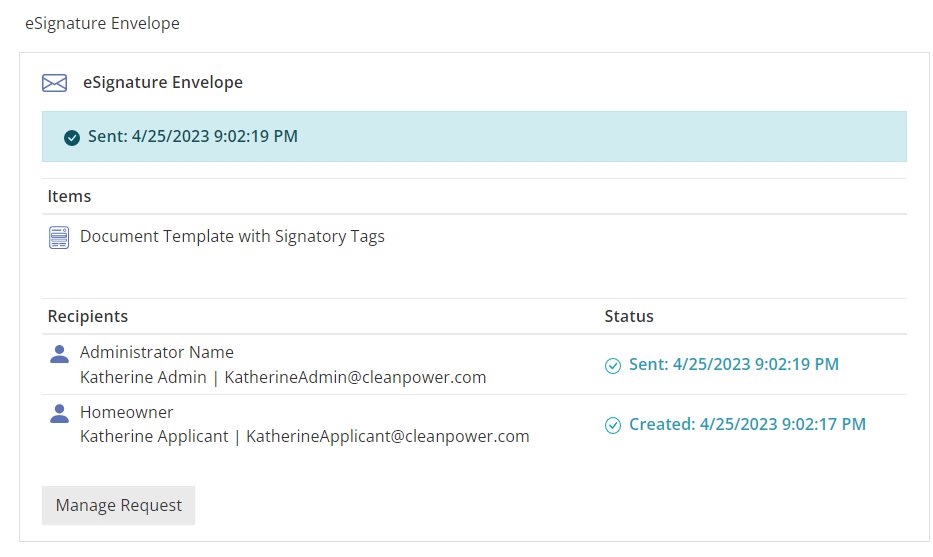
Once a project has been submitted, users with Admin access to the Admin View page may go to admin view by clicking a project >> Admin. If their Role has the “Show eSignature Panel” option enabled, the eSignature Statuses panel will display the status of all eSignature envelopes generated for the given project. This is also available in the view/edit View page.

On the admin page you will also be able to view and download the attachments that were set up in the envelope as shown in the figure below.

Manage eSignature Requests
Users in a Role that has the “Manage eSignature Request” permission enabled will find the Manage eSignature Request button in the Admin Project View page or the eSignature Envelope Status page under the Admin menu. This page will be useful if you need to resend eSignature notifications or if you would like to cancel eSignature requests.
The Manage eSignature request button can also be found in the Form that contains the eSignature Envelope request. To allow Applicants to Resend or Cancel eSignature requests, include the eSignature Form Element on a Form that users with an Applicant role can access. To show the eSignature element without showing the Manage Request button, set the element to “read-only.”
In other words, when an eSignature element is on a form and not set to read-only, any role with access to the form, based on its configured status, will have the ability to manage the eSignature request.
Please Note: The Manage Request button always includes both Resend and Cancel eSignature options. It is not possible to enable only one.
Resending eSignature Notifications
Resending eSignature notifications will retrigger the notification email currently triggered through DocuSign to address issues with recipients not receiving the initial eSignature request. We recommend resending eSignature notifications as the first measure in addressing missing or delayed eSignatures. The Resend Notifications button is available when clicking the Manage Request button and becomes available once immediately after requesting signatures, and then once every 15 minutes after the initial request has been sent.
You can correct contact info for recipients who have not yet signed by updating the relevant contact info fields on the form, then returning to the “Manage Request” dialog and using the Resend Notifications button. When notifications are resent, any updated contact info for pending recipients will be applied to the in-flight eSignature request. However, note that updated contact information will not be reflected in the eSignature documents. If you need the changes to be reflected in the eSignature documents, you will need to cancel the eSignature request and create a new one.
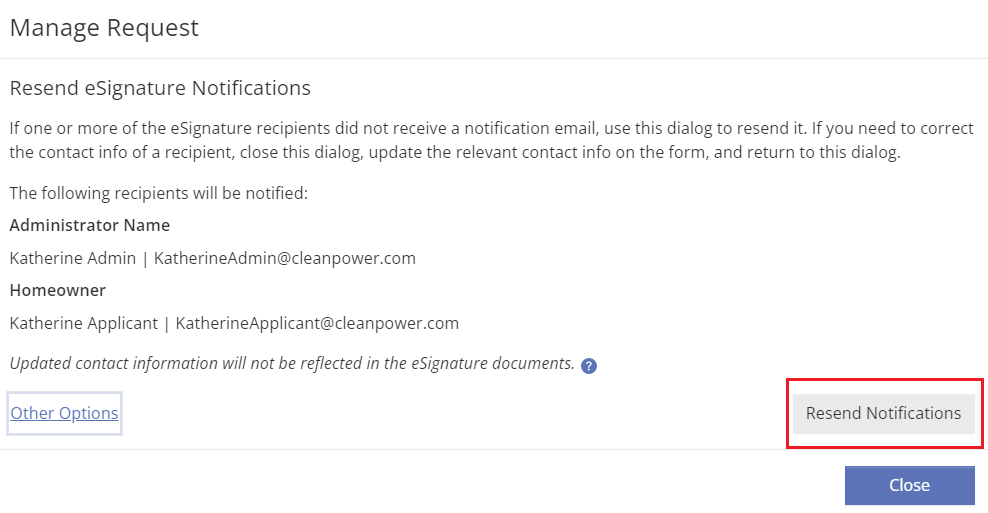
The Resend Notifications button is also available to non-admin roles (e.g. Applicants), easing the burden on utility staff handling customer inquiries as to why their eSignature process has not yet been completed (e.g. because one party may not yet have signed due to a variety of reasons). Please note: If a eSignature process is based upon an applicant’s entry of an Email Address or Contact form element, then the applicant can seamlessly correct contact information on the form and update the in-flight eSignature request using the Resend Notifications button, all without utility staff involvement.
Canceling eSignatures
The option to cancel an eSignature envelope (and hence incur an additional eSignature Request upon re-creating the respective eSignature request) requires the sender to choose one of several failure reasons and provides guidance about alternatives to cancelling the eSignature request depending on the cancellation reason. To cancel an eSignature that has already been sent go to that project’s admin page, please click on the Manage Request button for the respective eSignature on the form. Then click the dialog option Other Options Shown below:
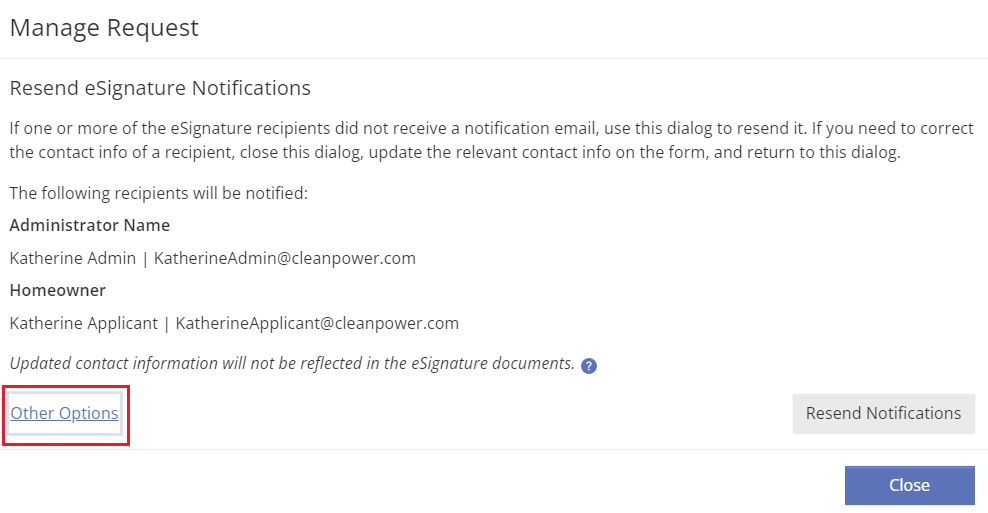
This will reveal the Cancel eSignature Request dialog requiring the user to choose one of several pre-formatted options which will provide further guidance on how to address common scenarios when considering the cancellation of an eSignature request:
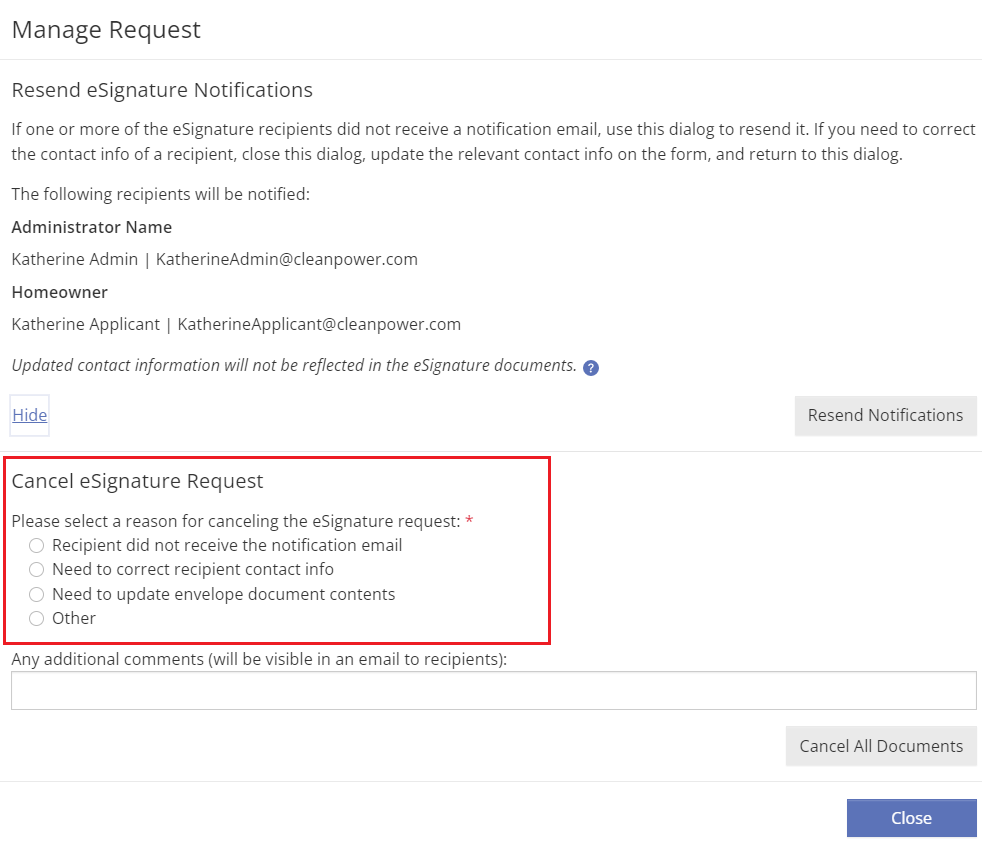
Once you are confident all other options have been exhausted, please use the Cancel All Documents (or Cancel Incomplete Documents on Merged Documents) button to proceed with the cancellation. Each email associated with the eSignatures will receive an email informing them the eSignature request was voided. Additionally, you can re-request eSignatures from this same spot again by requesting a new eSignature envelope via “Preview Document” >> “Request Signatures” as outlined above.
Start Over Button
In some circumstances, an eSignature envelope that was already signed by all signatories may need to be re-signed. This is most likely due to revision of some project details that are pulled into a document contained by the envelope. Once all signatories have signed, a Start Over button will appear to administrators both in the eSignatures section of the Admin page for the project and in the Form, as shown in the figures below. Clicking this button hides the completed attachments and brings back the “Request eSignatures” button.


Please note: PowerClerk charges for eSignatures based on the number of envelopes sent. Each unique set of recipients translates to one envelope. If all documents being signed have the same recipient (or group of recipients), they can be combined into a single envelope.
If changes or corrections are made to a document before any signatory has signed (e.g., correction to email address), the envelope is still valid; however, envelopes that are canceled and then re-sent will incur an additional envelope charge against your program’s eSignature envelope allotment.
Video Guides
Would a video guide help to better explain Document Templates? Contact us and let us know.
A full list of all Video Guides can also be found here.
FAQs
Have additional questions? Contact us to nominate your FAQ and help others find answers to your own questions concerning this feature.
Create A Support Ticket
Not finding your answer here? Submit a question to our support team at the PowerClerk Ticket System and leverage the PowerClerk team’s expertise.