PowerClerk Support Center
- Project Pages
- Program Design Menu
-
- Automations
- Channels
- Communications
- Connections
- Content Library
- Custom API IDs
- Data Fields
- Deadlines
-
- Questions to ask yourself
- Locating the Deadlines feature
- What are Deadlines
- How to Create a Deadline
- Deadline Automation Action Rules
- Utilizing Project Admin Page for Deadlines
- Communication Templates for Deadlines
- Deadline Set/Satisfy Options
- Program-Wide Deadline Actions
- Reporting on Deadlines
- Deadlines in Project List Columns
- FAQs
- Document Templates
- eSignature Envelopes
-
- Questions to Ask
- Locating the eSignature Feature
- What are eSignature Envelopes?
- eSignature Checklist: The Prerequisites to create a new Envelope
- How to set up Advanced eSignature Envelopes Step-by-Step
- How to add an eSignature Envelope to a form
- eSignature Automation Trigger
- Viewing Completed eSignature Envelopes
- Resending eSignature Notifications
- Canceling eSignatures
- FAQs
- Forms
-
- Questions to ask yourself
- Locating the Forms feature
- How to create and edit Forms
- Adding data fields
- Form Versions and Draft Forms
- Configuring Forms
- Form Field Elements
- Field Properties
- Conditional Visibility
- Sensitive Data Fields
- Location Form Element
- Address Autocomplete
- Exporting a Form to Excel
- VersaForms
- FAQs
- Formulas and Calculated Fields
- Front Page
- Incentive Design
- Milestones
- Project List Columns
- Project Summary
- Project Views
- Roles
- Themes
- Workflow
- Admin Menu
- Tools Menu
-
- My Account
-
- Questions to Ask
- Locating the My Account feature
- How to use the My Account feature
- Lockouts and Password Resets
- Setting up Multi-Factor Authentication
- Missing, lost, or stolen mobile devices: resetting Multi-Factor Authentication
- Disabling Multi-Factor Authentication
- Recovery Guidelines for MFA Administrators
- FAQs
- FormSense
- Grant Access
- Integration Guides & API
- PowerClerk Video Guides
-
- Setting up Roll-up Reports
- New User Video Guide
- Configuring Forms
- Roles and User Administration
- Setting up Business Days
- Formulas and Advanced Visibility Rules
- Visualize Workflows
- Dashboards
- FormSense
- Milestones
- ArcGIS
- Project Summary
- Automation with Formulas in Action Rules
- API
- Edit Forms - Tutorial #1
- SFTP Automatic Data Import
- Calculated Fields
- Web Connector Setup
- Edit Forms - Tutorial #2
- Build A Formula
- Help Articles
- PowerClerk Program Launch
- PowerClerk User Group Sessions (UGS)
- Learning Management System (LMS)
- Join us for Reflow!
- NEW: PowerClerk Certifications
Connections
Integrate access to custom web services with PowerClerk’s Connections functionality.
Questions to ask yourself about Connections:
What is a Connection/Web Connector (formerly called Standard Web Adapters)?
What kind of Web Connectors can be setup?
What external web service do I want to connect to through Connections?
What Message Formats can be sent with a Web Connector?
What is a Custom List Lookup?
Locating the Connections feature
Anyone in a Role with the Define Web Connectors privilege can create a Web Connector by opening the PROGRAM DESIGN menu and clicking on Connections. Please note: The Define Web Connectors privilege needs to be set by a CPR Admin, and you can request this privilege by contacting PowerClerk’s Support Team through the Ticket System.
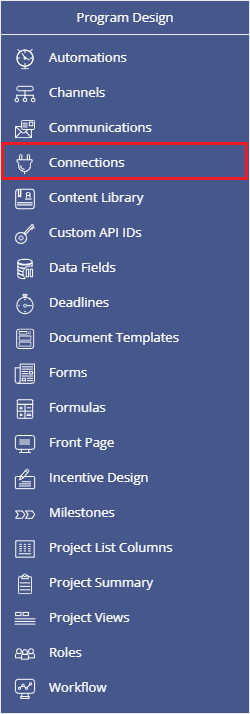
What are Connections?
Connections, also known as Web Connectors, allow PowerClerk to call utility-specific web services. A Web Connector will work similar to an API call to a utility’s API service that occurs within PowerClerk and can be configured to be an automated process that can either fill in pieces of data (e.g., to lookup the customer’s address in a CIS system) or kick off processes in other systems (e.g. a “set meter request”).
Connections include Web Connectors, Custom Connectors, and Custom List Lookups. A Web Connector is a “self-service” web connector builder for program designers. They are limited in message formats supported but can be adapted to any service endpoint changes. Web Connectors do not support SOAP message formats. For more information on the message formats supported, please look below at Web Connector Message Type Formats. A Custom Connector will require the PowerClerk team to work in close conjunction with the utility and will support SOAP message types. For more information regarding Custom Connectors please create a ticket in the PowerClerk Ticket System. A Custom List Lookup Connection allows a user to validate or retrieve data from an existing Custom List within PowerClerk. For more information on how to set up and configure a Custom List Lookup, please see below under Create a Custom List Lookup.
PowerClerk’s Connections functionality enables you to define a set of parameters to integrate utility-specific web services. The process of creating a Connection consists of:
- Utility admins will define the request/response data fields to use. The request fields will be the fields that PowerClerk sends to the web service and the response will be the fields that PowerClerk receives from the web service.
- A Test UI that allows utility admins to configure the connector based on what properties the connector exposes (e.g., endpoint/URL pointing to the utility-specific web service). Please note: You can define separate URLs to switch between Production and Test Environments, and store authentication information, as well as which messaging format to use (XML or JSON).
- Creating a Configuration, where you will be able to map the request/response variables to PowerClerk data fields.
Once you have configured, tested, and enabled your web connector there are two ways to use your new Web Connector in your program:
- On a Form with the Call Connection form element to create a button on a Form (to call the Web Connector when a user clicks the button).
- Via Automation to call the Web Connector on status transitions or other Automation triggers, including automated retries if the targeted utility-specific web service is unreachable.
How to Create a Web Connector
Define the Web Connector
When creating a Web Connector, you will need to:
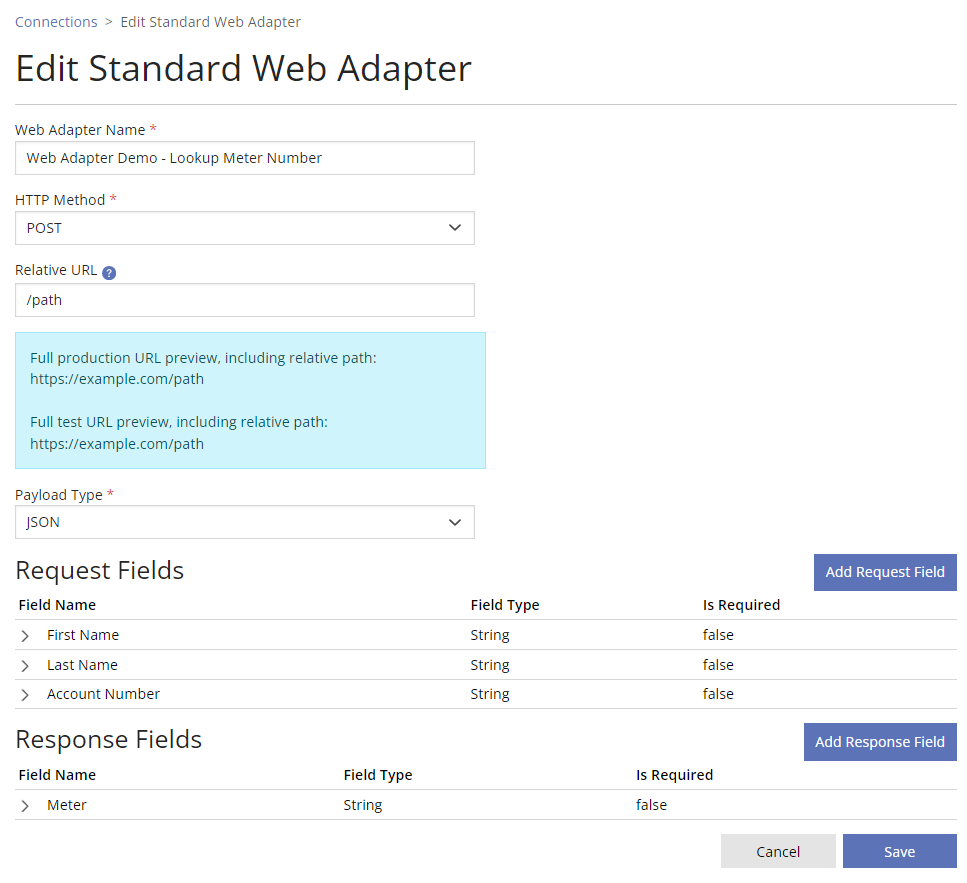
- Define the Web Connector name, HTTP method, Relative URL (optional), and Payload type.
- Specify the Request Fields (these fields will be sent from PowerClerk to the web service) and Response Fields (these fields will be sent from the web service back to PowerClerk).
The Web Connector requires:
- Web Connector Name – The name of the Web Connector. Please note: Web Connectors can have multiple configurations with a single web connector setup.
- HTTP Method – Web Connectors support GET, POST, PUT, and DELETE HTTP methods.
Note: GET and DELETE methods do not support request bodies and will be included in the Base URL. Additionally, GET and DELETE do not support message versions. If the message payload selected is Fields and Project information, the response will only include the Fields. - Relative URL (Optional) – This optional field will be appended to the Base URL defined on the Test Page. The Base URL and Relative URL are concatenated to form the full URL of the service.
Additionally, Relative URL’s support the usage of Path Variables. Path Variables can be defined in the Relative URL by enclosing the variable in curly braces. An example of the Relative URL with Path Variables is: action/{Path Variable 1}/{Path Variable 2}. - Payload Type – Web Connectors support JSON/XML payload types.
Please note: The Payload Type format (XML or JSON) dictates the format in which to provide the web service’s response and cannot be mixed between both formats. More information regarding Payload Type can be found below under Web Connector Payload Type Formats. More information on the Message Version will be found below under Supported Message Versions.
Define the Request and Response Fields:
- Name – the name of the field, which is used as a label in the UI
- DataType – the type of data that is passed in this Field. The DataType must be one of the following:
- String – used for a Single Line Text field on a Form
- Choice – used for a Drop-down List field or Multiple Choice field on a Form
- Int64 – used for an Integer field on a Form
- Decimal – used for a Decimal field on a Form
- Boolean – used for a Check Box field on a Form
- DateTime – used for a Date field on a Form
- IsRequired – Boolean indicating whether the program designer is required to provide a mapping for this Field when defining a Web Connector Configuration.
Please Note: Defining the Request and Response fields will not create Data Fields on PowerClerk. This will need to be done on a Form before you can configure the Web Connector to PowerClerk data fields.
See below for an example of the Edit Web Connector dialog to define request- and response fields in Connections after pressing the button New Web Connector:
Connecting, Testing, and Enabling the Web Connector
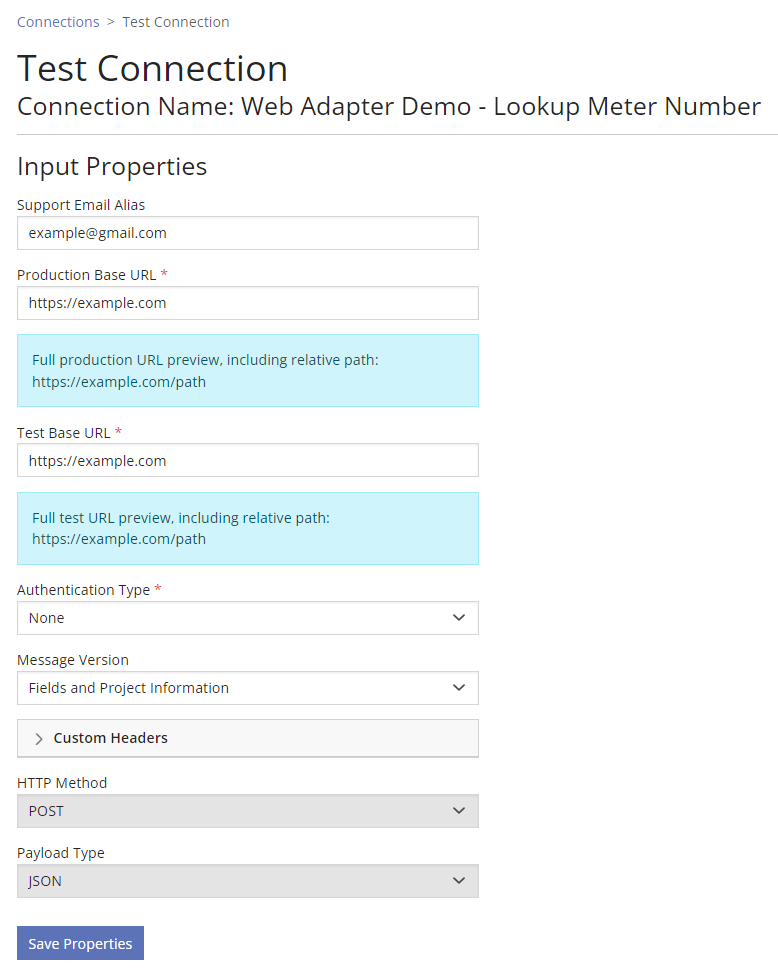
Once the Web Connector has been created, the default status of the web connector will be “Disabled”. After testing and configuring the connection to the utility-specific service’s endpoint URL, you can then select “Enable” for the Web Connector to work within the PowerClerk program.

The sample configuration below demonstrates the settings which need to be defined to successfully connect to the utility-specific web service. Setting Support Email Alias allows users to define an email address to receive notifications and error messages in the context of this new web connector. Connections also allow users to define a dedicated Production URL endpoint and Test Environment URL endpoint with unique authentication credentials for both. This will allow you to utilize your program’s Test Environment to facilitate testing Web Connector changes separately from your ongoing Production Environment. If a Relative URL is provided, it will be concatenated to the Base URL. In the example below, if the Base URL is “/path” and the Base URL is “https://example.com”, the Relative URL will be appended to the Base URL to create “https://example.com/path”:
To test if the above configuration is properly set up to retrieve data from your web service, please go ahead and click on Save Properties and then enter sample data to test out the web service connection:
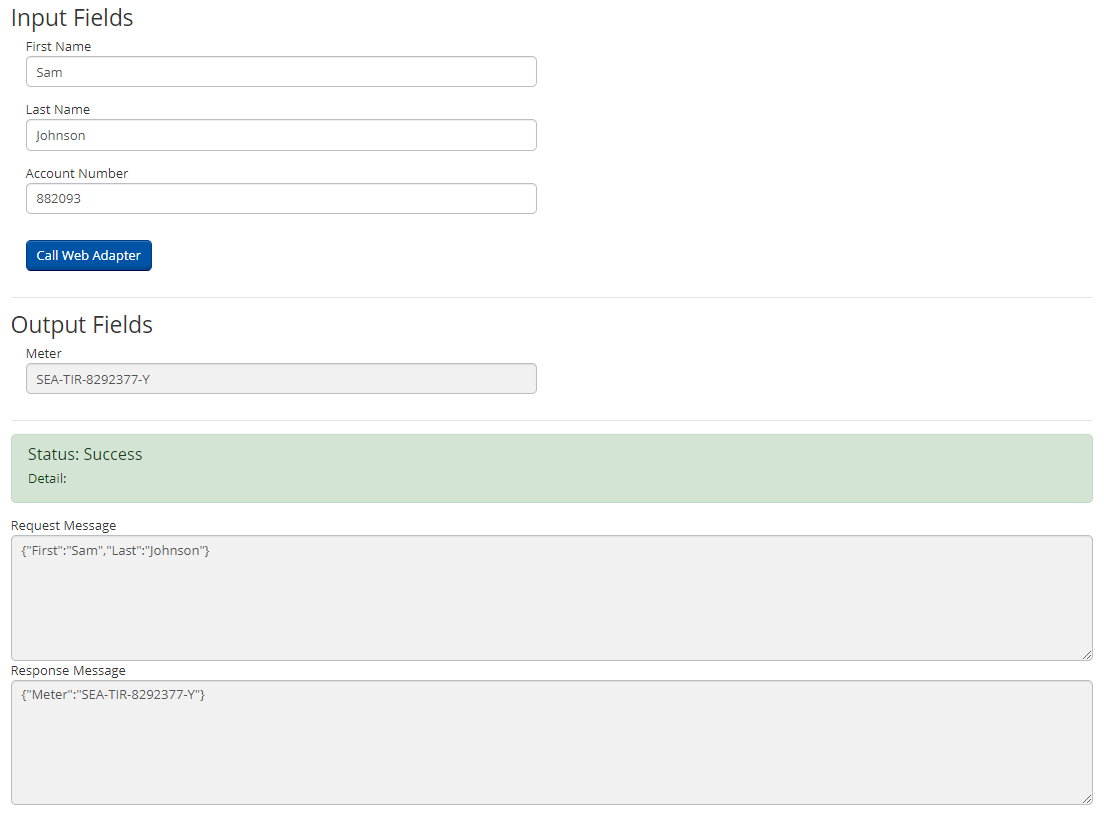
Please Note: If Path Variables were previously defined in the Relative URL when creating the web connector, these will automatically appear in the test section as required fields.
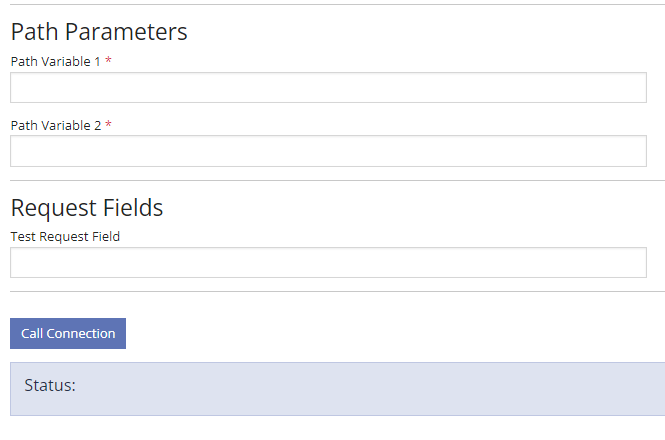
Creating a Web Connector Configuration
Once the Web Connector has been tested and enabled, you will be able to create a Configuration by pressing the Create Configuration button. This configuration will be where you map the Requests and Responses defined to PowerClerk Data Fields.

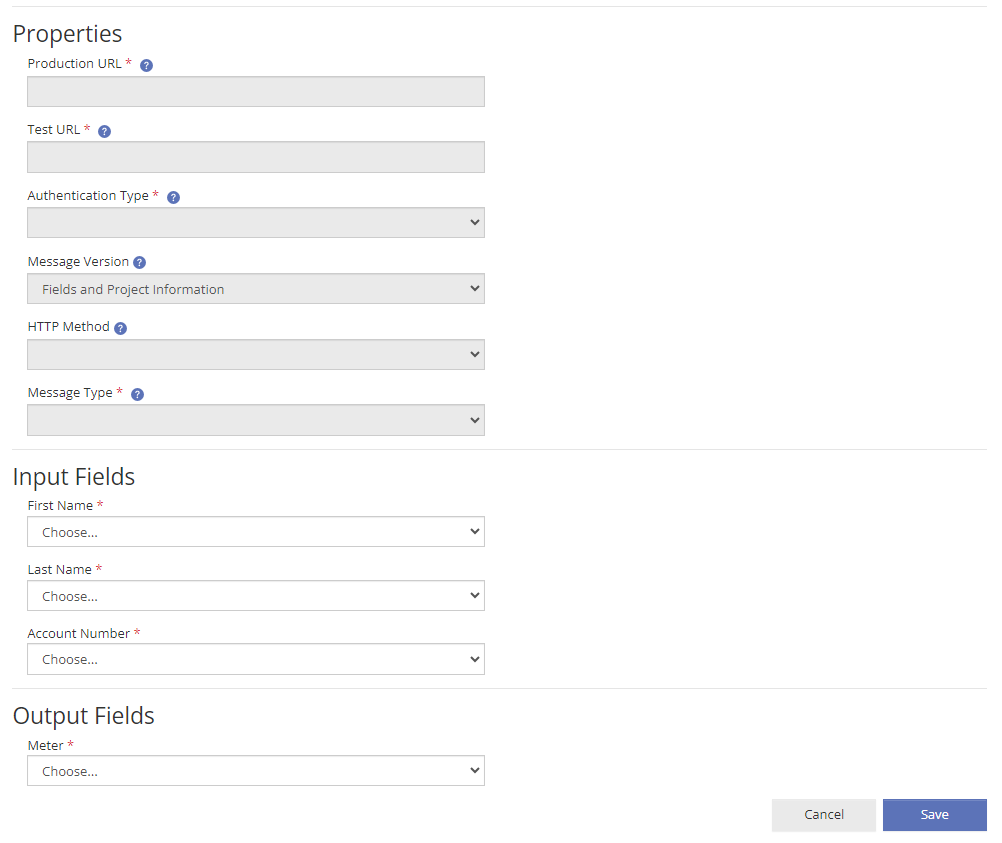
Please Note: The Properties previously defined in the Testing phase will be auto input into the configuration. To edit those, you will need to go to the Web ConnectorsTest page.
Additionally, if Path Variables were previously defined in the web connector set up, you will be able to map these fields back to PowerClerk fields. Path Variables currently only supports the following data types: strings, integers, or choice data fields.
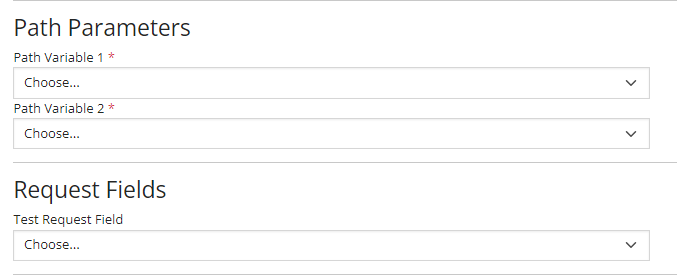
Utilizing Connections on PowerClerk
Once enabled and configured, a Connection/Web Connector will be able to be utilized on a Form or via an Automation.
Utilizing a Connection via Form
In a Form you will utilize the Call Connection Form element to create a button that will call the Web Connector when a user clicks the button.
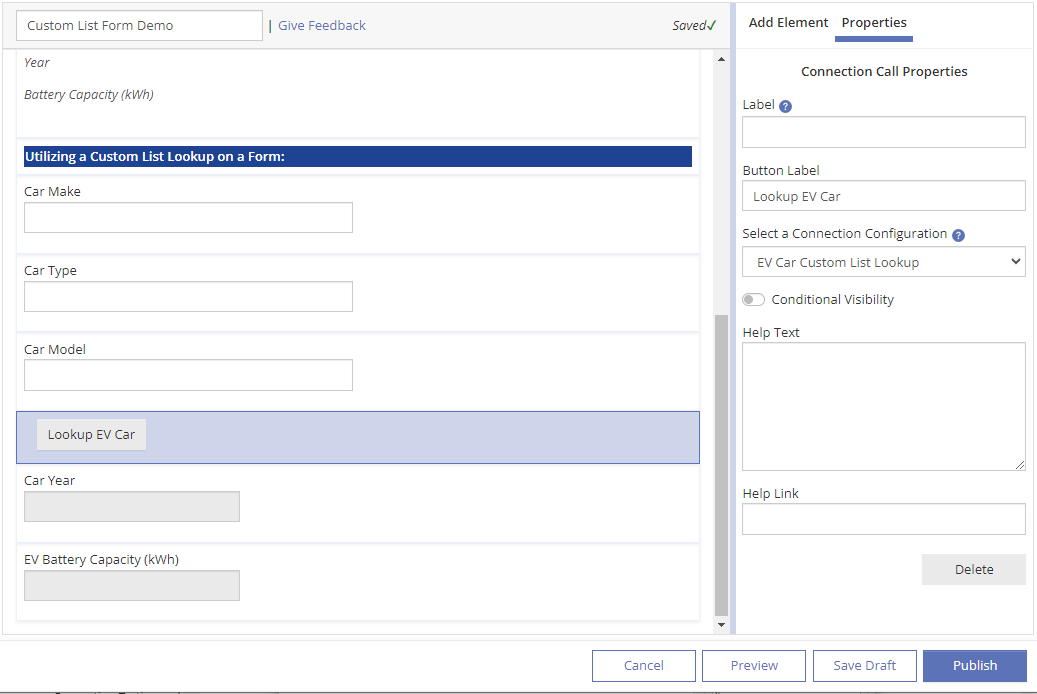
Utilizing a Connection via Automation
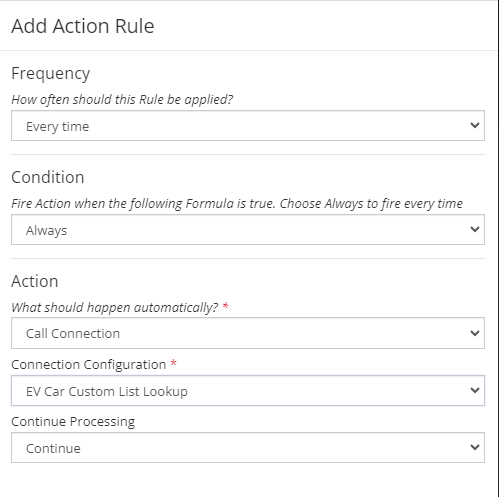
On an Automation, you can create an Action Rule with the action Call Connection and choose the Connection Configuration created to populate the data fields automatically.
Maintaining and Editing the Web Connector
Clean Power Research will maintain input- and output logs for any request issued by a Web Connector created in Connections. Please note that the Web Connector testing dialog and Support Email Alias (with a valid email address) will provide the means to troubleshoot common connectivity issues and exceptions, such as:
The remote server returned an error: (401) Unauthorized.– Root Cause: The credentials in the connectivity configuration dialog are invalid and need to be corrected or the utility-specific web service does not recognize the credentials as valid any longer.The remote server returned an error: (404) Not Found.– Root Cause: The endpoint URL for setting Production URL or Test URL are invalid and in need of a correction or the utility-specific web service is unavailable.The remote server returned an error: (500) Internal Server Error.– Root Cause: The utility-specific web service is not working properly and cannot provide a proper response to the Web Connector request.
Please note: When encountering issues with your Web Connector configuration, you may also find additional error details on the Admin >> Operation Status page under the Failed Background Operations tab.
Once a Web Connector has been used on a Form or in context of an Automation it cannot be altered in terms of input- or output fields and the proper way to re-use a prior Web Connector configuration is to use the Copy functionality on the old Web Connector to create a new version as shown below. This will create a new Web Connector instance and allow you to proceed with necessary changes:

Web Connector Payload Type Formats
Web Connector calls between PowerClerk and a utility-specific web service are made with a HTTP POST request to the endpoint URL that is associated with the web service. A client certificate is provided, and only HTTPS with TLS 1.2+ is supported. For each Web Connector, a serialization format for the message (for request and response) must be chosen as either XML or JSON. If XML is being used, then the message header will have “Content-Type” and “Accept” set to “application/xml”. If JSON is being used, then “application/json” will be used in the header instead.
The message body is a collection of Name / Value pairs, where the Name is the specified as part of the Web Connector Field, and the Value is the data associated with the PowerClerk DataField the Field is mapped to through configuration.
For XML, the message looks like the following.
<Fields>
    <Field Name="Account Number">123</Field>
    ...
</Fields>
For JSON, the message looks like the following. Note that for XML, values are always represented as strings, but for JSON, some values (such as numbers and Booleans) are not.
{
    "Account Number":"123",
    ...
}
The format for the Value depends on the DataType for the Field, as well as the type of serialization used.
- String or Choice DataType: The Value is simply the string data from PowerClerk. The only difference between these 2 DataTypes is that a Choice value must be a member of a pre-defined set of Strings in PowerClerk. Note that certain special characters will need to be escaped, following the requirements of the serialization format chosen. For XML the characters that must be escaped are documented at https://www.w3.org/TR/xml11/#sec-predefined-ent. The characters that must be escaped for JSON are documented at http://www.json.org/. For example, a Field with the Name “Sample String” and Value “`”@#$%^&*()<>\’” would be serialized as follows:
XML
<Field Name="Sample String">`"@#$%^&*()<>\'"</Field>
JSON
{"Sample String":"`\"@#$%^&*()<>\\'"}
- Int64 or Decimal DataType: The number numeric value is represented directly as a number in JSON, and as a String in XML. For example, the value 123 would be serialized as follows:
XML
    <Field Name="Sample Integer">123</Field>

    <Field Name="Sample Decimal">123.0</Field>
JSON
    {

        "Sample Integer":123

    }

    {

        "Sample Decimal":123.0

} - Boolean DataType: The value is represented directly as a lower-case Boolean value in JSON, and as a capitalized String in XML. For example:
XML
<Field Name="Sample Boolean">True</Field>
JSON
{"Sample Boolean":true}
- DateTime DataType: In both JSON and XML, the value is represented as a String in the ISO 8601 UTC format. For example:
XML
<Field Name="Sample DateTime">2019-10-24T00:00:00Z</Field>
JSON
{"Sample DateTime":"2019-10-24T00:00:00Z"}
A complete sample message with all the above data is shown below:
XML
<Fields>
    <Field Name="Sample String">`"@#$%^&*()<>\'"</Field>
    <Field Name="Sample Integer">123</Field>
    <Field Name="Sample Decimal">123.0</Field>
    <Field Name="Sample Boolean">True</Field>
    <Field Name="Sample DateTime">2019-10-24T00:00:00Z</Field>
</Fields>
JSON
{
    "Sample String":"`\"@#$%^&*()<>\\'",
    "Sample Integer":123,
    "Sample Decimal":123.0,
    "Sample Boolean":true,
    "Sample DateTime":"2019-10-24T00:00:00Z"
}
Web Connectors support nested objects to build complex payloads. When configuring the Web Connector to handle these payloads, include the nested request or response fields in the main payload. To indicate a nested section, use the “/” symbol as a separator.
For example, the following fields can be added in the “Edit Page”:
- Fields:
- Object1/Field1
- Object1/Field2
- Object2/Field3
- Object2/Field4

JSON
{
    "Object1": {
     "Field1":123,
     "Field2":123.0,
     },
    "Object2": {
     "Field3":123,
     "Field4":123.0,
     }
}
XML
<Fields>
    <Object1>
        <Field Name="Field1">123</Field>
                <Field Name="Field2">123.0</Field>
        </Object1>
        <Object2>
                <Field Name="Field3">123</Field>
                <Field Name="Field4">123.0</Field>
        </Object2>
</Fields>
Please Note: To include the symbol ‘/’ in the key name instead of using it for nesting, please use the symbol ‘~’.
To send or access an array element in a payload, use a number in the path. Numbers start at 0 for the first element in the array. Each value that will be mapped to a PowerClerk Data Field should be included as a separate field. Missed numbers will be included in requests as “null” values. The parent / root object in a payload cannot be an array number.
For example:

Example JSON payload (no middle name):
{
    "CustomerName": [
     "Sean",
     "",
     "Austin"
     ],
    "Location": [
     47.62295,
     -122.17969
     ]
}
XML example, where a root element is required, and elements are listed with an Item tag
<Data>
    <CustomerName>
        <Item>Sean</Item>
                <Item></Item>
                <Item>Austin</Item>
        </CustomerName>
        <Location>
                <Item>47.62295</Item>
                <Item>-122.17969</Item>
        </Location>
</Data>
For example:
- Fields
- Object1~/Field1
- Object1~/Field2
- Object2~~/Field3
- Object2~~/Field4
JSON
{
    "Object1/": {
     "Field1":123,
     "Field2":123.0,
     },
    "Object2~": {
     "Field3":123,
     "Field4":123.0,
     }
}
Retrieving Project Information via Built in Fields
When configuring Web Connector properties, there were previously two Message Versions to choose from: Fields only, and Fields and Project Information. With the updated functionality, users can now set built-in fields to any Request parameter.
To include project information to a Web Connector, add the intended built-in fields to the Request Fields when creating the Web Connector.
- Project Information that can be included are:
- Project Number
- Current Status
- Project Public ID
- Current Status Timestamp
- Builtin fields also support a special value
- Unique Request ID – a universally unique identifier. This is generated for each request, including retries, in a Version 4 UUID String format and can be useful for debugging and traceability.
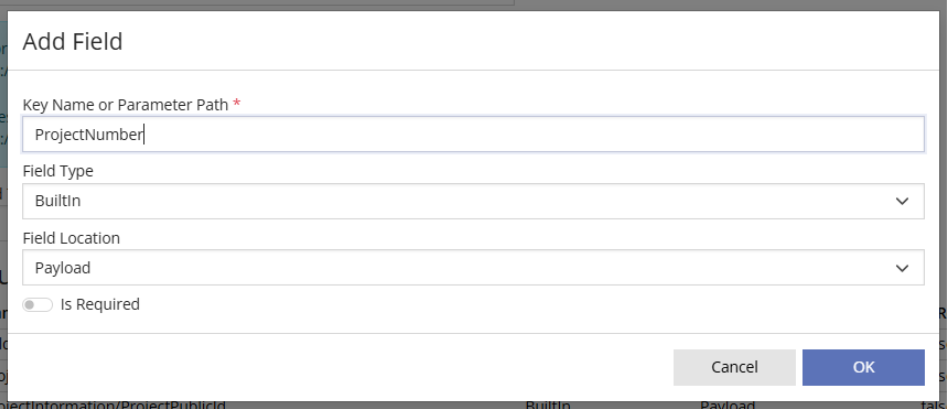
Once the built-in fields are added to the Web Connector and it is enabled, you will be able to create a configuration. During the configuration step, you will be able to map the built-in PowerClerk data fields to the request payload.
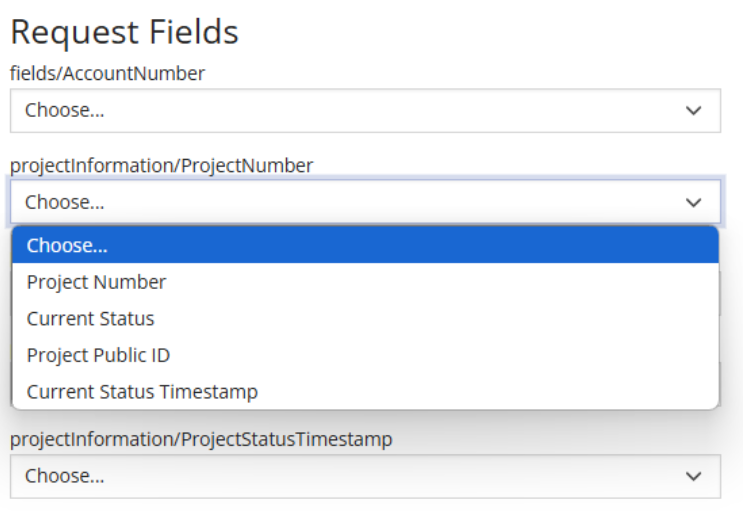
Please Note: Web Connectors created prior to this update have automatically been migrated by PowerClerk to align with the new structure and will not disrupt any current integrations. The figure below is an example of a Web Connector that was migrated to maintain compatibility with an existing integration.

Error Handling
PowerClerk’s Web Connector allows users to define custom error messages when creating a Web Connector.
Currently PowerClerk Supports the customization of the following HTTP Status Codes:
- 200 (Success) – The request was successful, and the server returned the requested data.
- 400 (Bad Request) – The server could not understand the request due to invalid syntax.
- 401 (Unauthorized) – Authentication is required, and the request has not been applied because it lacks valid credentials.
- 404 (Not Found) – The server could not find the requested resource.
- 4xx – Any error code from 400-499.
- 500 (Internal Server Error) – The server encountered an unexpected condition that prevented it from fulfilling the request.
- 5xx – Any error code from 500-599.
- Timeout – The request took too long to complete and did not receive a response from the server before timing out. PowerClerk will timeout locally after just less than a minute.
Error handling can be configured when creating the Web Connector on PowerClerk. To create a custom error message, select the Add Error Message button. From this button, an HTTP Status Code supported by PowerClerk can be selected.
For each status code, there will be a default static error message set when creating a new error message. Additionally, Error messages can be configured to allow only one message per HTTP status code.
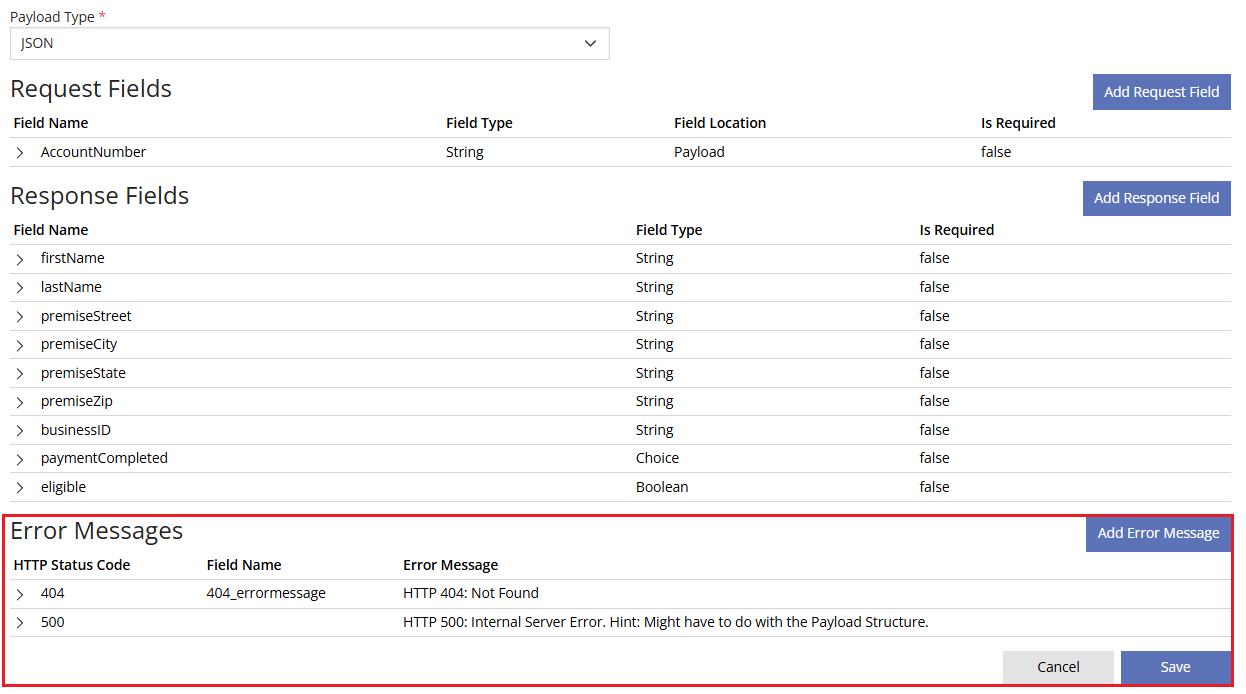
Once the HTTP Status Code is selected for configuration, the Error message source can be chosen from the following two options: Use static message or Extract from response.
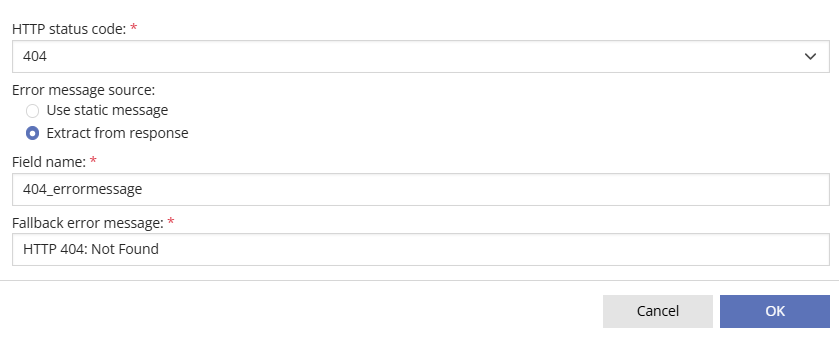
Selecting the option to Extract from response allows for the creation of a field name for the error message. This field name enables programmatic referencing of the error code from the system. Additionally, if the reference code is not configured, it is necessary to configure a Fallback error message that will appear if the Field name is not found.

Selecting Use static message, will allow an automatic static message to be configured.
Please Note: Previously to configure PowerClerk to emit an error code, PowerClerk utilized the following keywords ServiceErrorMessage and ServiceErrorDetails for HTTP 200 status codes. To assist with migration purposes, if these error messages were configured prior to the updated functionality to the error codes, these Web Connectors will automatically have the 200-status code configured with the field name ServiceErrorMessage. ServiceErrorDetails and ServiceErrorMessage will no longer have supported functionality on PowerClerk.
Custom List Lookup
Web Connector versus Custom List Lookup
While a Web Connector can be used to retrieve information from a web service external to PowerClerk, creating a Custom List Lookup Connection allows a user to validate or retrieve data from an existing Custom List within PowerClerk. This kind of lookup can be beneficial if the use case scenario should not offer up the entire data available on the Custom List for selection by the applicant, but to retrieve data matches with the click of a button and then to further process the retrieved data in data fields outside of the originating Custom List:

Create a Custom List Lookup
Prior to creating a Custom List Lookup, a Custom List must be defined in PowerClerk. Setting up a Connection to a Custom List will allow validation and retrieval of output data from the Custom List based on the provided input. This lookup functionality can be helpful if the underlying Custom List has thousands of selections to choose from, which would become difficult to handle via a regular drop-down selection.
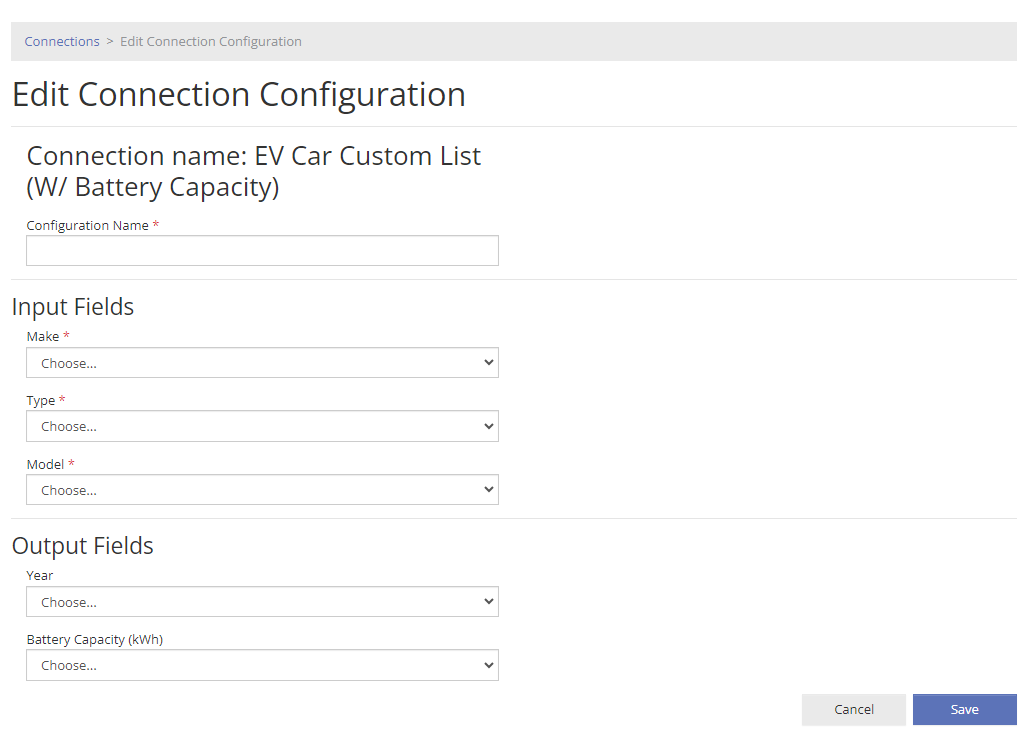
The results of a Connection to a Custom List Lookup can be populated into a variety of data fields present on the Form. These data fields do not need to be in proximity to the lookup button. Please Note: The configuration of the input and output fields for the Custom List is configured in the Connections page, while the configuration selection is done through the Automations page or on the Form Editor.

Once enabled, the Custom List Lookup Connection will become available for configuration. This will be configured in the Connections Page. You will be able to map the fields from the Custom List to PowerClerk Data Fields as shown below.

Utilizing the Custom List Lookup
Once enabled and configured, the Custom List Lookup will be able to be utilized on a Form or via an Automation. To learn more about how to utilize the Custom List Lookup Collection, read above, Utilizing Connections on PowerClerk.
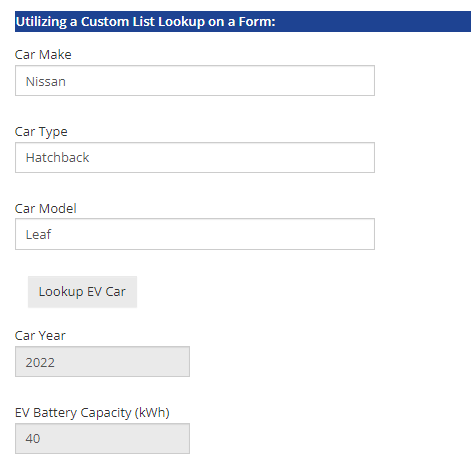
The result in this example is populated with the respective data with the push of the Lookup EV Car button in the output fields as follows:
Video Guides
Web Connector
This video guide will demonstrate how to build a web connector that allows a customer to validate themselves.
A full list of all Video Guides can also be found here.
FAQs
Have additional questions? Contact us to nominate your FAQ and help others find answers to your own questions concerning this feature.
Create A Support Ticket
Not finding your answer here? Submit a question to our support team at the PowerClerk Ticket System and leverage the PowerClerk team’s expertise.