PowerClerk Support Center
- Project Pages
- Program Design Menu
-
- Agent Studio
- Automations
- Channels
- Communications
- Connections
- Content Library
- Custom API IDs
- Data Fields
- Deadlines
-
- Questions to ask yourself
- Locating the Deadlines feature
- What are Deadlines
- How to Create a Deadline
- Deadline Automation Action Rules
- Utilizing Project Admin Page for Deadlines
- Communication Templates for Deadlines
- Deadline Set/Satisfy Options
- Program-Wide Deadline Actions
- Reporting on Deadlines
- Deadlines in Project List Columns
- FAQs
- Document Templates
- eSignature Envelopes
-
- Questions to Ask
- Locating the eSignature Feature
- What are eSignature Envelopes?
- eSignature Checklist: The Prerequisites to create a new Envelope
- How to set up Advanced eSignature Envelopes Step-by-Step
- How to add an eSignature Envelope to a form
- eSignature Automation Trigger
- Viewing Completed eSignature Envelopes
- Resending eSignature Notifications
- Canceling eSignatures
- FAQs
- Forms
-
- Questions to ask yourself
- Locating the Forms feature
- How to create and edit Forms
- Adding data fields
- Form Versions and Draft Forms
- Configuring Forms
- Form Field Elements
- Field Properties
- Conditional Visibility
- Sensitive Data Fields
- Location Form Element
- Address Autocomplete
- Exporting a Form to Excel
- VersaForms
- FAQs
- Formulas and Calculated Fields
- Front Page
- Incentive Design
- Milestones
- Project List Columns
- Project Summary
- Project Views
- Roles
- Themes
- Workflow
- Admin Menu
- Tools Menu
-
- My Account
-
- Questions to Ask
- Locating the My Account feature
- How to use the My Account feature
- Lockouts and Password Resets
- Setting up Multi-Factor Authentication
- Missing, lost, or stolen mobile devices: resetting Multi-Factor Authentication
- Disabling Multi-Factor Authentication
- Recovery Guidelines for MFA Administrators
- FAQs
- FormSense
- Grant Access
- Integration Guides & API
- PowerClerk Video Guides
-
- Setting up Roll-up Reports
- New User Video Guide
- Configuring Forms
- Roles and User Administration
- Setting up Business Days
- Formulas and Advanced Visibility Rules
- Visualize Workflows
- Dashboards
- FormSense
- Edit Forms - Tutorial #1
- Milestones
- ArcGIS
- SFTP Automatic Data Import
- Calculated Fields
- Project Summary
- Automation with Formulas in Action Rules
- Web Connector Setup
- Edit Forms - Tutorial #2
- API
- Build A Formula
- Help Articles
- PowerClerk Program Launch
- PowerClerk User Group Sessions (UGS)
- Learning Management System (LMS)
- Join us for Reflow!
- NEW: PowerClerk Certifications
Channels: Mark as Child and Make Successor
Channel Type: Mark as Child
The Mark as Child Channel Type allows an admin to declare a project to be the child of another project. Relationships can be seen on the Project’s Admin page. No information is shared between the related projects. Multiple projects can become the children of one parent project.
The Mark as Child Channel type assists Admin when a new project was created that is related to a different project, but still needs to undergo the workflow. Therefore, the new project may appear as a ‘duplicate’ and have matching data fields but is a viable project.
- Attributes of the Mark as Child Channel Type:
- Both projects already exist.
- Multiple projects can be marked as a child to the same parent project.
- No data is copied from the parent project to the child project.
- No further Automation or Action needs to occur in the relationship.
- Manually relate the projects together on the Child Project’s Admin Page.
- Use-cases for this Channel Type may include:
- Adding equipment and/or updating an existing system where the original is already a project.
- An applicant submits multiple viable projects under the same account. For example, a program that has many types of applications.
Creating the Mark as Child Channel Configuration
If this is an interprogram set-up, establish which program is the Published Program and which program is the Linked Program. The Published Program is the program that will have the child projects. The Linked Program is the program that will have parent projects.
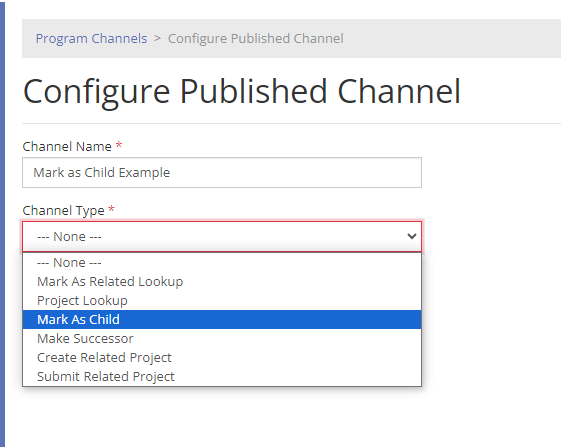
First, navigate to the Publishing Program. Then select “Publish New Channel” and select the Mark as Child Channel Type.
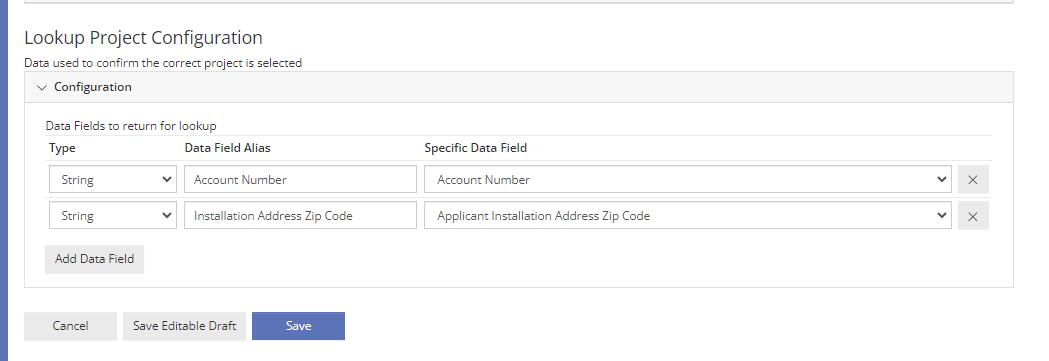
On the configuration page, you will select which data field(s) your Administrators can utilize to ensure the correct project is selected. PowerClerk will lookup the parent project’s data field values and return the result to your Administrators when they are marking the new project as a child to the parent project. It acts as a check for the Administrators. An example may be the Account Number of the Applicant.
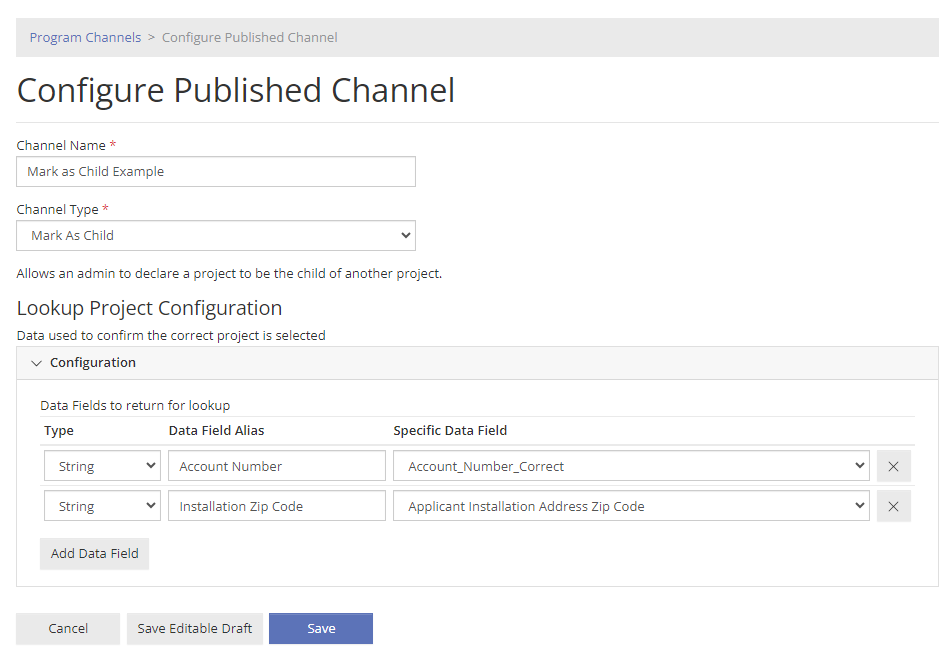
To configure the data field lookups, you will first select the Data Field Type and Data Field Alias. The Alias acts as a label for you to understand what data you are attempting to lookup. You cannot change the Data Field Type and the Alias once the Channel has been published.
You will also select the Specific Data Field that should be mapped to the Data Field Alias. This is the Data Field you wish to pull information from this Program. If you are connecting two programs, you will select the Data Field in the linked program as well when you link this Channel. This can be edited after the Channel is published.
You can add multiple data fields to return for lookup.
Once you are ready, save the Channel Configuration.
Publishing The Channel
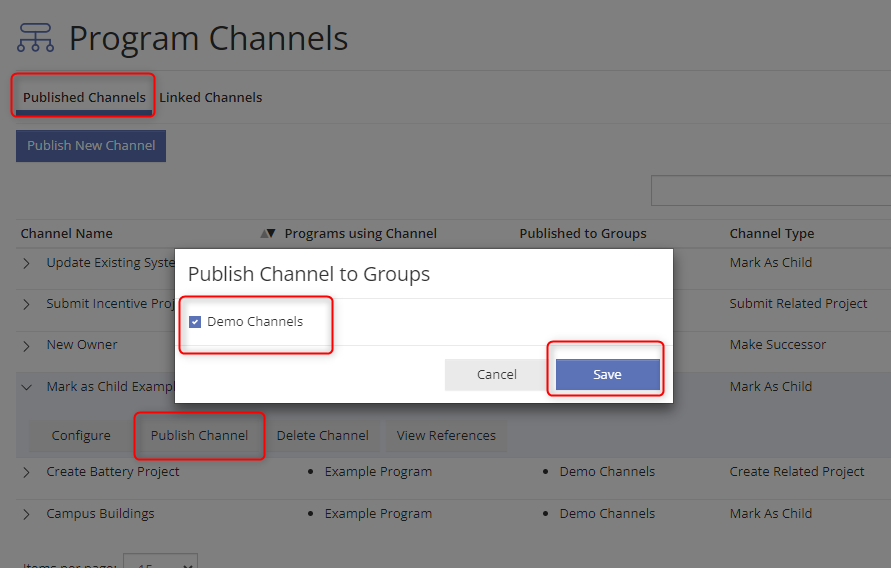
Publish the Channel by clicking on your new Channel. Select the Group and Save.
Link the Channel
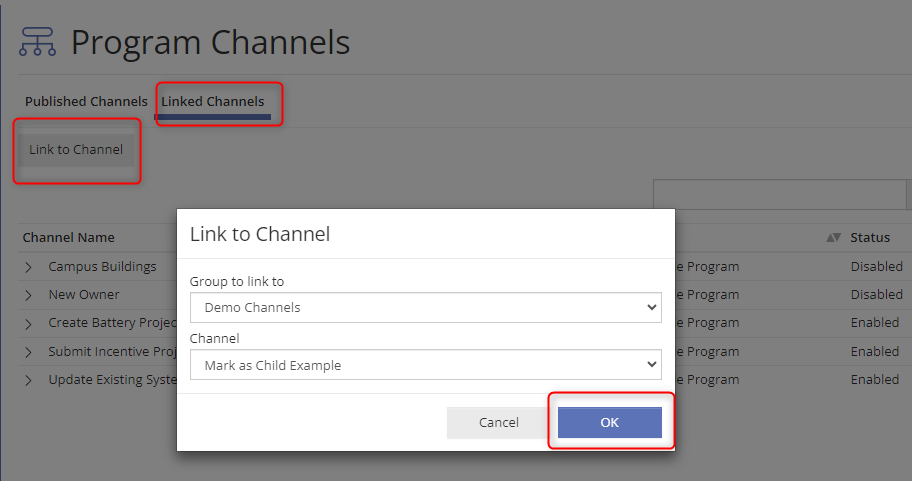
If this Channel is within the same program, tab over to “Linked Channels” and press “Link to Channel”. Select the proper Group and Channel and select “OK”. Then “Enable” the Channel.
If this Channel is between multiple programs, navigate to the other program’s Channel page. Tab over to “Linked Channels” and press “Link to Channel”. Select the proper Group and Channel and select “OK”. Then “Configure” the Channel and select the proper Data Fields to map the Lookups data fields. “Enable” the Channel.
Add Channel to your processes
This Channel only relates projects together and does not share information or take action on related projects.
To use this Channel, an Administrator can mark a project as a child on the Project’s Admin Page. You will select “Mark Project as Related” and enter the Project Number of the targeted project that will become the Parent. Then select “Check” to expose the Lookup Data. Once you have confirmed that these projects should be related, select “OK”.
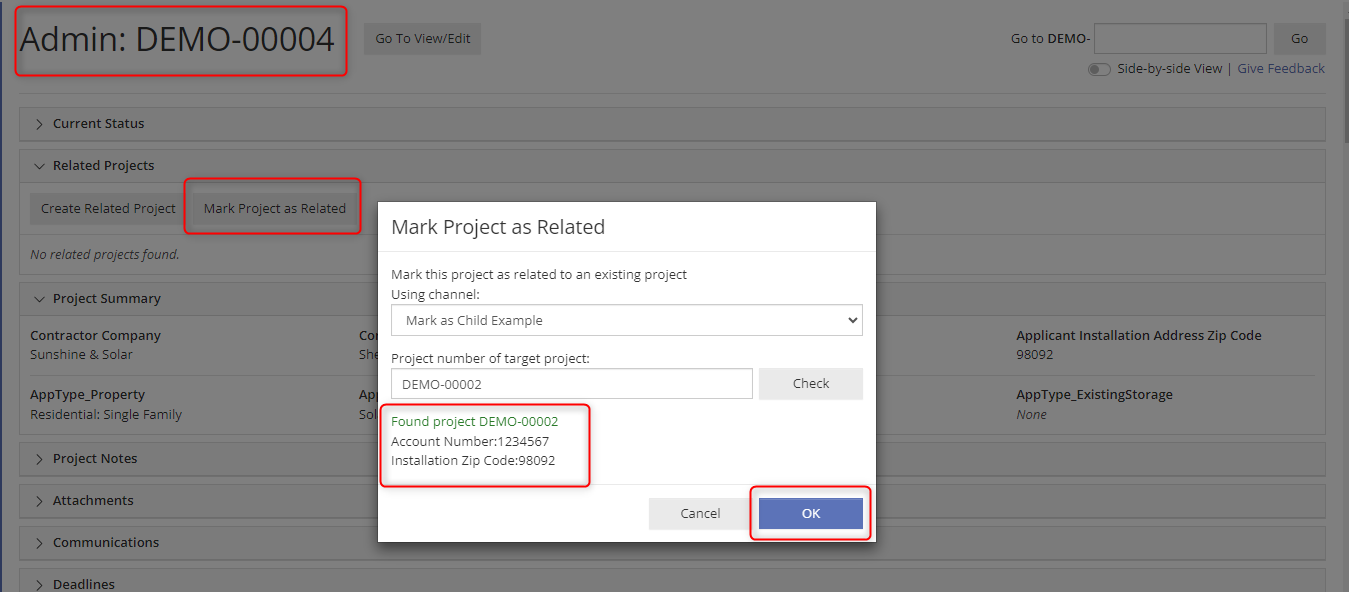
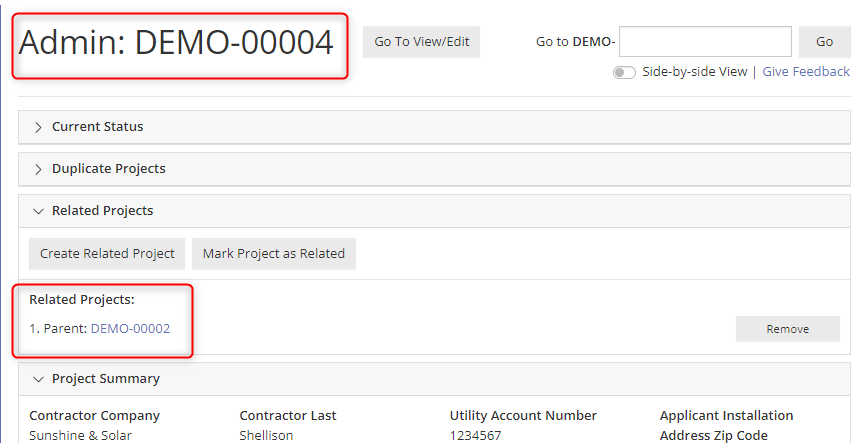
The relationship will appear on the Project’s Admin Page. It will not appear on the Project’s View/Edit Page.
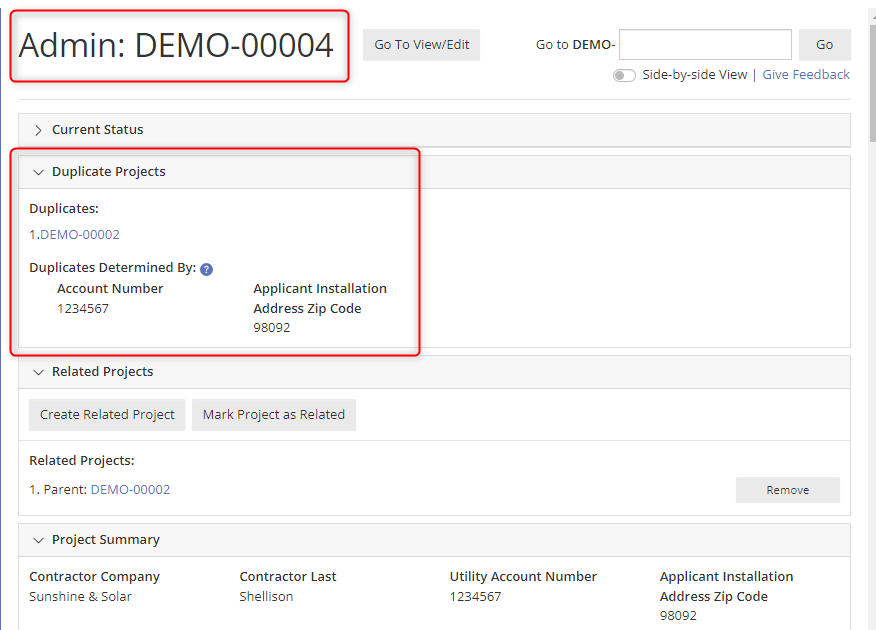
We suggest using this feature in conjunction with the Duplicate Check feature to easily locate projects that share the same Lookup information. We also suggest exposing the Lookup data fields in the Project’s Admin Page Project Summary for ease.
You may consider adding a checkbox or Multiple Choice to your Review Form to help remind your Administrators to check for parent projects.
Channel Type: Make Successor
The Make Successor Channel Type allows an admin to declare a project to be the successor of an existing project. It will copy data from the predecessor project, mark the current project as the successor, and send a Signal back to the predecessor project to take action.
The Make Successor Channel type is similar to the Mark as Child. A new project was created that is related to a different project, but still needs to undergo the workflow. In this use-case, data needs to be copied from the predecessor project to this current project. Action may need to be taken on the predecessor project (for example, moving it to an Archived status).
- Attributes of the Make Successor Channel Type:
- Both projects should already exist.
- Data can be copied from the predecessor project to the successor (as a one-time data copy).
- Further Automation Actions can occur on the predecessor project once it has been related.
- Manually relate the projects together on the Successor Project’s Admin Page.
- Use-cases for this Channel Type may include:
- Move in/move out process where you want to copy information over and/or take action on the original project
- Updates to an existing system where you want to copy information over and/or take action on the original project.
Creating the Make Successor Channel Configuration
If this is an interprogram set-up, establish which program is the Published Program and which program is the Linked Program. The Published Program is the program that will have the successor projects. The Linked Program is the program that will have predecessor projects. If interchangeability is desired, you can create two parallel Channels that are reversed.
First, navigate to the Publishing Program. Ensure that you have a Channel Group set-up by a CPR-Admin. Then select “Publish New Channel” and select the Make Successor Channel Type.
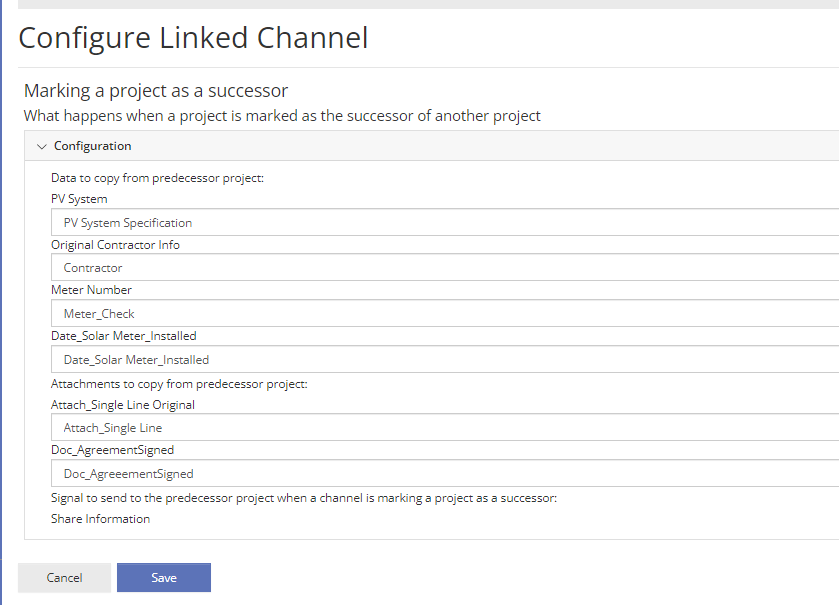
Select Data/Attachments to Copy
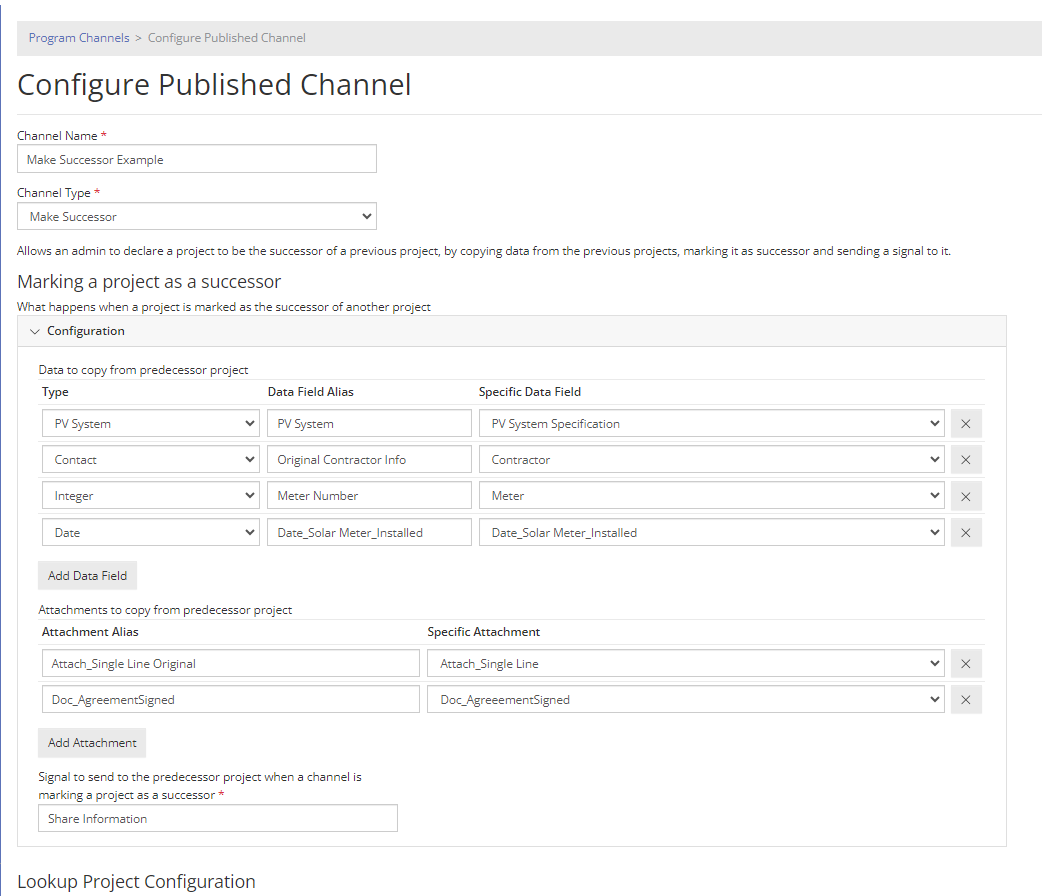
On the configuration page, select any data fields and attachments that you want copied from the predecessor project to the successor project. This will be copied the moment the relationship is created as a one-time copy. For example, in a move in/move out process, you may wish to copy the PV System Specs and One-Line Diagram.
Select the Data Field Type and Data Field Alias. The Alias acts as a label for you to understand what data you are attempting to copy. You cannot change the Data Field Type and the Alias once the Channel has been published.
Select the Specific Data Field that should be mapped to the Data Field Alias. This is the Data Field you wish to store the information in this program. You will select the Data Field in the linked program to pull the information from when you link this Channel. This can be edited after the Channel is published.
Establish a Signal
When you make a project a successor, you can send an Automation Signal back to the Predecessor project and take action. You can change the status of the Project, set data fields, etc. A common example is changing the status of the Predecessor Project to “Archive”.
Create a clear signal name to utilize in your configuration.
Lookup Project Configuration
Just like the Mark as Child Channel Type, you will select at least one data field to return for lookup and confirm the correct project was selected. See the Mark as Child Channel Type above for more information.
Once you are ready, save the Channel Configuration.
Publishing the Channel
Publish the Channel by clicking on your new Channel. Select the Group and Save.
Link the Channel
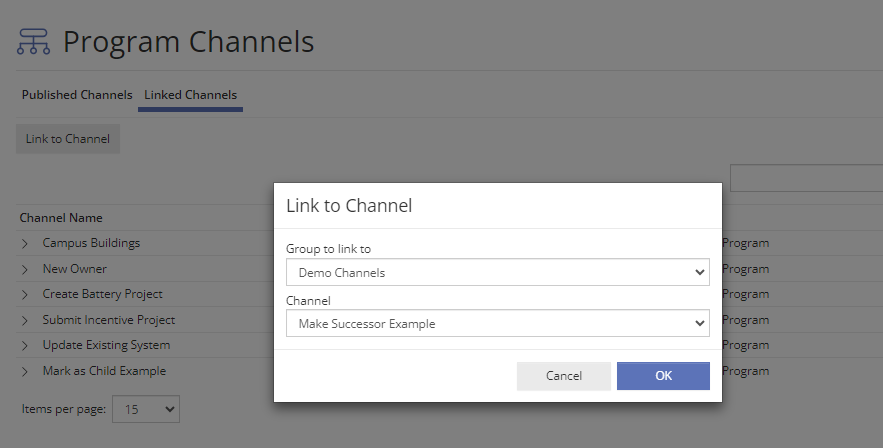
If this Channel will stay within the same program, tab over to “Linked Channels” and press “Link to Channel”. Select the proper Group and Channel and select “OK”. “Configure” the Channel. Map the data field aliases to the proper data fields for the data exchange and project lookup. These can be the same data fields from the Published ones, or unique ones. Then “Enable” the Channel.
If this Channel is between multiple programs, navigate to the other program’s Channel page. Tab over to “Linked Channels” and press “Link to Channel”. Select the proper Group and Channel and select “OK”. “Configure” the Channel. Map the data field aliases to the proper data fields for the data exchange and project lookup. Then “Enable” the Channel.
Add Channel to your processes
This Channel relates projects together, shares information from the Predecessor to the Successor, and can take action on the Predecessor.
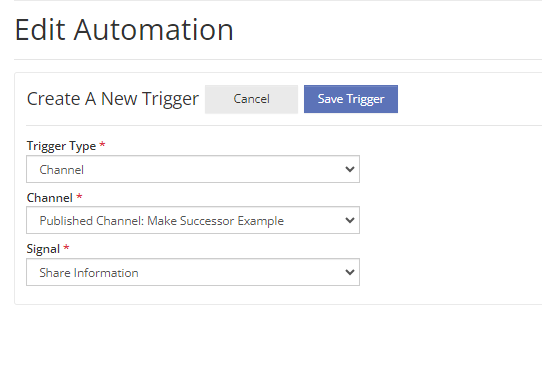
Set Up Signal
See below on how to set up Channel Signals in Automations. A common use-case is moving the predecessor project to an “Archive” status and setting a data field to indicate why. Please note that for this channel, the signal will only be received at the moment the relationship is created.
Mark the Projects as Related
To use this Channel, an Administrator can make a project a successor on the Project’s Admin Page. You will select “Mark Project as Related” and enter the Project Number of the targeted project that will become the Predecessor. Then select “Check” to expose the Lookup Data. Once you have confirmed that these projects should be related, select “OK”. The data will immediately be copied over.
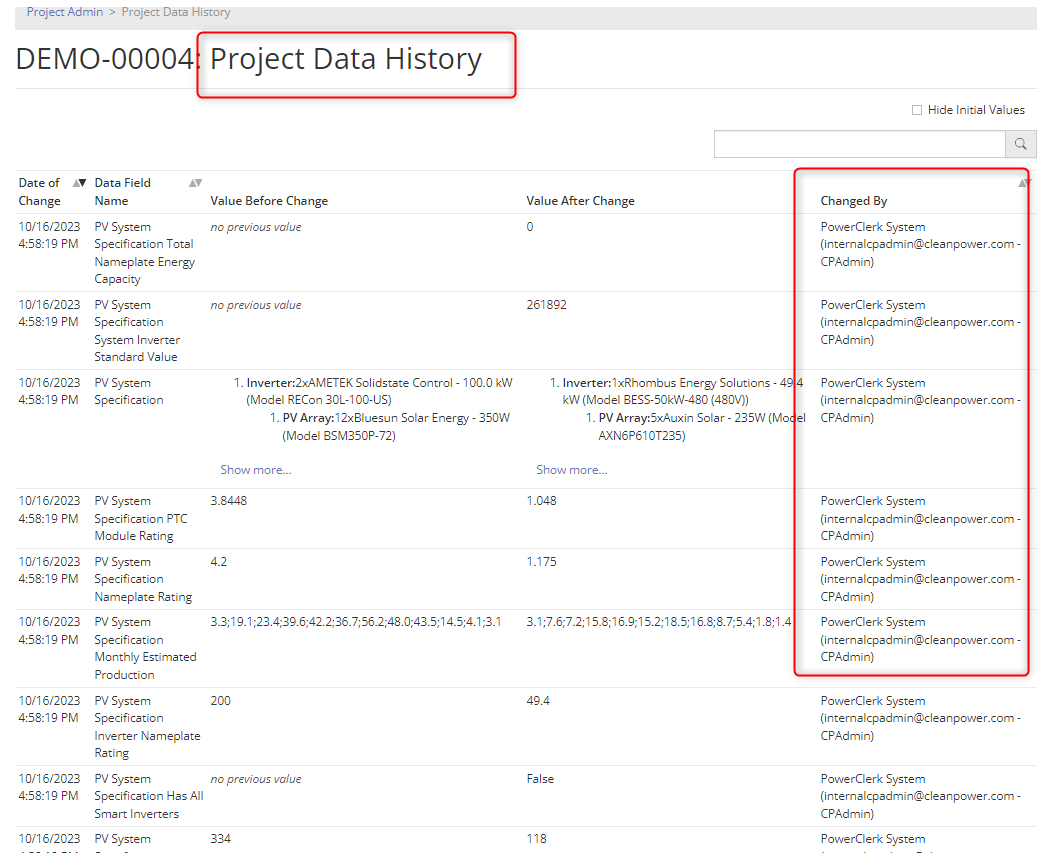
The relationship will appear on the Project’s Admin page. It will not appear on the Project’s View/Edit page for applicants to see.
We suggest using this feature in conjunction with the Duplicate Check feature to easily locate projects that share the same Lookup information. We also suggest exposing the Lookup data fields in the Project’s Admin Page Project Summary for ease.
You may consider adding a checkbox or Multiple Choice to your Review Form to help remind your Administrators to check for predecessor projects.

Video Guides
Would a video guide help to better explain Channels? Contact us and let us know.
A full list of all Video Guides can also be found here.
FAQs
Have additional questions? Contact us to nominate your FAQ and help others find answers to your own questions concerning this feature.
Create A Support Ticket
Not finding your answer here? Submit a question to our support team at the PowerClerk Ticket System and leverage the PowerClerk team’s expertise.